-
×InformationWindows update impacting certain printer icons and names. Microsoft is working on a solution.
Click here to learn moreInformationNeed Windows 11 help?Check documents on compatibility, FAQs, upgrade information and available fixes.
Windows 11 Support Center. -
-
×InformationWindows update impacting certain printer icons and names. Microsoft is working on a solution.
Click here to learn moreInformationNeed Windows 11 help?Check documents on compatibility, FAQs, upgrade information and available fixes.
Windows 11 Support Center. -
- HP Community
- Printers
- Printing Errors or Lights & Stuck Print Jobs
- Re: HP ENVY 5540 printing issues

Create an account on the HP Community to personalize your profile and ask a question
Your account also allows you to connect with HP support faster, access a personal dashboard to manage all of your devices in one place, view warranty information, case status and more.
Check some of the most frequent questions about Instant Ink: HP INSTANT INK, HP+ PLANS: INK AND TONER.
Check out our Black or Color Ink Not Printing, Other Print Quality Issues info about: Print quality and Cartridge Issues.

It has been a while since anyone has replied. Simply ask a new question if you would like to start the discussion again.
03-02-2019 12:58 PM
 HP Recommended
Product: HP ENVY 5540
Here is a pic of what we see when we print out a test pic. Parts of the text disappear. This happens when I print from iOS on my ipad using HP print icon and when my husband prints from his windows 10 desktop. I’m thinking that it’s the hardware as opposed to the software ... Thanks for your replies with your knowledge and expertise 😉
Solved! Go to Solution.
1 ACCEPTED SOLUTION
Accepted Solutions
03-03-2019 05:36 PM
HP Recommended
Welcome to the HP Support Community
I suggest you do a Hard Reset on the printer
(1) Turn the printer on, if it is not already on.
(2) Wait until the printer is idle and silent before you continue.
(3) With the printer turned on, disconnect the power cord from the rear of the printer.
(4) Unplug the power cord from the wall outlet.
(5) Wait at least 60 seconds.
(6) Plug the power cord back into the wall outlet.
NOTE: HP recommends connecting the printer power cord directly to the wall outlet.
(7) Reconnect the power cord to the rear of the printer.
(8) Turn on the printer, if it does not automatically turn on.
The printer might go through a warm-up period. The printer lights might flash, and the carriage might move.
Wait until the warm-up period finishes and your printer is idle and silent before you proceed.
Manually clean the area around the ink nozzles
-
Gather the following materials:
-
Long, lint-free cotton swabs
-
A clean, lint-free cloth, or any cloth that does not come apart or leave fibers
-
Distilled, filtered, or bottled water (tap water might damage the printer)
-
-
Turn on the printer.
-
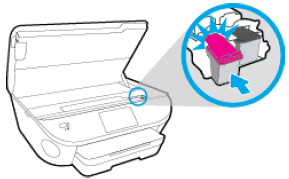
Open the ink cartridge access door by placing two fingers under one or both of the small handles on the sides of the ink cartridge access door, and then lift up.
Figure : Opening the ink cartridge access door

-
Disconnect the power cord from the rear of the printer.
-
Disconnect the USB, if it is connected.
-
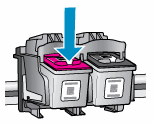
Lightly press down on an ink cartridge to release it.
Figure : Pressing down on the ink cartridge
-
Pull the ink cartridge toward you to remove it from the slot.
CAUTION:
Do not remove both ink cartridges at the same time. Remove and clean each ink cartridge one at a time. Do not leave an ink cartridge outside the printer for more than 30 minutes.
-
Hold the ink cartridge by its sides.
Figure : Holding the ink cartridge by its sides
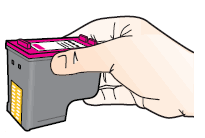
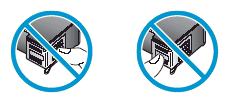
CAUTION:
Do not touch the copper-colored contacts or the ink nozzles. Touching these parts can result in clogs, ink failure, and bad electrical connections.
Figure : Do not touch the contacts or nozzles
-
Lightly moisten a cotton swab or lint-free cloth with distilled water, and then squeeze any excess water from it.
-
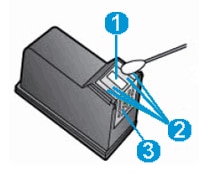
Clean the face and edges around the ink nozzle with the swab.
CAUTION:
Do not clean the ink nozzle plate.
Figure : Clean the area around the ink nozzle
-
Nozzle plate - Do not clean
-
Area surrounding ink nozzle - Do clean
-
Ink cartridge contacts - Do not clean
-
-
Either let the ink cartridge sit for 10 minutes to allow the cleaned area to dry, or use a new swab to dry it.
-
Slide the ink cartridge into the empty slot, and then gently push up on the ink cartridge until it snaps into place.
Figure : Inserting the ink cartridge
-
Repeat these steps to clean the other ink cartridge.
-
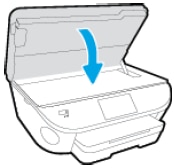
Close the ink cartridge access door.
Figure : Closing the ink cartridge access door
-
Reconnect the power cord to the rear of the printer.
-
Turn on the printer.
Try to print.
Refer to this document: https://support.hp.com/us-en/product/hp-envy-5540-all-in-one-printer-series/5447939/document/c047271... for Fixing Poor Print Quality.
Keep me posted, how it goes!
If the information I've provided was helpful, give us some reinforcement by clicking the Accepted Solution and Kudos buttons, that'll help us and others see that we've got the answers!
Have a great day!
Cheers:)
Raj1788
I am an HP Employee
7 REPLIES 7
03-03-2019 05:36 PM
HP Recommended
Welcome to the HP Support Community
I suggest you do a Hard Reset on the printer
(1) Turn the printer on, if it is not already on.
(2) Wait until the printer is idle and silent before you continue.
(3) With the printer turned on, disconnect the power cord from the rear of the printer.
(4) Unplug the power cord from the wall outlet.
(5) Wait at least 60 seconds.
(6) Plug the power cord back into the wall outlet.
NOTE: HP recommends connecting the printer power cord directly to the wall outlet.
(7) Reconnect the power cord to the rear of the printer.
(8) Turn on the printer, if it does not automatically turn on.
The printer might go through a warm-up period. The printer lights might flash, and the carriage might move.
Wait until the warm-up period finishes and your printer is idle and silent before you proceed.
Manually clean the area around the ink nozzles
-
Gather the following materials:
-
Long, lint-free cotton swabs
-
A clean, lint-free cloth, or any cloth that does not come apart or leave fibers
-
Distilled, filtered, or bottled water (tap water might damage the printer)
-
-
Turn on the printer.
-
Open the ink cartridge access door by placing two fingers under one or both of the small handles on the sides of the ink cartridge access door, and then lift up.
Figure : Opening the ink cartridge access door
-
Disconnect the power cord from the rear of the printer.
-
Disconnect the USB, if it is connected.
-
Lightly press down on an ink cartridge to release it.
Figure : Pressing down on the ink cartridge
-
Pull the ink cartridge toward you to remove it from the slot.
CAUTION:
Do not remove both ink cartridges at the same time. Remove and clean each ink cartridge one at a time. Do not leave an ink cartridge outside the printer for more than 30 minutes.
-
Hold the ink cartridge by its sides.
Figure : Holding the ink cartridge by its sides
CAUTION:
Do not touch the copper-colored contacts or the ink nozzles. Touching these parts can result in clogs, ink failure, and bad electrical connections.
Figure : Do not touch the contacts or nozzles
-
Lightly moisten a cotton swab or lint-free cloth with distilled water, and then squeeze any excess water from it.
-
Clean the face and edges around the ink nozzle with the swab.
CAUTION:
Do not clean the ink nozzle plate.
Figure : Clean the area around the ink nozzle
-
Nozzle plate - Do not clean
-
Area surrounding ink nozzle - Do clean
-
Ink cartridge contacts - Do not clean
-
-
Either let the ink cartridge sit for 10 minutes to allow the cleaned area to dry, or use a new swab to dry it.
-
Slide the ink cartridge into the empty slot, and then gently push up on the ink cartridge until it snaps into place.
Figure : Inserting the ink cartridge
-
Repeat these steps to clean the other ink cartridge.
-
Close the ink cartridge access door.
Figure : Closing the ink cartridge access door
-
Reconnect the power cord to the rear of the printer.
-
Turn on the printer.
Try to print.
Refer to this document: https://support.hp.com/us-en/product/hp-envy-5540-all-in-one-printer-series/5447939/document/c047271... for Fixing Poor Print Quality.
Keep me posted, how it goes!
If the information I've provided was helpful, give us some reinforcement by clicking the Accepted Solution and Kudos buttons, that'll help us and others see that we've got the answers!
Have a great day!
Cheers:)
Raj1788
I am an HP Employee
03-04-2019 04:01 PM
HP Recommended
Appreciate all your time and efforts.
This is a hardware issue, I would personally suggest you contact our HP Support for one on one interaction.
Please use the following link to create yourself a case number, then call and it may help speed up the call process:
Step 1. Open link: www.hp.com/contacthp
Step 2. Sign in / sign in as a guest
Step 3. Enter the product number or select to auto detect
Step 4. Scroll down to "Still need help? Complete the form to select your contact options"
Step 5. Scroll down and click: HP contact options - click on Get phone number and phone number appear.
Keep me posted on further assistance. Hope that helps!
If the information I've provided was helpful, give us some reinforcement by clicking the Accepted Solution and Kudos buttons, that'll help us and others see that we've got the answers!
Have a great day ahead!
Raj1788
I am an HP Employee
03-05-2019 12:53 PM
HP Recommended
Keep me posted for any other technical queries I'll be glad to assist you.
Have a great day!
Cheers:)
Raj1788
I am an HP Employee
03-05-2019 11:16 PM
HP Recommended
Read your reply posted on 03 – 03 – 2019 at 04:36 PM to @manhattanmarg.
Have the same issue with my HP ENVY 5530. Utilized your entire suggestion and it solve my problem.
Thank you very much.![]()
@karl.bockiii
Be alert for scammers posting fake support phone numbers and/or email addresses on the community.
If you think you have received a fake HP Support message, please report it to us by clicking on "Flag Post".
† The opinions expressed above are the personal opinions of the authors, not of HP. By using this site, you accept the Terms of Use and Rules of Participation.


Didn't find what you were looking for? Ask the community
† The opinions expressed above are the personal opinions of the authors, not of HP. By using this site, you accept the <a href="https://www8.hp.com/us/en/terms-of-use.html" class="udrlinesmall">Terms of Use</a> and <a href="/t5/custom/page/page-id/hp.rulespage" class="udrlinesmall"> Rules of Participation</a>.