• ×
    Information
    Windows update impacting certain printer icons and names. Microsoft is working on a solution.
    Click here to learn more
    Information
    Need Windows 11 help?
    Check documents on compatibility, FAQs, upgrade information and available fixes.
    Windows 11 Support Center.
  • post a message
  • ×
    Information
    Windows update impacting certain printer icons and names. Microsoft is working on a solution.
    Click here to learn more
    Information
    Need Windows 11 help?
    Check documents on compatibility, FAQs, upgrade information and available fixes.
    Windows 11 Support Center.
  • post a message
Guidelines
Experiencing 'Printer Blocked' or 'Printer Error' message? Click here for more information.
Check some of the most frequent questions about Instant Ink: HP INSTANT INK, HP+ PLANS: INK AND TONER.


Check out our Black or Color Ink Not Printing, Other Print Quality Issues info about: Print quality and Cartridge Issues.
HP Recommended
COLOR LASER JET PRO MFPM277dw
Microsoft Windows 10 (64-bit)

I printed out 1 picture and it was great but  when I tried to print a 2nd pic, it came out smudgy why?

1 REPLY 1
HP Recommended

@floubaker Welcome to HP Community!


I understand that you are getting smudgy printouts.


Please let us know if you are using HP genuine toner cartridges.


Are you able to make the color photocopy without any issue?


Please perform the hard reset and check.


Turn the printer on, if it is not already on. 


Wait until the printer is idle and silent before you continue. 


With the printer turned on, disconnect the power cord from the rear of the printer. 


Unplug the power cord from the wall outlet. 


Wait at least 60 seconds. 


Plug the power cord back into the wall outlet. 


Reconnect the power cord to the rear of the printer. 


Turn on the printer, if it does not automatically turn on. 


Wait until the printer is idle and silent before you proceed 


Follow these steps to print a cleaning page:

  1. From the Home screen on the printer control panel, touch Setup ().

  2. Touch Service, and then touch Cleaning Page.

  3. Load plain, white paper when you are prompted.

  4. Touch OK to begin the cleaning process.

  5. Try to print again to see if the issue is resolved,

Inspect the toner cartridge for damage

Check the toner cartridge for damage if there are issues like toner smears on the printed pages.

  1. Remove the toner cartridge from the printer, and then make sure that the sealing tape has been removed.

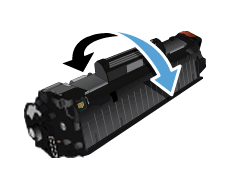
  2. Grasp both ends of the toner cartridge, and then gently rock the cartridge back and forth to distribute the toner.

    Figure : Gently rock the toner cartridge back and forth

    Image: Gently rock the toner cartridge back and forth
  3. Check the memory chip for damage.

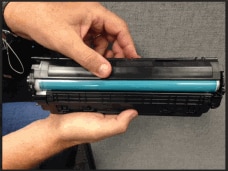
  4. Slide back the cartridge cover to expose the imaging drum.

       CAUTION: 

    Do not touch the roller (imaging drum) on the toner cartridge. Fingerprints on the imaging drum can cause print quality problems.

    Figure : Slide back the cartridge cover

    Image: Slide back the cartridge cover
  5. Examine the surface of the imaging drum on the toner cartridge.

    • If you see any scratches, fingerprints, or other damage on the imaging drum, replace the toner cartridge.

    • If the imaging drum does not appear to be damaged, close the cover, and then reinstall the cartridge in the printer.

  6. Try to print again to see if the issue is resolved:

If there are no defects on the last page you printed, the print mechanism and toner supplies are working correctly. There is no reason to clean or replace the toner cartridges. Instead, try these tips to improve the quality of your print jobs:

  • Repeat the first steps in this document to make sure that you are using genuine HP toner cartridges and the appropriate paper type for your print job. Certain paper types might be incompatible with HP printing systems, and HP cannot guarantee the reliability of non-HP toner cartridges.

  • Make sure that the printer is operating within the environmental specifications listed in the printer's Warranty and Legal Guide.

  • Make sure that the image you are printing has sufficient resolution. Images that have been enlarged too much might appear fuzzy or blurry.

  • If the problem is confined to a band near the edge of a printout, use the software that you installed with the printer, or another software program to rotate the image 180°. The problem might not display on the other end of the print job.

  • Try to print the same image or text from a different software program.


Keep us posted,

If you would like to thank us for our efforts to help you, 


Give us a virtual high-five by clicking the 'Thumbs Up' icon below, followed by clicking on the "Accept as solution" on this post, 


Have a great day!

† The opinions expressed above are the personal opinions of the authors, not of HP. By using this site, you accept the <a href="https://www8.hp.com/us/en/terms-of-use.html" class="udrlinesmall">Terms of Use</a> and <a href="/t5/custom/page/page-id/hp.rulespage" class="udrlinesmall"> Rules of Participation</a>.