-
×InformationNeed Windows 11 help?Check documents on compatibility, FAQs, upgrade information and available fixes.
Windows 11 Support Center. -
-
×InformationNeed Windows 11 help?Check documents on compatibility, FAQs, upgrade information and available fixes.
Windows 11 Support Center. -
- HP Community
- Printers
- Printing Errors or Lights & Stuck Print Jobs
- Ink cartridge HP Officejet 3830 error message

Create an account on the HP Community to personalize your profile and ask a question
11-13-2018 02:34 PM
Installed new ink cartridges after tthe old ones that came with the printer ran out Get the following error message "The indicated cartridge can only be used in the printer that inittially used it and must be replaced" HOe do I fix this so that I can use cartridges, genuine HP that I bought from store"
11-15-2018 08:44 AM - edited 11-15-2018 08:45 AM
@ ChunuSFO
Welcome to HP Forums,
This is a great place to get support, find answers and tips,
Thank you for posting your query, I'll be more than glad to help you out 🙂
I see that you’re getting an error message when you insert a new cartridge in your printer.
Don't worry as I'll be glad to help, however, to provide an accurate resolution, I need a few more details:
Have you attempted any steps on your own before posting on the HP Forums?
What happens if you put the old ink cartridges in your printer (Do you get a similar error)?
Here a few steps we could try to resolve the issue:
Remove, inspect, and then reseat the ink cartridges
If the ink cartridges are not correctly installed, the printer might display an error.
note: HP cannot guarantee the quality of remanufactured or refilled ink cartridges. Use genuine HP ink cartridges for good print quality.
If the printer is off, press the Power button to turn on the printer.
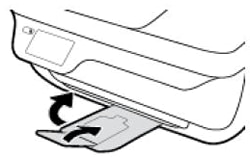
Close the output tray extender, and then push the output tray back into the printer.
Figure: Close the output tray extender, and then push the output tray into the printer
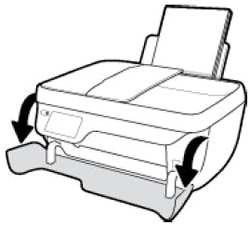
Open the exterior door.
Figure: Open the exterior door
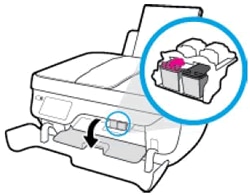
Open the ink cartridge access door.
The carriage moves to the center of the printer. Wait until the carriage is idle and silent before continuing.
Figure: Open the ink cartridge access door
Press down on the ink cartridge to release it, and then pull the ink cartridge out to remove it from its slot. Caution: Do not touch the copper-colored contacts or the ink nozzles. Touching these parts can result in clogs, ink failure, and bad electrical connections.
Figure: Remove the ink cartridge

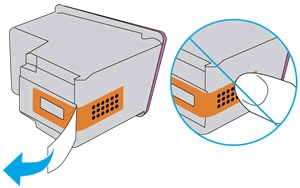
Remove any protective tape that still might be on the nozzles.
caution: Do not try to remove the copper electrical strip.
Figure: Remove the plastic tape
Hold the ink cartridge by its sides with the nozzles toward the printer, and then insert the ink cartridge into its slot. Make sure that the ink cartridge is inserted in the correct slot.
Figure: Reinsert the ink cartridge
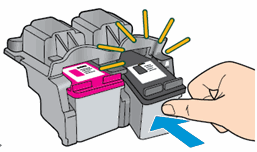
The tri-color ink cartridge (
 ) goes in the slot on the left.
The black ink cartridge (
 ) goes in the slot on the right.
Push the ink cartridge forward into its slot until it snaps into place.
Repeat these steps to replace the other ink cartridge, if necessary.
Close the ink cartridge access door.
Figure: Close the ink cartridge access door
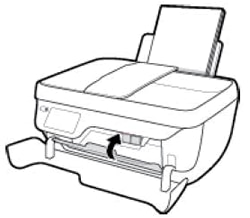
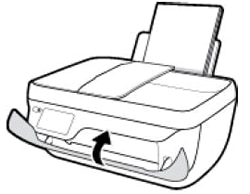
Close the exterior door.
Figure: Close the exterior door
If the error persists, continue to the next step.
Clean the ink cartridge contacts
If the ink cartridge contacts are dirty, the printer might display an ink cartridge error.
caution: Clean the ink cartridges one at a time. Do not leave an ink cartridge outside the printer for more than 30 minutes.
Gather the following materials:
Dry foam rubber swabs, lint-free cloth, or any soft material that does not come apart or leave fibres (coffee filters work well)
Distilled, filtered, or bottled water (tap water might contain contaminants that can damage the ink cartridges)
caution: Do not use platen cleaners or alcohol to clean the ink cartridge contacts. These can damage the ink cartridge or the printer.
Press the Power button to turn on the printer.
Close the output tray extender, and then push the output tray back into the printer.
Figure: Close the output tray extender, and then push the output tray into the printer

Open the exterior door.
Figure: Open the exterior door

Open the ink cartridge access door.
The carriage moves to the centre of the printer.
Figure: Open the ink cartridge access door

Wait until the carriage is idle and silent before continuing.
Disconnect the power cord from the rear of the printer.
Disconnect the USB cable, unless your printer is connected to a wireless network.
Press down on the ink cartridge to release it, and then pull the ink cartridge out to remove it from its slot.
Figure: Remove the ink cartridge

caution: Do not remove both ink cartridges at the same time. Remove and then clean each ink cartridge one at a time. Do not leave an ink cartridge outside the printer for more than 30 minutes.
Hold the ink cartridge by its sides.
Figure: Hold the ink cartridge by its sides
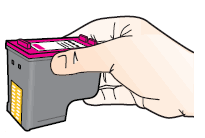
Inspect the contacts for ink and debris buildup.
Wipe the contacts with a dry swab or other lint-free material until no debris remains on them.
caution: Be careful to wipe only the contacts. Do not smear any ink or debris elsewhere on the ink cartridge.
Dip a clean foam-rubber swab or lint-free cloth into distilled water, and then squeeze any excess water from it.
Clean only the copper-coloured contacts, and then allow the ink cartridge to dry for approximately 10 minutes.
Figure: Clean the contacts
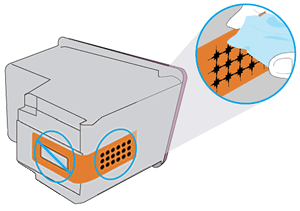
Lightly moisten another foam-rubber swab with distilled water, and then squeeze any excess water from the swab.
Use the swab to clean the electrical contacts in the carriage, located inside the printer.
Clean the contacts in the carriage.
Figure: The carriage contacts
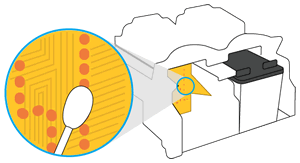
Either let the ink cartridge sit for 10 minutes to allow the cleaned area to dry, or use a new swab to dry it.
note: Make sure that the ink cartridge is not left out of the printer for more than 30 minutes.
Hold the ink cartridge by its sides with the nozzles toward the printer, and then insert the ink cartridge into its slot. Make sure that the ink cartridge is inserted in the correct slot.
Figure: Insert the ink cartridge into the slot

Push the ink cartridge forward into its slot until it snaps into place.
Repeat these steps to clean and then reinsert the other ink cartridge.
Close the ink cartridge access door.
Figure: Close the ink cartridge access door

Close the exterior door.
Figure: Close the exterior door

Reconnect the power cord to the rear of the printer.
Reconnect the USB cable, unless your printer is connected to a wireless network.
Press the Power button to turn on the printer if it does not turn on automatically.
If the issue persists, try changing the Ink Cartridges.
Keep me posted!
If I have helped you resolve the issue, feel free to give me a virtual high-five by clicking the 'Thumbs Up' icon below,
Followed by clicking on "Accept as solution" from the drop-down menu on the upper right corner,
Thank you for posting in the HP Support Forum. Have a great day!
ECHO_LAKE
I am an HP Employee
