-
×InformationWindows update impacting certain printer icons and names. Microsoft is working on a solution.
Click here to learn moreInformationNeed Windows 11 help?Check documents on compatibility, FAQs, upgrade information and available fixes.
Windows 11 Support Center. -
-
×InformationWindows update impacting certain printer icons and names. Microsoft is working on a solution.
Click here to learn moreInformationNeed Windows 11 help?Check documents on compatibility, FAQs, upgrade information and available fixes.
Windows 11 Support Center. -
- HP Community
- Printers
- Printing Errors or Lights & Stuck Print Jobs
- Re: Suddenly NO black ink cartridge recognized

Create an account on the HP Community to personalize your profile and ask a question
05-24-2018 02:59 PM
This is at least the second time this has happened to me in the last month or so.
I turn on my F2210, which I haven't needed to use that often, and suddenly the attention light is blinking for the black ink cart.
The first time, I went and got new carts (21/22). But, it acted like something worse happened, not recognizing either black cart.
After some reading, I eventually decided to unplug the unit for an extended period, after which it reset to original settings and accepted the original carts.
But then today, I turned it on (for scanning, NOT printing) and the same thing occurred with the black cart.
Scanning worked without issue. This is, as I've noted in other posts, a 7-yr-old unit, and moderate-sized newer ones are probably out there.
So what can I do? Just leave the thing unplugged, or start hunting a new one? And can you repost a listing of printers/all-in-ones that use HP 21 and 22 carts?
Thanks.
Solved! Go to Solution.
Accepted Solutions
05-24-2018 07:25 PM
According to the HP SureSupply site the following printers use the HP 21 and/or HP 22 cartridges. I do not know if there are nay current models that use these.
The troubleshooting steps in the document here may help resolve the cartridge error on your black cartridges with the Officeejet F2210 printer. Go through the steps in order, especially pay attention to cleaning the cartridge and electrical contacts as shown in step two:
Step two: Clean the problem cartridge contacts
- Gather the following items:
- Clean distilled water. Use bottled or filtered water if distilled water is not available.
- Clean cotton swabs or any soft, lint-free material that will not stick to the cartridges (coffee filters work well).
- Open the cartridge access door. The carriage moves into the middle of the access area, unless there is an obstruction.Figure : Open the cartridge access door

- Disconnect the power cord from the rear of the product.
- Press down on one of the cartridges to release it, and then pull it out from its slot.Figure : Remove the problem cartridge

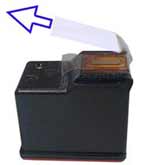
- If there is tape on the cartridge, remove it. Do not remove the copper-colored strip.Figure : Remove the tape
 If you removed the tape from the cartridge, there is no need to clean the cartridge. Continue to the step to reinstall the cartridge.
 - Place the cartridge on a piece of paper with the nozzle plate facing up.
- Dip a swab in the clean water, and then squeeze it to remove most of the moisture. The swab should only be slightly damp.
- Clean the cartridge contacts.
CAUTION:
Avoid touching the nozzles.Figure : Clean the cartridge contacts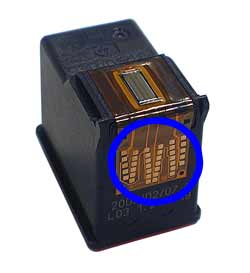
NOTE:
Clean the contacts quickly enough so that the cartridge is not outside of the product for more than 30 minutes. The ink can dry and clog the nozzles if the cartridge is outside of the product for too long. - Clean the contacts in the carriage slot for the problem cartridge.
WARNING:
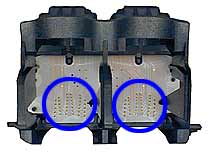
Make sure that the power cord is disconnected from the product.Figure : The carriage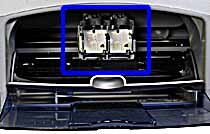 Figure : The gold-colored contacts in the carriage
- Wait ten minutes to allow the cartridge and carriage to dry.
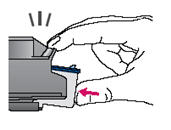
- Place the cartridge in its slot at a slight, upward angle, and then press up and forward until the cartridge snaps into position.Figure : Install the cartridge
- Reconnect the power cord to the rear of the product.
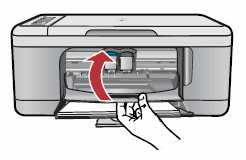
- Close the cartridge access door.Figure : Close the cartridge access door
 An alignment page prints after about a minute.
I am not an employee of HP, I am a volunteer posting here on my own time.
If your problem is solved please click the "Accept as Solution" button
If my answer was helpful please click "Yes" to the "Was this post helpful" question.
05-24-2018 07:25 PM
According to the HP SureSupply site the following printers use the HP 21 and/or HP 22 cartridges. I do not know if there are nay current models that use these.
The troubleshooting steps in the document here may help resolve the cartridge error on your black cartridges with the Officeejet F2210 printer. Go through the steps in order, especially pay attention to cleaning the cartridge and electrical contacts as shown in step two:
Step two: Clean the problem cartridge contacts
- Gather the following items:
- Clean distilled water. Use bottled or filtered water if distilled water is not available.
- Clean cotton swabs or any soft, lint-free material that will not stick to the cartridges (coffee filters work well).
- Open the cartridge access door. The carriage moves into the middle of the access area, unless there is an obstruction.Figure : Open the cartridge access door

- Disconnect the power cord from the rear of the product.
- Press down on one of the cartridges to release it, and then pull it out from its slot.Figure : Remove the problem cartridge

- If there is tape on the cartridge, remove it. Do not remove the copper-colored strip.Figure : Remove the tape
 If you removed the tape from the cartridge, there is no need to clean the cartridge. Continue to the step to reinstall the cartridge.
 - Place the cartridge on a piece of paper with the nozzle plate facing up.
- Dip a swab in the clean water, and then squeeze it to remove most of the moisture. The swab should only be slightly damp.
- Clean the cartridge contacts.
CAUTION:
Avoid touching the nozzles.Figure : Clean the cartridge contacts
NOTE:
Clean the contacts quickly enough so that the cartridge is not outside of the product for more than 30 minutes. The ink can dry and clog the nozzles if the cartridge is outside of the product for too long. - Clean the contacts in the carriage slot for the problem cartridge.
WARNING:
Make sure that the power cord is disconnected from the product.Figure : The carriage Figure : The gold-colored contacts in the carriage
- Wait ten minutes to allow the cartridge and carriage to dry.
- Place the cartridge in its slot at a slight, upward angle, and then press up and forward until the cartridge snaps into position.Figure : Install the cartridge

- Reconnect the power cord to the rear of the product.
- Close the cartridge access door.Figure : Close the cartridge access door
 An alignment page prints after about a minute.
I am not an employee of HP, I am a volunteer posting here on my own time.
If your problem is solved please click the "Accept as Solution" button
If my answer was helpful please click "Yes" to the "Was this post helpful" question.
05-27-2018 07:59 PM
I'm answering this quite honestly: I turned the unit on today (5/27), and the attention lights were not lit for either cart, and nor were any others. I got an auto-page for alignment, which I then used for that; (re)printed something that was in my queue from a few days ago; then made a copy, and all went through like nothing adverse had happened.
I will, though, keep the cleaning instructions from your response, just in case.
Thanks for your help.
Didn't find what you were looking for? Ask the community
