• ×
    Information
    Windows update impacting certain printer icons and names. Microsoft is working on a solution.
    Click here to learn more
    Information
    Need Windows 11 help?
    Check documents on compatibility, FAQs, upgrade information and available fixes.
    Windows 11 Support Center.
  • post a message
  • ×
    Information
    Windows update impacting certain printer icons and names. Microsoft is working on a solution.
    Click here to learn more
    Information
    Need Windows 11 help?
    Check documents on compatibility, FAQs, upgrade information and available fixes.
    Windows 11 Support Center.
  • post a message
Guidelines
Experiencing 'Printer Blocked' or 'Printer Error' message? Click here for more information.
Check some of the most frequent questions about Instant Ink: HP INSTANT INK, HP+ PLANS: INK AND TONER.


Check out our Black or Color Ink Not Printing, Other Print Quality Issues info about: Print quality and Cartridge Issues.
HP Recommended
HP Deskjet 2541
Microsoft Windows 7 (64-bit)

My HP Deskjet 2541 makes a clicking/ratcheting noise while printing. It prints fine, it's just the noise it makes. The selection for MS Windows 7 (64-bit) may not be right. All I know is I have Windows 7.

1 REPLY 1
HP Recommended

@buglover

Thank you for posting on HP Support Community.


Don't worry as I'll be glad to help, I have a few troubleshooting steps we could try to fix the issue:  

A grinding sound is heard when the printer is turned on or when it is printing. Blinking lights may accompany the noise. The problem can be caused by a carriage stall or a paper jam. To resolve this issue, follow the instructions below.

  1. Turn the printer on.

    • For the 800, 900, 3820, 5500, and 6000 series, open the top cover of the printer. Verify that the carriage moves to the center of the printer. If the carriage does not move to the center, proceed to step 2.

    • For the 5100, 5600, and 5800 series printers, open the top cover of the printer. Verify that the service station (the piece below the cartridges) lowers, allowing access to the cartridges. If the service station does not lower, proceed to step 2.

  2. Unplug the power cable from the back of the printer.

  3. If the carriage moved to the center, or if the service station lowered, remove the cartridges. Check inside the printer for any broken parts.

    If the carriage did not move to the center, try to manually slide the carriage to the center. If the carriage is locked either in the left or right position, proceed to step 5.

  4. Close the top cover of the printer.

  5. If the printer is a HP Deskjet 900 series printer, refer to the HP support document Removing the Cartridges if the Printer will not Turn On or the Carriage is Locked (bpd50074). This document will provide information for unlocking the carriage from the right side of the printer. If the issue is on another model of printer, proceed to step 6.

  6. Remove the rear access door, or the automatic two-sided printing accessory, and check for any paper jams or paper obstructions. Remove any obstructions.

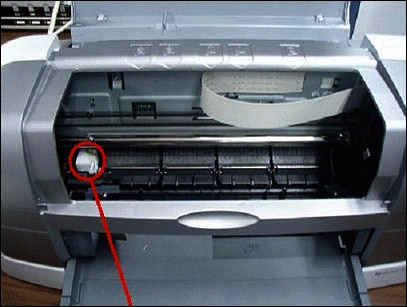
  7. Check to make certain the carriage is on the right side of the printer. Rotate the rear paper guide rollers upwards five times, then downwards four times. If the rollers will not move, open the top cover and slide the carriage to the right (if it is not already there and if carriage can move). Try to roll the rollers again while pushing the clutch in. If the rollers do not move, continue on to the next step.

    Figure : Location of the clutch

  8. Replace the rear access door accessory, or the automatic two-sided printing accessory. Close the top cover.

  9. Plug the power cable back in.

  10. Turn the printer on, and replace the cartridges if possible. If the carriage moves, but there is still a grinding noise, there may be a paper feed issue. If the carriage will not move, then it is a carriage stall issue.

  11. After installing the cartridge, if the printer has a solid power light, perform a self-test on the printer.

Service or replace your HP product if the issue persists after completing all the preceding steps.

Go to Contact HP Customer Support to schedule a product repair or replacement. If you are in Asia Pacific, you will be directed to a local service center in your area.

To confirm your warranty status, go to HP Product Warranty Check. Repair fees might apply for out-of-warranty products.


Hope this helps! Keep me posted for further assistance.
Please click “
Accept as Solution” if you feel my post solved your issue, it will help others find the solution.

ECHO_LAKE
I am an HP Employee

† The opinions expressed above are the personal opinions of the authors, not of HP. By using this site, you accept the <a href="https://www8.hp.com/us/en/terms-of-use.html" class="udrlinesmall">Terms of Use</a> and <a href="/t5/custom/page/page-id/hp.rulespage" class="udrlinesmall"> Rules of Participation</a>.