• ×
    Information
    Windows update impacting certain printer icons and names. Microsoft is working on a solution.
    Click here to learn more
    Information
    Need Windows 11 help?
    Check documents on compatibility, FAQs, upgrade information and available fixes.
    Windows 11 Support Center.
  • post a message
  • ×
    Information
    Windows update impacting certain printer icons and names. Microsoft is working on a solution.
    Click here to learn more
    Information
    Need Windows 11 help?
    Check documents on compatibility, FAQs, upgrade information and available fixes.
    Windows 11 Support Center.
  • post a message
Guidelines
Experiencing 'Printer Blocked' or 'Printer Error' message? Click here for more information.
Check some of the most frequent questions about Instant Ink: HP INSTANT INK, HP+ PLANS: INK AND TONER.


Check out our Black or Color Ink Not Printing, Other Print Quality Issues info about: Print quality and Cartridge Issues.
HP Recommended
hp 8720 officejet pro
Microsoft Windows 10 (64-bit)

error message cartridges not intended for use in this machine

3 REPLIES 3
HP Recommended

@larry79,


Welcome to HP Forums, 

This is a great place to get support, find answers and tips, 

Thank you for posting your query, I'll be more than glad to help you out 🙂 


Are you using the ink cartridges from the same region where you bought the printer?


Follow the steps given below:


Step 1: Make sure the ink cartridges are inserted correctly


Make sure the ink cartridges are inserted correctly.

  1. Press the Power button to turn on the printer, if it is not already on.

  2. Open the ink cartridge access door.

    The carriage moves to the center of the printer.

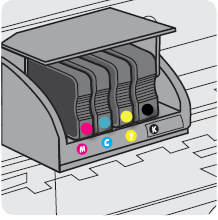
  3. Make sure the letter on the ink cartridge label matches the letter on the carriage slot.

    Figure : Properly installed ink cartridges

    Image: Properly installed ink cartridges.
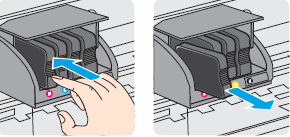
  4. Push in on the front of the ink cartridge to release it, and then pull it toward you to remove it from its slot.

    Figure : Removing the ink cartridge from its slot

    Image: Remove the ink cartridge from its slot.
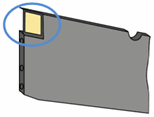
  5. Inspect the copper-colored ink cartridge contact for ink buildup or debris.

    Figure : Copper-colored contact on the ink cartridge

    Image: Copper-colored contact on the ink cartridge.
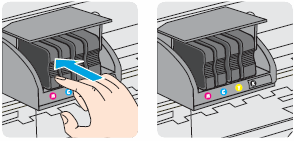
  6. Carefully reinsert the ink cartridge into its slot, making sure the letter on the ink cartridge matches the letter on the slot, and then push the ink cartridge forward until it clicks into place.

       CAUTION:

    Do not lift the latch handle on the carriage to insert ink cartridges. Doing so could cause the printhead or ink cartridges to be incorrectly seated, which could damage the print mechanism and cause printing problems.

    Figure : Inserting the ink cartridge into its slot

    Image: Insert the ink cartridge into its slot.
  7. Repeat these steps for other ink cartridges, if necessary.

  8. Make sure no ink cartridge is sticking out farther than the other ink cartridges.

    If an ink cartridge is sticking out, push it until it snaps into place.

  9. Close the ink cartridge access door.

  10. Check the control panel for any error messages.

If these steps resolved the issue, and the printer does not display an ink cartridge error, you do not need to continue troubleshooting.


Step 2: Check the carriage latch


Make sure the carriage latch is down.

  1. Open the ink cartridge access door.

    The carriage moves to the center of the printer.

  2. Make sure the carriage latch is down. If the carriage latch is up, press it down until it snaps into place.

    Figure : Carriage latch is down

    Image: Carriage latch is down
  3. Close the ink cartridge access door.

If these steps resolved the issue, and the printer does not display an ink cartridge error, you do not need to continue troubleshooting.


Step 3: Clean the ink cartridge contacts


Clean the ink cartridge contacts to remove debris that might be preventing an electrical connection.

   CAUTION:

Clean the ink cartridges one at a time. Do not leave an ink cartridge outside of the printer for more than 10 minutes. Also, never turn off the printer when an ink cartridge is removed from its slot. Leaving ink cartridge slots empty might cause damage to the ink cartridge ink system.

  1. Find a clean, lint-free cloth (eyeglass wipes or coffee filters work well) that you can use to clean the ink cartridge contacts.

  2. Make sure the printer is turned on.

  3. Open the ink cartridge access door.

    The carriage moves to the center of the printer.

  4. Push in on the front of the problem ink cartridge to release it, and then pull the ink cartridge toward you to remove it from its slot.

    Figure : Remove the problem ink cartridge from its slot

    Image: Remove the ink cartridge from its slot.
  5. With a clean, lint-free cloth (eyeglass wipes or coffee filters work well), wipe the copper-colored contact on the ink cartridge.

    Figure : Copper-colored contact on the ink cartridge

    Image: Copper-colored contact on the ink cartridge.
  6. Carefully reinsert the ink cartridge into its slot, making sure the letter on the ink cartridge matches the letter on the slot.

    Figure : Insert the ink cartridge into its slot

    Image: Insert the ink cartridge into its color-coded slot.
  7. Push the ink cartridge forward until it clicks into place.

  8. Repeat these steps for the other ink cartridges, if necessary.

  9. Close the ink cartridge access door.

  10. Check the control panel for any error messages.

  11. If the error message persists, repeat the previous steps to clean the ink cartridge contacts.

If these steps resolved the issue, and the printer does not display an ink cartridge error, you do not need to continue troubleshooting.


Step 4: Reset the printer


Resetting the printer can reset the connection with the ink cartridge and clear any error messages.

  1. Turn the printer on, if it is not already on.

  2. Wait until the printer is idle and silent before you continue.

  3. With the printer turned on, disconnect the power cord from the rear of the printer.

  4. Unplug the power cord from the wall outlet.

  5. Wait at least 60 seconds.

  6. Plug the power cord back into the wall outlet.

       NOTE:

    HP recommends connecting the printer power cord directly to the wall outlet.

  7. Reconnect the power cord to the rear of the printer.

  8. Turn on the printer, if it does not automatically turn on.

    The printer might go through a warm-up period. The printer lights might flash, and the carriage might move.

  9. Wait until the warm-up period finishes and your printer is idle and silent before you proceed.

Let me know how that pans out. 🙂

I hope you have a good day ahead,

And Feel free to ask any other queries as  well,

Considering, this forum has some of the best people in the world available and ready to help. 😉

Barachiel
I am an HP Employee

HP Recommended

This printer is not that old.  Purchased at the first of the year, 2019. I've tried the basics of wiping the copper piece on the cartridge, I've turned off the printer.  It is not accepting any replacement ink cartridges.  The cartridge I am trying to replace right now is the black.  I am replacing it with an HP 952XL.  I have ordered new ink to see if it is the cartridge itself.  But this is getting costly.  This is the second time I have had cartridges not accepted by this printer!  

HP Recommended

Hello,

Thank you for posting in this thread. Unfortunately based on when the last response was made, I have closed this thread to help keep comments current and up to date. We recommend starting a new thread for your issue by clicking here.
To be more helpful with your post, you can add key information if you desire: 
1. Product Name and Number (please do not post Serial Number)
• Example: HP Pavilion DV2-1209AX or HP Deskjet 3000 Printer CH393A
2. Operating System installed (if applicable)
• Example: Windows XP, Windows Vista 32-bit, Windows 7 64-bit
3. Error message (if any)
• Example: ""Low disk space"" error in Windows
4. Any changes made to your system before the issue occurred
• Examples: Upgrading your Operating System or installing a new software; or installing new hardware like a printer, modem, or router.
If you have any other questions about posting in the community, please feel free to send me a private message!

Thank you

† The opinions expressed above are the personal opinions of the authors, not of HP. By using this site, you accept the <a href="https://www8.hp.com/us/en/terms-of-use.html" class="udrlinesmall">Terms of Use</a> and <a href="/t5/custom/page/page-id/hp.rulespage" class="udrlinesmall"> Rules of Participation</a>.