• ×
    Information
    Windows update impacting certain printer icons and names. Microsoft is working on a solution.
    Click here to learn more
    Information
    Need Windows 11 help?
    Check documents on compatibility, FAQs, upgrade information and available fixes.
    Windows 11 Support Center.
  • post a message
  • ×
    Information
    Windows update impacting certain printer icons and names. Microsoft is working on a solution.
    Click here to learn more
    Information
    Need Windows 11 help?
    Check documents on compatibility, FAQs, upgrade information and available fixes.
    Windows 11 Support Center.
  • post a message
Guidelines
Experiencing 'Printer Blocked' or 'Printer Error' message? Click here for more information.
Check some of the most frequent questions about Instant Ink: HP INSTANT INK, HP+ PLANS: INK AND TONER.


Check out our Black or Color Ink Not Printing, Other Print Quality Issues info about: Print quality and Cartridge Issues.
HP Recommended
hp envy 5540 all in one
Microsoft Windows 10 (64-bit)

recently, I cannot print from the 6 x 4 photo compartment in my printer! I get the message...no paper or blocked..i have tried everything ! a4 printing is not a problem !

1 REPLY 1
HP Recommended

@teajenny1


Welcome to the HP Support Community.


Is this only happening while printing photos or even with normal documents?


Follow these steps to clean the paper feed rollers.

  1. Remove any paper in the printer before you clean the rollers.

  2. Press the Power button to turn off the printer, if it is not off already.

  3. Disconnect the power cord from the rear of the printer.

       WARNING: 

    You must disconnect the power cord before reaching inside the printer to avoid risk of injuries or electric shock.

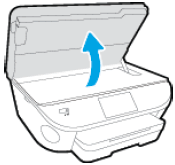
  4. Open the cartridge access door.

    Figure : Open the cartridge access door

    Image: Open the cartridge access door
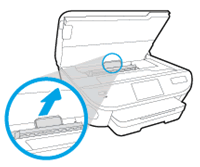
  5. Locate the paper path cover, grasp the handle, and then lift up to remove it.

    Figure : Remove the paper path cover

    Image: Remove the paper path cover
  6. Lightly dampen a clean swab with the water, and then squeeze any excess liquid from the swab.

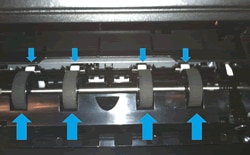
  7. Press the swab against the rollers inside the printer, and then rotate the rollers upwards with your fingers. Apply a moderate amount of pressure to remove any dust or dirt buildup.

    Figure : Clean the rollers in the paper path access area

    Image: Clean the rollers in the paper path access area
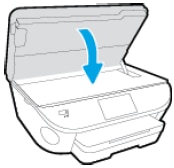
  8. Replace the paper path cover, and then close the cartridge access door.

    Figure : Close the cartridge access door

    Image: Close the cartridge access door
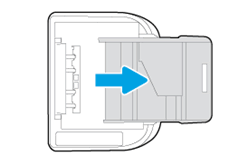
  9. Gently turn the printer onto its right side, and then pull open the input tray so that you can access its underside.

    Figure : Turn the printer onto its right side

    Image: Turn the printer onto its right side
  10. Lightly dampen a clean swab with the water, and then squeeze any excess liquid from the swab.

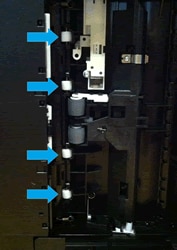
  11. Clean the rollers in the gap behind the input tray. Make sure that none of the rollers are not missing, that they turn easily, and that they are springy when you press them.

    Figure : Clean the rollers behind the input tray

    Image: Clean the rollers behind the input tray
  12. Before you turn the printer over to its normal position, continue to the next step to clean the paper pick rollers.

Step 2: Clean the paper pick rollers

Follow these steps to clean the paper pick rollers.

  1. Make sure that the printer is turned off, the power cord is disconnected, and the printer is turned onto its right side with the input tray open.

  2. Lightly dampen a clean swab with the water, and then squeeze any excess liquid from the swab.

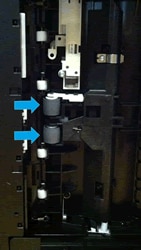
  3. Press the swab against the rollers inside the printer, and then rotate the rollers upwards with your fingers. Apply a moderate amount of pressure to remove any dust or dirt buildup.

    Figure : Clean the paper pick rollers

    Image: Clean the paper pick rollers
  4. Make sure that the rollers turn easily when you press them.

  5. Allow the rollers to dry for 10 to 15 minutes.

  6. Turn the printer over to its normal position.

  7. Reconnect the power cord to the rear of the printer, and then press the Power button to turn on the printer.

If the issue persists, please perform the remaining steps from this document: https://support.hp.com/in-en/product/hp-envy-5540-all-in-one-printer-series/5447939/document/c043564...


Let me know if this helps.


If the information I've provided was helpful, give us some reinforcement by clicking the Accepted Solution button, that'll help us and others see that we've got the answers!


Thanks!

Have a great day!


I am an HP Employee

† The opinions expressed above are the personal opinions of the authors, not of HP. By using this site, you accept the <a href="https://www8.hp.com/us/en/terms-of-use.html" class="udrlinesmall">Terms of Use</a> and <a href="/t5/custom/page/page-id/hp.rulespage" class="udrlinesmall"> Rules of Participation</a>.