-
×InformationNeed Windows 11 help?Check documents on compatibility, FAQs, upgrade information and available fixes.
Windows 11 Support Center. -
-
×InformationNeed Windows 11 help?Check documents on compatibility, FAQs, upgrade information and available fixes.
Windows 11 Support Center. -
- HP Community
- Printers
- Printing Errors or Lights & Stuck Print Jobs
- problems with printing

Create an account on the HP Community to personalize your profile and ask a question
Your account also allows you to connect with HP support faster, access a personal dashboard to manage all of your devices in one place, view warranty information, case status and more.
Check some of the most frequent questions about Instant Ink: HP INSTANT INK, HP+ PLANS: INK AND TONER.
Check out our Black or Color Ink Not Printing, Other Print Quality Issues info about: Print quality and Cartridge Issues.

It has been a while since anyone has replied. Simply ask a new question if you would like to start the discussion again.
07-29-2018
01:07 AM
- last edited on
07-29-2018
05:58 PM
by
![]() Cheron-Z
Cheron-Z
 HP Recommended
Product: МФП HP Officejet Pro 6830 e-All-in-One Serial number: [edit]
Operating System: Microsoft Windows 10 (64-bit)
Gentlemen, the printer HP Officejet Pro 6830 e-All-in-One suddenly began to demand the cartridges setup. On the printer they also cost. The software is not stitched. What to do? Sorry for the English. Russia.


cartridges setup established
Solved! Go to Solution.
1 ACCEPTED SOLUTION
7 REPLIES 7
07-29-2018 05:55 PM
HP Recommended
Welcome to HP Support Forums. 🙂
Let me take a moment to thank you for posting on the HP Support Forums.
I understand that your HP Officejet Pro 6830 e-All-in-One Printer is asking to use the setup ink cartridges. Not to worry, I'll be glad to assist you with this case.
Did any changes take place on the printer recently (ink cartridge replacement, etc.)?
Are you using the original ink cartridges that came with the printer?
Meanwhile, please perform the following steps:
- Disconnect the power cable from the printer while the printer is still ON.
- Disconnect any other cables if connected the printer.
- Press and hold the printer’s power button for 15 seconds.
- The printer should be directly connected to the wall outlet and not to a surge protector.
- Reconnect the power cable to print and the printer should power ON by itself. If the printer doesn’t power ON then please manually power it ON.
You may continue to perform the following steps on your printer:
Step 1: Make sure the ink cartridges are correctly installed
The printer might display an error if the ink cartridges are not correctly installed.
-
Turn on the printer.
-
Open the ink cartridge access door.
-
Wait until the carriage is idle and silent before you continue.
-
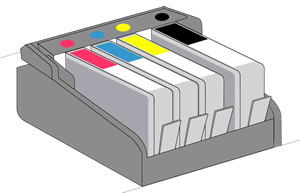
Make sure the ink cartridges are marked ‘SETUP'.
-
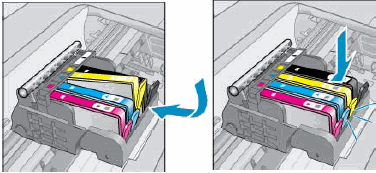
Make sure the color-coded icon on each ink cartridge label matches the color-coded icon on the carriage slot. If the icons do not match, remove the ink cartridge and insert it in the correct slot.
Figure : Checking the color-coded icons on the ink cartridges and carriage slot
-
Move your finger along the top of the ink cartridges to check for any unseated ink cartridges in the carriage. Press down on any ink cartridge that is higher than the others to firmly snap the ink cartridge into its slot.
Figure : Pressing down on the unseated ink cartridge
-
If the ink cartridge does not snap into place, remove the ink cartridge from the carriage.
-
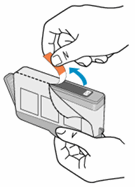
Gently bend the tab away from the ink cartridge.
caution: Be careful not to bend the tab out more than 1.27 cm (0.5 in). Moving the tab too far might damage the ink cartridge or cause the tab to break off.
Figure : Gently bending the tab away from the ink cartridge
-
Bend the tab away from the ink cartridge
-
Do not bend the tab more than 1.27 cm (0.5 in)
-
-
Reinsert the ink cartridge into the carriage until it snaps into place.
-
-
Close the ink cartridge access door.
Try to print. If the issue persists, continue to the next step.
Step 2: Clean the ink cartridge and printhead contacts
Remove the ink cartridges to clean the ink cartridge and printhead contacts, and then reinstall the ink cartridges into the printer.
caution: Clean the ink cartridges one at a time. Do not leave an ink cartridge outside of the printer for more than 30 minutes. Also, never turn off the printer when an ink cartridge is removed from its slot. Leaving ink cartridge slots empty might cause damage to the ink cartridge ink system.
-
Gather the following materials:
-
A clean, lint-free cloth
-
A clean, dry cotton swab
-
Distilled or bottled water
caution: Do not use tap water, platen cleaners, or alcohol because they might contain contaminants that can damage the contacts.
-
-
Open the ink cartridge access door.
-
Wait until the printer is idle and silent before you proceed.
-
Disconnect the power cord from the rear of the printer.
-
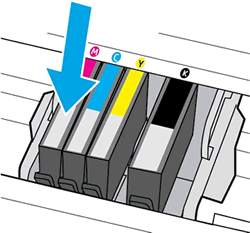
Press the tab inward on the front of the ink cartridge to release it, and then pull up on the ink cartridge to remove it from the slot.
Figure : Removing the ink cartridge

-
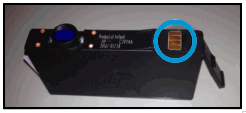
Lightly dampen a clean, lint-free cloth with bottled or distilled water, and then clean ink cartridge contact.
Figure : Example of the copper-colored ink cartridge contact
-
Place the ink cartridge to the side with the contacts facing upwards.
-
Moisten a cotton swab, and then wipe the contacts inside the printhead.
Figure : Cleaning the printhead contacts
-
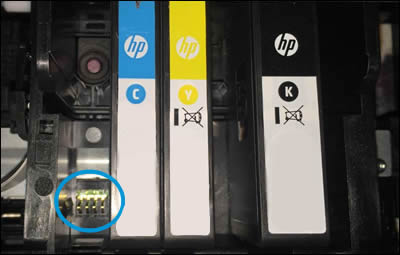
Carefully reinsert the ink cartridge into the correct colored slot, and then press down on the ink cartridge until it clicks into place.
Figure : Insert the ink cartridge
-
Repeat these steps for other ink cartridges.
-
Close the ink cartridge access door.
Try to print. If the issue persists, continue to the next step.
Step 3: Clean the ink cartridge contacts again
Cleaning the ink cartridge contacts a second time can help resolve the issue. Repeat the steps that you performed earlier in this document to clean the ink cartridge contacts.
After cleaning the contacts a second time, try to print. If the issue persists, continue to the next step.
Step 4: Reset the printer
Resetting the printer can resolve an ink cartridge error.
-
Turn the printer on, if it is not already on.
-
Wait until the printer is idle and silent before you continue.
-
With the printer turned on, disconnect the power cord from the rear of the printer.
-
Unplug the power cord from the wall outlet.
-
Wait at least 60 seconds.
-
Plug the power cord back into the wall outlet.
note: HP recommends connecting the printer power cord directly to the wall outlet.
-
Reconnect the power cord to the rear of the printer.
-
Turn on the printer, if it does not automatically turn on.
-
Wait until the printer is idle and silent before you proceed.
Try to print. If the issue persists, continue to the next step.
Step 5: Replace the problem ink cartridge
If the previous steps have not helped, replace the ink cartridge indicated on the printer control panel.
If you have a defective cartridge or printhead, it might be under warranty. To check the warranty on your ink or toner supplies, go to hp.com/go/learnaboutsupplies, and then review the limited warranty information for your supplies.
-
Open the ink cartridge access door.
-
Wait until the printer is idle and silent before you proceed.
-
Press the tab inward on the front of the ink cartridge to release it, and then pull up on the ink cartridge to remove it from the slot.
Figure : Removing the ink cartridge
-
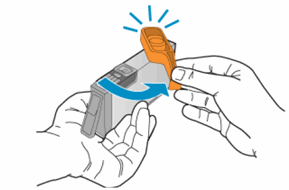
Remove a new ink cartridge from its package, and then pull the orange pull-tab straight back.
caution: Make sure you remove the orange pull-tab and plastic wrap completely before you remove the orange cap in the next step. Otherwise, ink might leak from the ink cartridge. When you remove the plastic wrap, the paper label on the top of the ink cartridge tears slightly, which is necessary to properly vent the ink cartridge.
Figure : Pulling the orange tab on the wrapper straight back
-
Hold the ink cartridge by its sides, and then twist the protective orange cap counter-clockwise to snap it off the ink cartridge.
caution: Do not touch the copper-colored contacts or the ink nozzles. Touching these parts can result in clogs, ink failure, and bad electrical connections.
Figure : Twisting the orange cap to snap it off the ink cartridge
-
Gently bend the tab away from the ink cartridge.
caution: Be careful not to bend the tab out more than 1.27 cm (0.5 in). Moving the tab too far might damage the ink cartridge or cause the tab to break off.
Figure : Gently bending the tab away from the ink cartridge
-
Bend the tab away from the ink cartridge
-
Do not bend the tab more than 1.27 cm (0.5 in)
-
-
Carefully reinsert the ink cartridge into the correct colored slot, and then press down on the ink cartridge until it clicks into place.
Figure : Inserting the ink cartridge
-
Repeat these steps to install additional new ink cartridges, if necessary.
-
Close the ink cartridge access door.
By now the printer should be able to print perfectly.
I sincerely hope this fixes the issue. Keep me posted for further assistance.
Cheers! 🙂
07-29-2018 10:17 PM
HP Recommended
thanks for the answer. Everything is done, but the printer does not work. Original cartridges. The firmware does not work. Before the denial of work, there was probably an update via the Wi-Fi Internet. how to make advanced reset. I will be very grateful for your concern. With kind wishes, Boris.
07-30-2018 10:14 AM
HP Recommended
You're most welcome. You have been fabulous to work with considering your superb technical skills and valuable patience. Kudos to you for that.
I have sent you a private message with the steps to perform a semi full reset on the printer. This will restore the printer to its original factory settings.
Hope that helps. Keep me posted.
Good luck! 🙂
Be alert for scammers posting fake support phone numbers and/or email addresses on the community.
If you think you have received a fake HP Support message, please report it to us by clicking on "Flag Post".
† The opinions expressed above are the personal opinions of the authors, not of HP. By using this site, you accept the Terms of Use and Rules of Participation.


Didn't find what you were looking for?
Ask the community
† The opinions expressed above are the personal opinions of the authors, not of HP. By using this site, you accept the <a href="https://www8.hp.com/us/en/terms-of-use.html" class="udrlinesmall">Terms of Use</a> and <a href="/t5/custom/page/page-id/hp.rulespage" class="udrlinesmall"> Rules of Participation</a>.