• ×
    Information
    Windows update impacting certain printer icons and names. Microsoft is working on a solution.
    Click here to learn more
    Information
    Need Windows 11 help?
    Check documents on compatibility, FAQs, upgrade information and available fixes.
    Windows 11 Support Center.
  • post a message
  • ×
    Information
    Windows update impacting certain printer icons and names. Microsoft is working on a solution.
    Click here to learn more
    Information
    Need Windows 11 help?
    Check documents on compatibility, FAQs, upgrade information and available fixes.
    Windows 11 Support Center.
  • post a message
Guidelines
Note: From May 1, 2024, the HP Scan and Capture app will no longer be available (retired) in the Microsoft Store and HP will not release any further app updates. Alternatively, you can download HP Smart from the Microsoft Store. For more information on how to set up your printer using the HP Smart app, go to HP printer setup (HP Smart app).
Common problems HP Solution Center not working : Adobe Flash Player Error and Unable to scan
We would like to share some of the most frequently asked questions about HP Solution Center not working : Adobe Flash Player Error and Unable to Scan.
HP Recommended
HP Color Laser Jet Pro MFP M281fdw
macOS 10.15 Catalina

I have been having issues when I scan a document on my new Printer. A black line appears on the bottom of the scanned document whenever I use the Document Feeder. It does not appear when using the Flatbed. The document also isn't perfectly aligned. I tried cleaning the glass and doing a hard reset, but nothing has worked. Any ideas on what could be causing this issue? 


Test 3.jpg

1 REPLY 1
HP Recommended

@JustinCGD


I have gone through your Post and I would like to help


I suggest you start with a printer reset


- Turn on the printer.
- Wait until the printer is idle and silent before you continue.
- Disconnect the USB cable from the rear of the printer. If your printer has a network or wireless connection, leave it connected.
- Remove the ink cartridges from the printer.
- With the printer turned on, disconnect the power cord from the rear of the printer and from the wall outlet or power strip.
- Wait at least 60 seconds.
- Plug the power cord back into the wall outlet.
NOTE: HP recommends connecting the printer power cord directly to a wall outlet.
- Reconnect the power cord to the rear of the printer.
- Turn on the printer, if it does not automatically turn on.
- The printer might go through a warm-up period. The printer lights might flash, and the carriage might move.
- Wait until the warm-up period finishes and your printer is idle and silent before you proceed.
- Reinsert the ink cartridges, and then close the ink cartridge access door.
- If you receive a prompt to print a calibration page, do so.


Next update the Printer Firmware. You can refer to this Link: https://support.hp.com/in-en/document/c02919168


If the issue persists, try cleaning the ADF rollers

  1. Gather the following materials:

    • A clean, lint-free cloth, or any cloth that does not come apart or leave fibers

    • Distilled, filtered, or bottled water (tap water might damage the printer)

  2. Remove the original document from the ADF.

  3. Turn off the printer.

  4. Disconnect the power cord from the rear of the printer.

  5. Open the ADF cover.

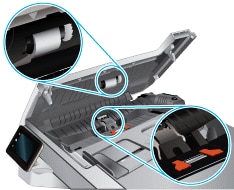
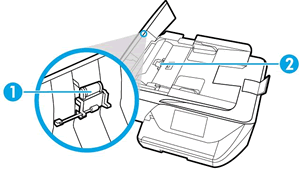
  6. Find the paper pick rollers and the separator pad inside the ADF.

    Figure : Example of the paper pick rollers and separator pad in a LaserJet printer

    The paper pick rollers and separator pad

    Figure : Example of the paper pick rollers and separator pad in a OfficeJet printer

  7. Lightly dampen a clean, lint-free cloth with filtered or distilled water, then squeeze any excess liquid from the cloth.

  8. Use the damp cloth to wipe any residue off the paper pick rollers and the separator pad.

  9. Leave the ADF cover open for two minutes to allow the paper pick rollers and separator pad to dry.

  10. Close the ADF cover.

  11. Reload the original document print side up in the document feeder tray. Gently slide the document into the printer as far as it can go.

  12. Slide in the paper width guides until they are snug against the paper.

    Do not push the paper width guides in so far that they bend the paper.

  13. Reconnect the power cord to the rear of the printer.

  14. Turn on the printer, then try to scan.

Keep me posted how it goes 😊


If the information I've provided was helpful, give us some reinforcement by clicking the "Solution Accepted" on this Post and it will also help other community members with similar issue.


KrazyToad
I Am An HP Employee

† The opinions expressed above are the personal opinions of the authors, not of HP. By using this site, you accept the <a href="https://www8.hp.com/us/en/terms-of-use.html" class="udrlinesmall">Terms of Use</a> and <a href="/t5/custom/page/page-id/hp.rulespage" class="udrlinesmall"> Rules of Participation</a>.