-
×InformationNeed Windows 11 help?Check documents on compatibility, FAQs, upgrade information and available fixes.
Windows 11 Support Center.
-
×InformationNeed Windows 11 help?Check documents on compatibility, FAQs, upgrade information and available fixes.
Windows 11 Support Center.
- HP Community
- Printers
- Printing Errors or Lights & Stuck Print Jobs
- ERROR CODE 0XC4EB8004
Create an account on the HP Community to personalize your profile and ask a question
06-11-2023 09:48 PM
Hi @Rogel26,
Welcome to the HP Support Community.
I'd like to help!
follow the steps below-
Step 1: Reset the printer
Resetting the printer can sometimes resolve this error.
With the printer turned on, disconnect the power cord from the printer.
Unplug the power cord from the power source.
Wait 60 seconds.
Reconnect the power cord to a wall outlet and to the printer.
note:
HP recommends plugging the printer directly into a wall outlet.
If the error persists, continue to the next step.
Step 2: Remove, inspect, and then reseat the printheads
The printer might display an error if the printheads are not correctly installed. Perform the following steps only for the printhead indicated on the printer control panel.
Turn on the printer.
Make sure plain paper is loaded in the input tray.
Make sure all ink tanks are at least half full.
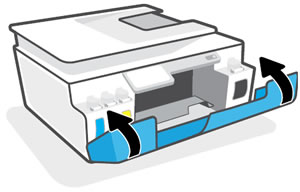
Open the front door, and then open the printhead access door.
Wait until the carriage stops moving before you continue.
Make sure the printhead carriage latch is closed.
If the printhead latch is closed, continue with these steps.
If the printhead latch is open, push down on the latch to close it, close the front door, and then try to print. If the error persists, continue with these steps.
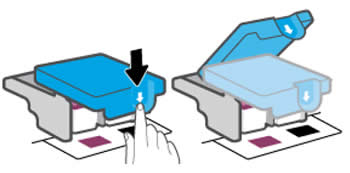
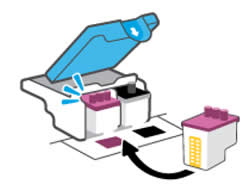
Push down on the carriage latch to unlock it.
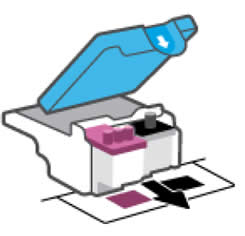
Press down on the printhead to release it, pull it out of its slot, and then set it aside on a protected surface, such as a sheet of paper.
caution:
To prevent ink from leaking or transferring, hold the printhead by the sides and keep the printhead upright at all times.
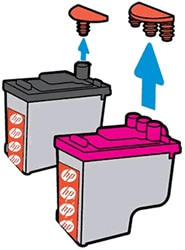
Make sure the plugs on top of the printhead have been removed.
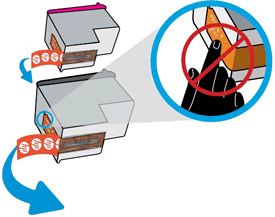
Make sure the tape from the printhead contacts has been removed.
caution:
Do not touch the copper-colored contacts or the ink nozzles. Do not replace the protective tape on the contacts. Handling these parts can result in clogs, ink failure, and bad electrical connections.
Slide the printhead at a slight upward angle into its slot, and then push up on the printhead until it snaps into place.
Repeat the previous steps for the other printhead, only if indicated by the Printhead icon or error message.
Close the carriage latch by pushing it down until it locks into place.
Close the front door.
If you still have issues, it could be a hardware failure.
Hope this helps!
Please click “Accepted Solution” if you feel my post solved your issue, it will help others find the solution. Click the “Kudos/Thumbs Up" on the bottom right to say “Thanks” for helping!
I am an HP Employee