• ×
    Information
    Windows update impacting certain printer icons and names. Microsoft is working on a solution.
    Click here to learn more
    Information
    Need Windows 11 help?
    Check documents on compatibility, FAQs, upgrade information and available fixes.
    Windows 11 Support Center.
  • post a message
  • ×
    Information
    Windows update impacting certain printer icons and names. Microsoft is working on a solution.
    Click here to learn more
    Information
    Need Windows 11 help?
    Check documents on compatibility, FAQs, upgrade information and available fixes.
    Windows 11 Support Center.
  • post a message
Guidelines
The HP Community is where owners of HP products, like you, volunteer to help each other find solutions.
Archived This topic has been archived. Information and links in this thread may no longer be available or relevant. If you have a question create a new topic by clicking here and select the appropriate board.
HP Recommended
Envy 7640
Microsoft Windows 10 (64-bit)

After sitting idle, for hours or overnight the Envy 7640 printer makes a grinding sound when pulling in the paper. The printer is only a month old. This problem lasts for the first few papers and then stops. This noise was not there the first two weeks after I bought it. What is the solution for this?

2 REPLIES 2
HP Recommended

Welcome to the HP Community @Rick58, I hope you are well 🙂


I wanted to reach out to try to help with the printer making noises when you attempt to print. I would think that there could be built up paper debris on the rollers that could be causing the noise. Try cleaning the rollers inside of the printer as shown below, to see if that helps.


Clean the rollers from inside the printer:

Dust, paper fiber, and other debris might accumulate on the paper feed rollers and cause paper jams and paper feed issues. Use the following steps to clean the rollers inside the printer, and then try to print a Printer Status Report.
Step 1: Clean the paper feed rollers
Follow these steps to clean the paper feed rollers.
  1. Gather the following materials:
    • Long, lint-free cotton swabs
    • A clean, lint-free cloth, or any cloth that does not come apart or leave fibers
    • Distilled, filtered, or bottled water (tap water might damage the printer)
  2. Turn on the printer, if it is not already on.
  3. Open the ink cartridge access door.
    Figure : Opening the ink cartridge access door
    Image: Opening the ink cartridge access door.
  4. Wait until the carriage is idle and silent before you proceed.
     WARNING:
    You must disconnect the power cord before reaching inside the printer to avoid the risk of injuries or electric shock.
  5. Disconnect the USB cable from the rear of the printer, if you have a cable connection to the printer.
  6. Locate the paper path cover, grasp the handle, and then lift up to remove it.
    Figure : Removing the paper path cover
    Image: Locating the paper path cover.
  7. Lightly dampen the swab with the water, and then squeeze any excess liquid from the swab.
  8. Use a flashlight to inspect the rollers. Press the swab against the rollers inside the printer, and then rotate the rollers upwards with your fingers.
    Apply a moderate amount of pressure to remove any dust or dirt buildup.
    Figure : Example of the rollers in the paper path access area
    Image: Example of the rollers in the paper path access area.
  9. Allow the rollers to dry completely (approximately 10 minutes).
  10. Replace the paper path cover, and then close the ink cartridge access door.
    Figure : Closing the ink cartridge access door
    Image: Closing the ink cartridge access door.
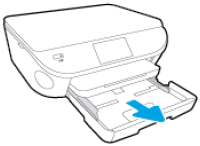
  11. Grasp the output tray, and then pull toward you to remove it.
  12. Pull out the input tray to its outermost position.
    Figure : Pulling out the input tray
    Image: Pulling out the input tray.
  13. Remove all paper from the input tray.
  14. Turn the printer onto its right side so you can access its underside. Make sure to hold the printer firmly with one hand to avoid tipping.
    Figure : Turning the printer onto its right side
    Image: Turning the printer onto its right side.
  15. Lightly dampen a clean, lint-free cloth with bottled or distilled water, and then squeeze any excess liquid from the cloth.
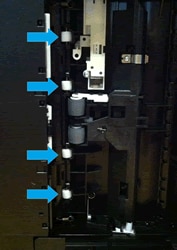
  16. Use a flashlight to inspect the space where the input tray was. Press the cloth against the rollers, and then rotate them upward with your fingers.
    Apply a moderate amount of pressure to remove any dust or dirt buildup.
    Figure : Example of the rollers underneath the printer
    Image: Example of the rollers underneath the printer.
  17. Allow the rollers to dry completely (approximately 10 minutes).
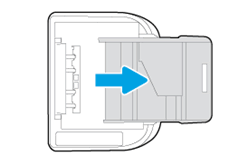
  18. Push in the input tray, and then turn the printer over to the upright position.
  19. Slide the output tray back onto the input tray.
  20. Reconnect the power cord to the rear of the printer, and then plug in the power cord to an electrical outlet.
  21. Reconnect the USB or Ethernet cable, unless your printer is connected to a wireless network.
  22. Turn on the printer.
    The printer might go through a warm-up period and the carriage might move. Wait until the warm-up period finishes before you proceed.
Step 2: Clean the ADF rollers and the separator pad (optional)
If you are trying to copy or fax a document, and the document does not feed into the ADF, clean the ADF rollers and the separator pad to remove dust, paper fiber, and other debris that might accumulate on the rollers and cause paper feed issues. If you are not using the ADF, continue to the next step.
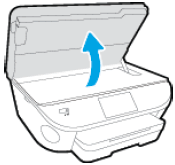
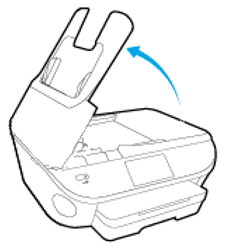
  1. Lift the top cover of the ADF.
    Figure : Lift the ADF cover
    Image: Lift the ADF cover
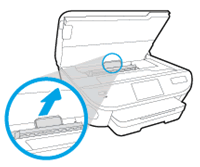
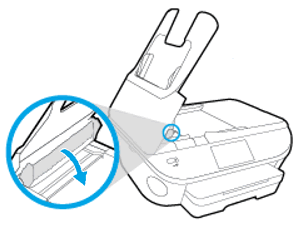
  2. Pull down the ADF mechanism to access the rollers and separator pad.
    Figure : Pull down the ADF mechanism
    Image: Pull down  the ADF mechanism.
  3. Lightly dampen a clean, lint-free cloth with bottled or distilled water, and then squeeze any excess liquid from the cloth.
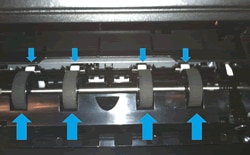
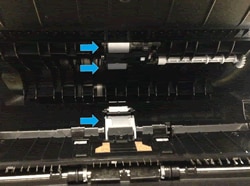
  4. Press the cloth against the rollers, and then rotate them upward with your fingers. Apply a moderate amount of pressure to remove any dust or dirt buildup.
    Figure : Clean the rollers and separator pad
    Image: Clean the rollers and separator pad
  5. Allow the rollers to dry for 10 to 15 minutes.
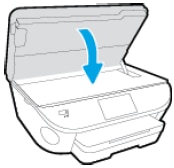
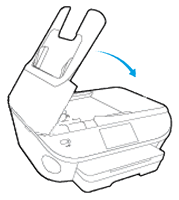
  6. Close the ADF cover.
    Figure : Close the ADF cover
    Image: Close the ADF cover
  7. Reconnect the power cord to the rear of the printer, and then reconnect the USB or Ethernet cable if you had either connected.
  8. Press the Power button to turn on the printer.
Step 3: Print a Printer Status Report
Try to print a Printer Status Report to make sure that the hardware functions correctly.


If these steps fixed the issue, please click the "Accept as Solution" button down below in this message. If you just wish to say "thanks" for my reply to help, click the "thumbs up" to send me a Kudos.


If you run into any issues, please let me know and I will do my best to help.

Have a great day!

a i n b o w 7000

I work on behalf of HP


Click the “Kudos Thumbs Up" at the bottom of this post to say “Thanks” for helping!
HP Recommended

Cleaned the rollers and gears as you described.  Still having noise.  Sounds like the plastic gears are slipping because of wear.  Can they be replaced?

Archived This topic has been archived. Information and links in this thread may no longer be available or relevant. If you have a question create a new topic by clicking here and select the appropriate board.
† The opinions expressed above are the personal opinions of the authors, not of HP. By using this site, you accept the <a href="https://www8.hp.com/us/en/terms-of-use.html" class="udrlinesmall">Terms of Use</a> and <a href="/t5/custom/page/page-id/hp.rulespage" class="udrlinesmall"> Rules of Participation</a>.