• ×
    Information
    Windows update impacting certain printer icons and names. Microsoft is working on a solution.
    Click here to learn more
    Information
    Need Windows 11 help?
    Check documents on compatibility, FAQs, upgrade information and available fixes.
    Windows 11 Support Center.
  • post a message
  • ×
    Information
    Windows update impacting certain printer icons and names. Microsoft is working on a solution.
    Click here to learn more
    Information
    Need Windows 11 help?
    Check documents on compatibility, FAQs, upgrade information and available fixes.
    Windows 11 Support Center.
  • post a message
Guidelines
We have new content about Hotkey issue, Click here to check it out!
HP Recommended
HP Omen15-ax002na
Microsoft Windows 10 (64-bit)

Hi, I turned my laptop on today to notice a light brown/yellow area in the bottom right corner. This is noticable when I look straight on, but fades when I look from either side. Lightly rubbing the corner, turns it to white momentarily. No hardware damage has occured, no falls or bangs. Can someone determine what the issue is and what is the solutions? Thanks

4 REPLIES 4
HP Recommended

@HeatherLouita

Welcome to HP Forums, 

This is a great place to get support, find answers and tips to your technical queries.


To provide you with an accurate solution, I'll need a few more details:

Connect a different monitor and check if the issue persists.

Are you facing this issue after an update?


In the meanwhile, follow the below steps to boot into BIOS page and check if the issue persists.


1. Turn on or restart the computer.

2. While the display is blank, press the f10 key to enter the BIOS settings menu.

3. Press the f9 key to reset the BIOS to the default settings.

4. Press the f10 key to save the changes and exit the BIOS settings menu.


Then, use the following steps to open the System Tests menu when Windows won't start.

  1. Hold the power button for at least five seconds to turn off the computer.

  2. Turn on the computer and immediately press Esc repeatedly, about once every second. When the menu appears, press the F2 key.

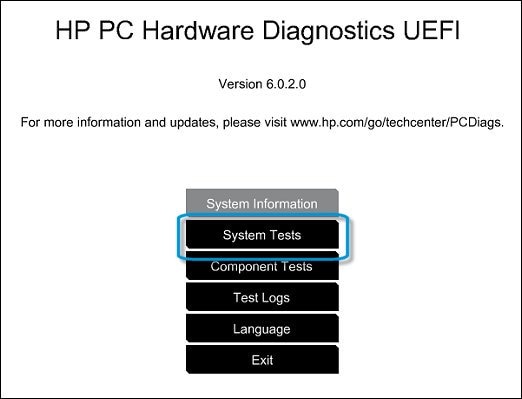
  3. On the main menu, click System Tests.

    Figure : Selecting the System Tests from the main menu

    Selecting the System Tests from the main menu
  4. Run the Extensive Test

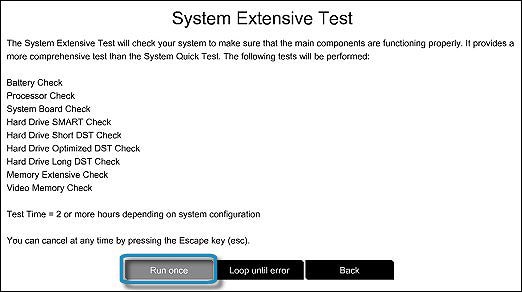
The Extensive Test checks your system to make sure that the main components are functioning properly. It provides a more comprehensive test than the Quick Test. These tests run consecutively through the listed components and can take 2 or more hours to complete.

The following tests are performed:

  • Battery check

  • Processor check

  • System board check

  • Hard drive SMART check

  • Hard drive short DST check

  • Hard drive optimized DST check

  • Hard drive long DST check

  • Memory extensive check

  • Video memory check

You cannot use your computer during the test. The Extensive Test takes 2 or more hours to complete, depending on the system configuration. You can cancel at any time by pressing the Escape key (Esc).

Use the following steps to run the Extensive Test.

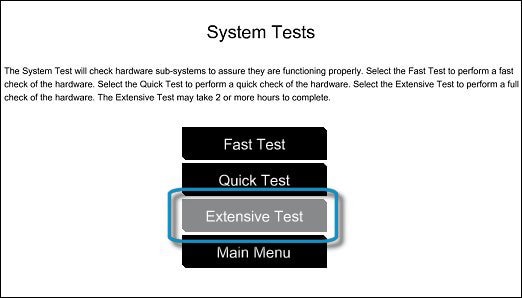
  1. From the main menu, click System Tests, then click Extensive Test.

    Figure : Selecting the Extensive Test

     Selecting the Extensive Test
  2. Click Run once, or Loop until error.

    While the test is running, the time remaining and test result for each component are shown on the screen. The test can take 2 or more hours to complete.

    Figure : Running the Extensive Test

    Running the Extensive Test
  3. If a component fails a test, write down the failure ID (24-digit code) so you have it available when you contact HP Customer Support. The information is also available in Test Logs on the main menu.

    If the System Test did not detect a hardware problem

Keep me posted, how it goes!

Cheers:)

Raj1788
I am an HP Employee 

HP Recommended

Hi Raj,


Thanks for your help. The "mark" dissapeared for a couple of days, but it returned today, on the left side of the screen this time. So I ran the diagostic as you described and it passed, no issues at all.


I don't think this occured directly after an update, perhaps I should restore it, however I believe this is a hardware issue. 


It was connected to an external monitor the first time I noticed it, and since then. The external monitor doesn't have any brown areas, just my laptop monitor. 


I've attached photos, very difficult to see on camera. The first image is when I first noticed it.


HP-Mark-1 (1).jpg


And the second - from today, you can see the difference between that and a screenshot of the same area.


HP-Mark-2 (1).jpg


Let me know if there is anything else I can do,

Thanks again, Heather


HP Recommended

@HeatherLouita


Thanks for keeping us posted. I truly appreciate your patience and efforts.

As @Raj1788 is out of the office today, I'm replying to you. 


I suggest you to check in the BIOS of the laptop if the display issue occurs. The following steps will help you to check in the BIOS:

  • Shut down the laptop.
  • Power on the laptop and immediately hit the f10 key repeatedly (7-8 times).
  • This should open the BIOS screen. If the display issue occurs in the BIOS then it appears to be a hardware issue. 

In case it turns out to be a hardware issue, please refer to my private message for the next course of action.


Hope this information helps. Feel free to keep me posted for any further questions.


Cheers! 🙂

HP Recommended

Hi, thanks for your response. It still appears on BIOS screen. I'll continue support per the message.


Thanks

Heather

† The opinions expressed above are the personal opinions of the authors, not of HP. By using this site, you accept the <a href="https://www8.hp.com/us/en/terms-of-use.html" class="udrlinesmall">Terms of Use</a> and <a href="/t5/custom/page/page-id/hp.rulespage" class="udrlinesmall"> Rules of Participation</a>.