• ×
    Information
    Windows update impacting certain printer icons and names. Microsoft is working on a solution.
    Click here to learn more
    Information
    Need Windows 11 help?
    Check documents on compatibility, FAQs, upgrade information and available fixes.
    Windows 11 Support Center.
  • post a message
  • ×
    Information
    Windows update impacting certain printer icons and names. Microsoft is working on a solution.
    Click here to learn more
    Information
    Need Windows 11 help?
    Check documents on compatibility, FAQs, upgrade information and available fixes.
    Windows 11 Support Center.
  • post a message
Guidelines
Experiencing 'Printer Blocked' or 'Printer Error' message? Click here for more information.
Check some of the most frequent questions about Instant Ink: HP INSTANT INK, HP+ PLANS: INK AND TONER.


Check out our Black or Color Ink Not Printing, Other Print Quality Issues info about: Print quality and Cartridge Issues.
HP Recommended
Microsoft Windows 11

I have a Photosmart 7520 printer that quit working. I get a error message that says: missing or failed print head.  Help

1 REPLY 1
HP Recommended

Hi @max10pointer,


Welcome to the HP Support Community. 


I'd be happy to help you! 


This looks like a hardware issue. However, 


Clean the printhead


There are three areas on the printhead that need to be cleaned: the plastic ramps on both sides of the ink nozzles, the edge between the ink nozzles and the electrical contacts, and the electrical contacts.

Figure : The three areas on the printhead that need to be cleaned

Plastic ramps on the sides of the nozzles

Edge between nozzles and contacts

Electrical contacts

   CAUTION: 

Do not touch the ink nozzles. Do not touch the electrical contacts with your finger.


Figure : Do not touch the contact area with your fingers 

Image: Do not touch the contact area with your fingers.

Follow these steps to clean the printhead.

Gather the following cleaning materials:

Several clean, lint-free cloths or papers. Coffee filters and glass-cleaning cloths work well.

Distilled or bottled water. Do not use tap water. Tap water can contain contaminants that can damage the printhead.

Lightly dampen a clean, lint-free cloth.

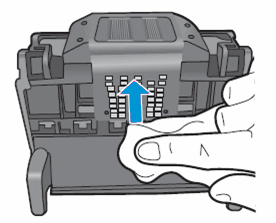
Use the damp cloth to wipe the electrical contacts from the bottom to the top. Do not go past the edge between the electrical contacts and the ink nozzles. Repeat this motion until no ink appears on the cloth.

Figure : Clean the electrical contacts

  1. Image: Clean the electrical contacts.

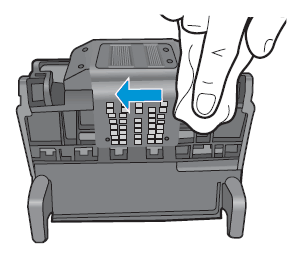
Use a fresh, lightly dampened, lint-free cloth to wipe any accumulated ink and debris from the edge between the ink nozzles and the electrical contacts.

Figure : Clean the edge between the ink nozzles and the electrical contacts

  1. Image: Clean the edge between the ink nozzles and the electrical contacts.

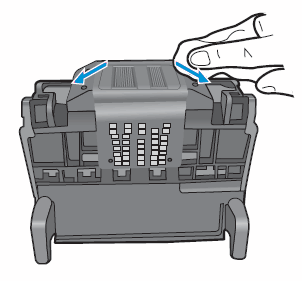
Use a fresh, lightly dampened, lint-free cloth to wipe the plastic ramps on both sides of the ink nozzles. Wipe away from the nozzles only.

Figure : Clean the ramps

  1. Image: Clean the ramps.

Dry the previously cleaned areas with a clean, dry, lint-free cloth.

Lightly dampen a fresh, clean, lint-free cloth with bottled or distilled water.

Clean the electrical contacts inside the printer by wiping them from top to bottom. Repeat this motion until no ink appears on the cloth.

Figure : Clean the electrical contacts inside the printer

  1. Image: Clean the electrical contacts inside the printer.

Dry the area with a clean, dry, lint-free cloth.

Step 3: Reinstall the printhead and cartridges

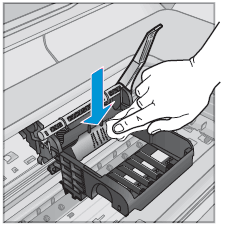
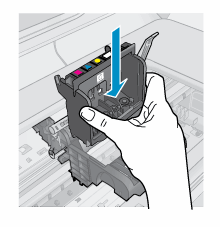
Hold the printhead upright with the colored icons on the top.

Lower the printhead into the carriage.

Figure : Reinstall the printhead

  1. Image: Reinstall the printhead.

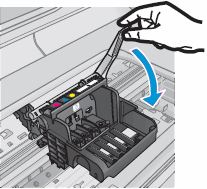
Carefully lower the latch handle.

Figure : Lower the latch handle

  1. Image: Lower the latch handle.

   CAUTION: 

Leaving the latch handle raised can result in incorrectly seated cartridges. The latch must remain down to install the cartridges correctly.

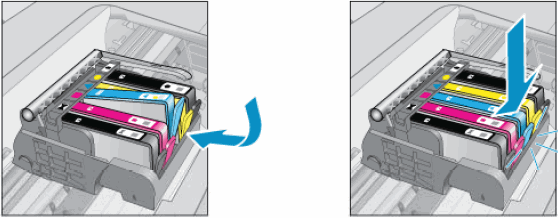
With the nozzle and contacts facing down, slide the cartridges into their slots. Press down on the cartridge until it clicks into place. Make sure that the colored icon on the cartridge label matches the colored icon on the carriage slot.

Figure : Reinstall each cartridge

  1. Image: Reinstall each cartridge.

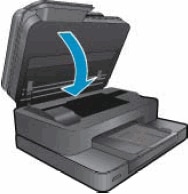
Close the cartridge access door. The carriage returns to the right side of the printer.

Figure : Close the cartridge access door

  1. Image: Close the cartridge access door.

If the issue persists, contact the phone support for service options.


Keep me posted for further assistance.


 Please mark this post as Accepted Solution” if the issue is resolved and if you feel this reply was helpful click “Yes”.

Elohi_NR
I am an HP Employee
† The opinions expressed above are the personal opinions of the authors, not of HP. By using this site, you accept the <a href="https://www8.hp.com/us/en/terms-of-use.html" class="udrlinesmall">Terms of Use</a> and <a href="/t5/custom/page/page-id/hp.rulespage" class="udrlinesmall"> Rules of Participation</a>.