• ×
    Information
    Windows update impacting certain printer icons and names. Microsoft is working on a solution.
    Click here to learn more
    Information
    Need Windows 11 help?
    Check documents on compatibility, FAQs, upgrade information and available fixes.
    Windows 11 Support Center.
  • post a message
  • ×
    Information
    Windows update impacting certain printer icons and names. Microsoft is working on a solution.
    Click here to learn more
    Information
    Need Windows 11 help?
    Check documents on compatibility, FAQs, upgrade information and available fixes.
    Windows 11 Support Center.
  • post a message
Guidelines
Experiencing 'Printer Blocked' or 'Printer Error' message? Click here for more information.
Check some of the most frequent questions about Instant Ink: HP INSTANT INK, HP+ PLANS: INK AND TONER.


Check out our Black or Color Ink Not Printing, Other Print Quality Issues info about: Print quality and Cartridge Issues.
HP Recommended
laserjet 1020
Mac OS X 10.10 Yosemite

it was fine and i print the first paper, after that it start open the red light and write on the computer paper jam. what should i do now??

1 REPLY 1
HP Recommended

Hi @hiamiqraf,


I'd like to help!


Try the below steps to resolve the issue -


Step one: Remove any loose paper first

Remove all loose paper from the main tray, the priority feed slot, and the output bin.

   CAUTION: 

Do not try to remove jammed paper at this stage.

Step two: Clear the paper jam

Follow these steps to remove jammed paper from the product.

  1. Press the Power switch to turn off the product, and then disconnect the power cord from the rear of the product.

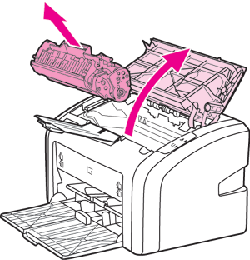
  2. Open the print cartridge door, and then remove the print cartridge.

    NOTE: 

    Opening the print cartridge door andremoving the print cartridge relieves tension on the product rollers, which prevents damage tothe product and makes the removal of jammed pages easier.

    Figure : Open the print cartridge door and remove the print cartridge

    Illustration of removing the print cartridge.
       CAUTION: 

    To prevent damage to the print cartridge, cover it with a sheet of paper to minimize exposure to direct light.

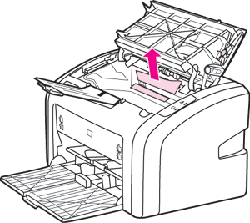
  3. With both hands, grasp the paper where it is most visible, including the middle, and then carefully pull the paper straight out of the product.

    Figure : Remove the jammed paper

    Illustration of removing jammed paper.
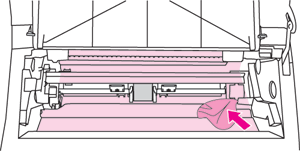
  4. Look inside the product for any torn pieces of paper or labels, and then remove them.

  5. If any jammed paper remains in the input tray or the output tray, grasp it with both hands and gently remove it.

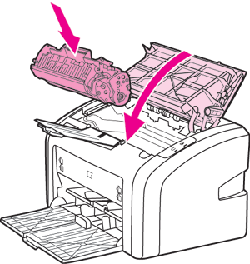
  6. Reinstall the print cartridge, and then close the print cartridge door.

    Figure : Reinstall print cartridge and close print cartridge door

    Illustration of reinstalling the print cartridge.
  7. Reconnect the power cord to the rear of the product, and then press the Power switch to turn on the product.

Step three: Reset the printer

  1. Press the Power switch to turn off the product.

  2. Wait 30 seconds, and then press the Power switch to turn on the product.

Step four: Reload paper

  1. Slide the paper length and width guides to their outermost positions.

  2. Tap a stack of plain, white paper on a flat surface to align the edges.

  3. Load the paper into the input tray with the narrow edge first and the print side facing up.

  4. Slide the paper length and width guides inward until they stop at the edges of the paper.

    Figure : Slide in the paper guides

    Illustration of sliding in the paper guides.

Step five: Check the print settings

Follow these steps to check and adjust print settings for the current software program.

NOTE: 

Steps can vary depending on the software program.

  1. From the File menu in the software program, click Print.

  2. In the Print dialog box, click Properties.

  3. Check the settings on the Paper/Quality tab, change them if necessary, and then click OK.

  4. Try printing again.

  • If these steps resolved the issue, there is no need to continue troubleshooting.

  • If the issue persists, see the next step.

Step six: Clean the cartridge area

During the printing process, paper, toner, and dust particles can accumulate inside the product and might cause paper jams. Follow these steps to clean the print cartridge area.

  1. Turn the product off, and then disconnect the power cord from the back of the product. Wait for the product to cool.

  2. Open the top access door, and then remove the cartridge.

       CAUTION: 

    To prevent damage to the cartridge, cover the cartridge with a sheet of paper to minimize its exposure to direct light.

  3. With a dry, lint-free cloth, wipe any residue from the paper path area and the cartridge cavity.

       CAUTION: 

    Do not touch the black sponge transfer roller inside the product. By doing so, you can damage the product.

  4. Replace the cartridge, and then close the top access door.

  5. Reconnect the power cord to the back of the product.

  6. Press the power switch to turn on the product.

  7. Try printing again.

If the issue persists, I'd suggest you Contact HP in your region regarding the service options for your printer


Hope this helps! Keep me posted. 


And, Welcome to the HP Support Community. 


Please click “Accept as Solution” if you feel my post solved your issue, it will help others find the solution.

Click the “Kudos, Thumbs Up" on the bottom right to say “Thanks” for helping

† The opinions expressed above are the personal opinions of the authors, not of HP. By using this site, you accept the <a href="https://www8.hp.com/us/en/terms-of-use.html" class="udrlinesmall">Terms of Use</a> and <a href="/t5/custom/page/page-id/hp.rulespage" class="udrlinesmall"> Rules of Participation</a>.