-
×InformationNeed Windows 11 help?Check documents on compatibility, FAQs, upgrade information and available fixes.
Windows 11 Support Center. -
-
×InformationNeed Windows 11 help?Check documents on compatibility, FAQs, upgrade information and available fixes.
Windows 11 Support Center. -
- HP Community
- Notebooks
- Business Notebooks
- Calibrate HP battery from BIOS

Create an account on the HP Community to personalize your profile and ask a question
09-10-2019 10:47 AM
Dear all,
My laptop battery suddenly start getting crazy.
I am trying to run battery test and calibration from the BIOS since I am using Linux OS on my laptop.
Please help me to calibrate and test my laptop battery from the BIOS.

09-13-2019 01:41 PM
@SAMOKAMO I'm afraid HP doesn't support Linux as of now, I suggest making use of windows instead, that said, you maybe able to manually perform a test and calibration using the below steps as there are no option of doing this via the BIOS:
Install the HP Hardware Diagnostics using this link: click here (to perform the test)
Manually calibrating the battery requires four steps: fully charge the battery, discharge or drain the battery, recharge the battery, and then run the battery test. Calibrating the battery improves the accuracy of the battery gauge software so that it more accurately displays the current level of charge. The following instructions work with most battery types.
Step 1: Charge the battery
Use the power cord to charge the battery to a full charge.
-
Plug in the power cord.
-
Charge the battery to a full charge, 99% to 100%. To check the battery charge, mouse over the battery icon in the system tray on the Desktop.
-
When the battery is fully charged, proceed to the next step.
Step 2: Discharge the battery
After the battery fully charges, use HP PC Hardware Diagnostics to discharge the battery.
-
Unplug the power cord.
-
Press and hold the Power button for at least five seconds to turn off the computer.
-
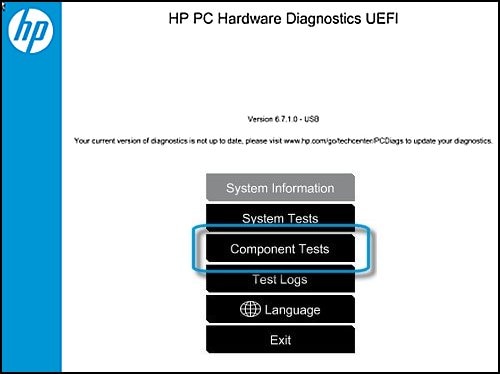
Turn on the computer and immediately press the F2 key repeatedly, about once every second until the HP PC Hardware Diagnostics UEFI menu displays.
-
Click Component Tests in the main menu.
NOTE:
The purpose is to drain or discharge the battery, not get the results of the test. The battery discharges and the computer turns off before the test results display.

-
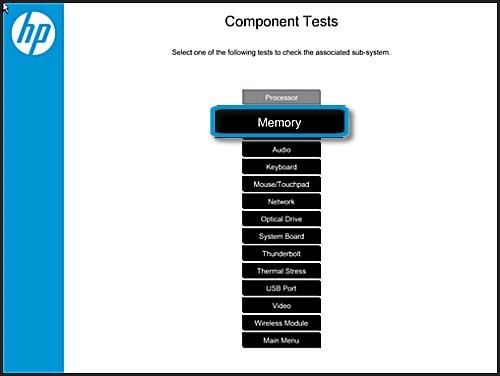
In the list of Component Tests, click Memory.

-
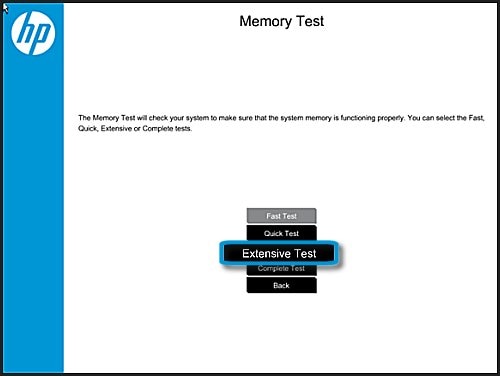
Click Extensive Test.

-
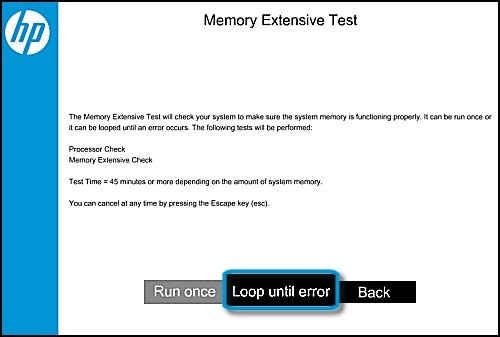
Click Loop until error to start the test. Let the test continue until the battery is completely discharged and the computer shuts down.
NOTE:
This test only discharges the battery and does not impact the memory.

Step 3: Recharge the battery
Recharge the battery fully before you calibrate the battery.
NOTE:If you run the HP Battery Check before the battery charges fully, you might get a false battery failure result.
-
Plug in the power cord to charge the battery.
-
Charge the battery to a full charge, 99% to 100%. To make sure the computer reaches a full charge, keep the computer attached to the power cord for at least 3 hours.
NOTE:
The battery continues to charge with the computer on or off.
-
Check the battery charge. Turn on the computer and start Windows normally. On the desktop mouse over the battery icon in the system tray to view the battery charge percentage. Make sure the battery charge percentage is 99% or 100%.
NOTE:
If you plug in your power cord and immediately run the HP Battery Check, you might get a false failure showing the battery is bad. If the battery is in a low-charge state (at less than 3%) you might also get a false reading.
P.S: Welcome to HP Community 😉
Keep us posted,
If you would like to thank us for our efforts to help you,
Give us a virtual high-five by clicking the 'Thumbs Up' icon below, followed by clicking on the "Accept as solution" on this post,
Have a great day!
Riddle_Decipher
I am an HP Employee
Learning is a journey, not a destination.
Let's keep asking questions and growing together.

