-
×InformationNeed Windows 11 help?Check documents on compatibility, FAQs, upgrade information and available fixes.
Windows 11 Support Center. -
-
×InformationNeed Windows 11 help?Check documents on compatibility, FAQs, upgrade information and available fixes.
Windows 11 Support Center. -
- HP Community
- Desktops
- Desktop Hardware and Upgrade Questions
- No Display due to SecureBoot

Create an account on the HP Community to personalize your profile and ask a question
05-11-2020 04:08 AM
I updated the CPU cooler in my PC and part of that required removal of the graphics card; however, when I put it all together again it appears that the motherboard no longer recognises the GPU. From reading around it appears the secure boot might have something to do with it. The PC seems to start up (as in no beeps, no warnings); however, just no display.
The trouble is without the display I cannot try to disable secure boot. Can someone please provide instructions on how to disable secure boot without looking at the bios (because I cannot see it), e.g. press f10, press down arrow twice, etc. noting the PC type in the description.
Also if anyone has any other solutions, please let me know.
TIA
05-20-2020 11:30 AM
Thank you for posting on HP Support Community.
Don't worry as I'll be glad to help, I have a few troubleshooting steps we could try to fix the issue:
To enable or disable Secure Boot on an HP notebook computer, first confirm if Legacy Support is available and enabled.
-
Turn off the computer.
-
Press the power button to turn on the computer, and then immediately press the Esc key repeatedly until the Startup Menu opens.

-
Press F10 to open BIOS Setup.
-
Use the right arrow key to select System Configuration, use the down arrow key to select Boot Options, and then press Enter.

-
Check for Legacy Support in the list.

-
If Legacy Support is not listed, continue to the next step.
-
If Legacy Support is listed and you are enabling Secure Boot, use the down arrow to select Legacy Support, press Enter, select Disabled, press Enter, and then continue to the next step.
-
If Legacy Support is listed and you are disabling Secure Boot, continue to the next step.
-
-
Use the down arrow key to select Secure Boot, and then press Enter.
-
Use the down arrow key to select Enabled or Disabled depending on your requirements.

-
Press Enter to save the change.
-
If you enabled Secure Boot, depending on your notebook, press F10 to save the changes and reboot, or use the left arrow key to select the File menu, use the down arrow key to select Save Changes and Exit, and then press Enter to select Yes to confirm the change.
-
If you disabled Secure Boot, continue to the next step.
-
-
Use the arrow keys to select Legacy Support, press Enter to change the setting to Enable, press Enter, select Yes in the confirmation window, and then press Enter.

-
Use the down arrow key to select a device in the Legacy Boot Order menu, and press F5 and F6 to move the device down or up.

-
Press F10 to accept the changes, use the left arrow key to select Yes, and then press Enter to Exit Saving Changes to restart the computer.
-
If an Operating System Boot Mode Change message displays, type the code shown, and then press Enter to start Windows.
NOTE: Make sure you type the code correctly. There is no text field to see what you are typing. This is expected behavior.

-
Turn off the computer, wait a few seconds, turn on the computer, and then immediately press Esc repeatedly until the Startup menu opens.
-
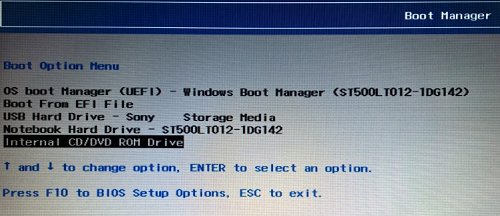
When the Startup Menu displays, press F9 to open the Boot Device Options.

-
When the Boot Manager Window opens, use the down arrow key to select a boot device, and then press Enter to start the computer from the selected device.

Hope this helps! Keep me posted for further assistance.
Please click “Accept as Solution” if you feel my post solved your issue, it will help others find the solution.
ECHO_LAKE
I am an HP Employee
