-
×InformationNeed Windows 11 help?Check documents on compatibility, FAQs, upgrade information and available fixes.
Windows 11 Support Center. -
-
×InformationNeed Windows 11 help?Check documents on compatibility, FAQs, upgrade information and available fixes.
Windows 11 Support Center. -
- HP Community
- Desktops
- Desktop Video, Display and Touch
- Hdmi port for tv and vr headset

Create an account on the HP Community to personalize your profile and ask a question
Your account also allows you to connect with HP support faster, access a personal dashboard to manage all of your devices in one place, view warranty information, case status and more.

It has been a while since anyone has replied. Simply ask a new question if you would like to start the discussion again.
07-11-2018 03:04 PM
 HP Recommended
Product: Hp omen 880
Operating System: Microsoft Windows 10 (64-bit)
I am using the hdmi port on the graphics card to the tv but I want to run a vr headset but it needs to go into the graphics card. I have tried to contact the tv hdmi to the mother board but is has no signal. How can I get this to work..
Solved! Go to Solution.
1 ACCEPTED SOLUTION
Accepted Solutions
07-12-2018 04:54 PM
HP Recommended
Thank you for joining HP Forums.
This is a great place to get support, find answers to your technical queries.
I understand that you are trying to connect tv but you are not getting the signal, need not worry I'll be glad to assist you.
To provide you with an accurate solution, I'll need a few more details:
Did you try with the different monitor?
Or alternate cable?
Choosing the right location
Notice the location of windows in the room when deciding where to place the display. The screen can reflect direct sunlight or bright lights, making viewing uncomfortable.
Select a location for the monitor or TV that is near the PC and a power source. Cables can be unsightly and should be hidden from view, such as by routing them behind the back of the desk between a wall.
Set the monitor or TV on a flat level surface. Make sure that the monitor or TV does not rest on any cables.
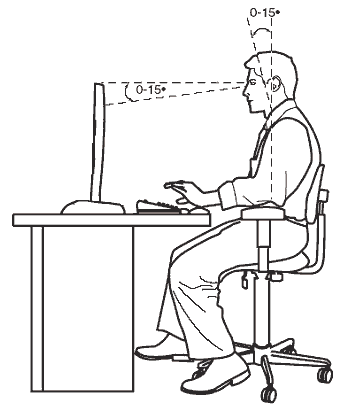
The height and angle of the monitor or TV should not cause neck or back pain during prolonged viewing. It should be positioned so the eyes of the person using the monitor or TV are at least one meter (three feet) away and only slightly angled down. An adjustable chair can help achieve a comfortable position.
Figure : Proper viewing height
Types of video connectors
Know the video connectors on your computer and display devices to avoid problems and get the best possible picture quality.
There are two types of video transfer methods: Digital and Analog. If you try to connect a digital connector to an analog port or vise versa, you will not be able to view video. Also, if you attempt to play protected high-definition digital content, such as Blu-ray movies, over an analog connection, you will probably get an error message or the movie will play at lower quality resolutions.
S-video and Composite (analog)
Do not remove the video port cover
If your computer came with a graphics card, HP may have installed a plastic cover over the video port attached to the motherboard. This is because video has been set up to go through the graphics card for better performance. Most PCs can use graphics from the video card or the motherboard, but not both at the same time. If you remove the plastic cover to connect a monitor (usually VGA), the video will not work unless the video card is removed. The better solution is to connect an adapter to make the connection (see next section).
Figure : VGA connector cover
-
Video card with 1 VGA port and 1 DVI port
-
Covered VGA port - should not be used
Using adaptors to help make the connection
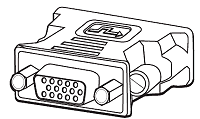
Ideally, you want to have the same video connector on the PC and monitor or TV, but there may be times when this is not possible. When the video connector on the back of your computer does not match the video connector on the display device, you may need a special cable or adapter. For example, HP provides a small DVI to VGA adapter in the box with many of its computers. Connect this adapter to the DVI port on the computer and then connect the VGA cable from the monitor or TV into the adapter.
Figure : VGA to DVI adapter
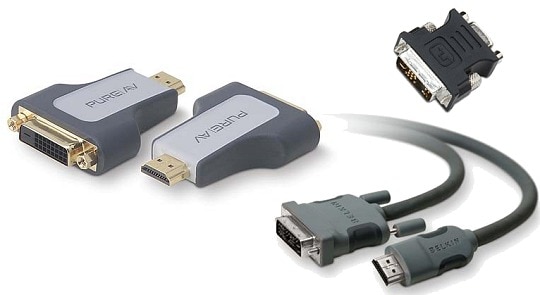
Another good answer may be a special cable that has different connection types on each end. Make sure you know the two types of video connectors before purchasing an adapter or cable.
Figure : Examples of adapters and cables
NOTE:
An HDMI connection can also carry audio. HDMI audio is lost when using a DVI to HDMI adapter or cable solution.
NOTE:
You cannot connect DVI-D to VGA.
Configuring the monitor
Use the following steps to provide Windows with the settings for your monitor, projector or TV:
-
Plug the monitor or TV into the computer.
-
Turn on the monitor or TV.
-
Turn on the computer.
-
When Windows opens, it should find the monitor(s) using Windows Plug and Play process. Give Windows extra time to start up while it installs the necessary files for the monitor or TV.
NOTE:
Most monitors work fine without installing any software by using Microsoft's Plug and Play. However, if your monitor came with a software installation disc, you should install any drivers related to the monitor to get the best experience.
-
Once Windows has finished Plug and Play, right-click anywhere on the Windows desktop and select Screen Resolution to open a Display Properties window.
-
Set the Resolution slider to match the default resolution of your monitor.
For LED and LCD displays, refer to the box, user guide, or product specifications to find the native display resolution.
For older CRT monitors (the viewing area is a large glass tube) the display resolution can be set to whatever looks best - a good resolution for CRTs is 1024 x 768 or higher.
-
Click OK.
Your monitor has been installed.
Use this link: https://support.hp.com/us-en/product/omen-by-hp-880-100-desktop-pc-series/18695893/document/c0331940... for more reference.
Keep me posted, how it goes!
If the information I've provided was helpful, give us some reinforcement by clicking the Accepted Solution and Kudos buttons, that'll help us and others see that we've got the answers!
have a great day!
Cheers:)
Raj1788
I am an HP Employee
3 REPLIES 3
07-12-2018 04:54 PM
HP Recommended
Thank you for joining HP Forums.
This is a great place to get support, find answers to your technical queries.
I understand that you are trying to connect tv but you are not getting the signal, need not worry I'll be glad to assist you.
To provide you with an accurate solution, I'll need a few more details:
Did you try with the different monitor?
Or alternate cable?
Choosing the right location
Notice the location of windows in the room when deciding where to place the display. The screen can reflect direct sunlight or bright lights, making viewing uncomfortable.
Select a location for the monitor or TV that is near the PC and a power source. Cables can be unsightly and should be hidden from view, such as by routing them behind the back of the desk between a wall.
Set the monitor or TV on a flat level surface. Make sure that the monitor or TV does not rest on any cables.
The height and angle of the monitor or TV should not cause neck or back pain during prolonged viewing. It should be positioned so the eyes of the person using the monitor or TV are at least one meter (three feet) away and only slightly angled down. An adjustable chair can help achieve a comfortable position.
Figure : Proper viewing height
Types of video connectors
Know the video connectors on your computer and display devices to avoid problems and get the best possible picture quality.
There are two types of video transfer methods: Digital and Analog. If you try to connect a digital connector to an analog port or vise versa, you will not be able to view video. Also, if you attempt to play protected high-definition digital content, such as Blu-ray movies, over an analog connection, you will probably get an error message or the movie will play at lower quality resolutions.
S-video and Composite (analog)
Do not remove the video port cover
If your computer came with a graphics card, HP may have installed a plastic cover over the video port attached to the motherboard. This is because video has been set up to go through the graphics card for better performance. Most PCs can use graphics from the video card or the motherboard, but not both at the same time. If you remove the plastic cover to connect a monitor (usually VGA), the video will not work unless the video card is removed. The better solution is to connect an adapter to make the connection (see next section).
Figure : VGA connector cover
-
Video card with 1 VGA port and 1 DVI port
-
Covered VGA port - should not be used
Using adaptors to help make the connection
Ideally, you want to have the same video connector on the PC and monitor or TV, but there may be times when this is not possible. When the video connector on the back of your computer does not match the video connector on the display device, you may need a special cable or adapter. For example, HP provides a small DVI to VGA adapter in the box with many of its computers. Connect this adapter to the DVI port on the computer and then connect the VGA cable from the monitor or TV into the adapter.
Figure : VGA to DVI adapter
Another good answer may be a special cable that has different connection types on each end. Make sure you know the two types of video connectors before purchasing an adapter or cable.
Figure : Examples of adapters and cables
NOTE:
An HDMI connection can also carry audio. HDMI audio is lost when using a DVI to HDMI adapter or cable solution.
NOTE:
You cannot connect DVI-D to VGA.
Configuring the monitor
Use the following steps to provide Windows with the settings for your monitor, projector or TV:
-
Plug the monitor or TV into the computer.
-
Turn on the monitor or TV.
-
Turn on the computer.
-
When Windows opens, it should find the monitor(s) using Windows Plug and Play process. Give Windows extra time to start up while it installs the necessary files for the monitor or TV.
NOTE:
Most monitors work fine without installing any software by using Microsoft's Plug and Play. However, if your monitor came with a software installation disc, you should install any drivers related to the monitor to get the best experience.
-
Once Windows has finished Plug and Play, right-click anywhere on the Windows desktop and select Screen Resolution to open a Display Properties window.
-
Set the Resolution slider to match the default resolution of your monitor.
For LED and LCD displays, refer to the box, user guide, or product specifications to find the native display resolution.
For older CRT monitors (the viewing area is a large glass tube) the display resolution can be set to whatever looks best - a good resolution for CRTs is 1024 x 768 or higher.
-
Click OK.
Your monitor has been installed.
Use this link: https://support.hp.com/us-en/product/omen-by-hp-880-100-desktop-pc-series/18695893/document/c0331940... for more reference.
Keep me posted, how it goes!
If the information I've provided was helpful, give us some reinforcement by clicking the Accepted Solution and Kudos buttons, that'll help us and others see that we've got the answers!
have a great day!
Cheers:)
Raj1788
I am an HP Employee
07-16-2018 11:58 AM
HP Recommended
Thanks for the reply.
I'm glad to know about it, please feel free to get back for further assistance.
Keep me posted.
If the information I've provided was helpful, give us some reinforcement by clicking the Accepted Solution and Kudos buttons, that'll help us and others see that we've got the answers!
Have a great day!
Cheers:)
Raj1788
I am an HP Employee
Be alert for scammers posting fake support phone numbers and/or email addresses on the community.
If you think you have received a fake HP Support message, please report it to us by clicking on "Flag Post".
† The opinions expressed above are the personal opinions of the authors, not of HP. By using this site, you accept the Terms of Use and Rules of Participation.


Didn't find what you were looking for?
Ask the community
† The opinions expressed above are the personal opinions of the authors, not of HP. By using this site, you accept the <a href="https://www8.hp.com/us/en/terms-of-use.html" class="udrlinesmall">Terms of Use</a> and <a href="/t5/custom/page/page-id/hp.rulespage" class="udrlinesmall"> Rules of Participation</a>.