-
×InformationNeed Windows 11 help?Check documents on compatibility, FAQs, upgrade information and available fixes.
Windows 11 Support Center. -
-
×InformationNeed Windows 11 help?Check documents on compatibility, FAQs, upgrade information and available fixes.
Windows 11 Support Center. -
- HP Community
- Desktops
- Desktop Video, Display and Touch
- Mounting bracket for HP2009m monitor

Create an account on the HP Community to personalize your profile and ask a question
01-25-2019 12:32 PM
I just bought a monitor stand with tilt and swivel. I have no idea how to attach the bracket to the back of the monitor. Does the square plastic panel (approx. 4.5" x 4.5") in the middle of the rear panel come off? It seems like it does and where the bracket would get attached but I'm afraid to pry it off. The monitor specs say it is VESA 75x75 and 100x100 compatible.
01-28-2019 05:56 AM - edited 01-28-2019 05:57 AM
Welcome to HP Support Forums!
I see from your post that you need information and assistance related to Mounting the HP Pavilion 2009m monitor. No worries, I'll be glad to assist you.
After reviewing your post, I did go through the Product specification and found that your monitor supports wall mounting and here's the Standard VESA 4-hole 100 mm x 100 mm.
For more information on how to mount the monitor on the wall, please follow this link: Setting Up Your Monitor
The monitor can be attached to a wall-mounting arm that you buy separately.
Preparing to install a wall-mounting arm (not supplied)
Before you mount the monitor on a wall, a swing arm, or other mounting fixture, remove the monitor base.
WARNING:Check that the wall-mounting fixture is adequately installed and secured before attaching the monitor. Refer to the instructions supplied with the wall-mounting fixture and check that it can support the monitor.
WARNING:Make sure the monitor is lying flat, with the screen down. Attempting to remove the base or pedestal from the monitor while it is upright might result in personal injury.
CAUTION:The screen is fragile. Placing the monitor face-down on a flat, soft area prevents scratches, defacing, or breakage.
Turn off the monitor power, and disconnect all power, video, and audio cables.
Place the monitor face-down on a soft, protected surface.
Remove the four screws that fasten monitor base to the monitor.
Figure : Removing the monitor base screws

Slide the base off the back of the monitor.
Figure : Removing the monitor base

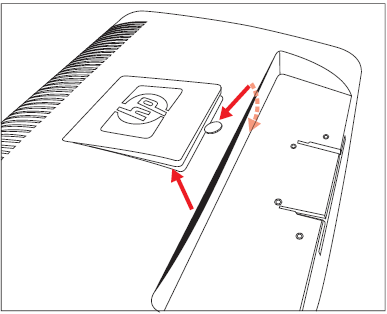
Remove the square plate on the back of monitor. Use a coin at the base of the plate to pry it loose.
Figure : Removing the plate from the back of the monitor

Four threaded holes are exposed. These holes are for screws to attach the swing arm or other mounting fixture to the back of the monitor.
Figure : Threaded holes for attaching the wall mount

Figure : Threaded holes for attaching the VESA 100x200 wall mount (2709m)

Follow the instructions included with the mounting fixture to make sure that the monitor is safely attached.
The four threaded holes that are on the back of the panel are compliant with the VESA standard for mounting flat-panel monitors.
Save the cover, screws, and base for future use.
Installing a wall mounting arm
Mount the monitor to a swing arm or other mounting fixture by following the instructions included with the mounting fixture. Ensure that the monitor is safely attached.
NOTE:Mounting fixture is sold separately.
Place the monitor panel screen down on the flat, soft area.
Place the wall mounting arm onto the back of the monitor. Line up the holes of the arm with the mounting holes in the back of the monitor.
Insert the four screws into the mounting holes and tighten.
Reconnect the cables.
See the user’s manual that came with the wall mounting arm (purchased separately) for instructions on attaching it to the wall.
Please let me know if this resolves the issue, or if you require further assistance!
Eagerly waiting for your response!
that said, If the information I've provided was helpful,
give us some reinforcement by clicking the solution and kudos buttons,
that'll help us and others see that we've got the answers!
Good Luck.
Jeet_Singh
I am an HP Employee
