-
×InformationNeed Windows 11 help?Check documents on compatibility, FAQs, upgrade information and available fixes.
Windows 11 Support Center. -
-
×InformationNeed Windows 11 help?Check documents on compatibility, FAQs, upgrade information and available fixes.
Windows 11 Support Center. -
- HP Community
- Archived Topics
- Printers Archive
- All the lights are flashing...

Create an account on the HP Community to personalize your profile and ask a question
Your account also allows you to connect with HP support faster, access a personal dashboard to manage all of your devices in one place, view warranty information, case status and more.
05-17-2016 10:58 AM
 HP Recommended
Product: Envy 5530 e-all-in-one series
Operating System: Microsoft Windows 8.1 (64-bit)
All the lights on the panel are flashing and the only thing I can do to make it stop is unplug it. It is also making a high pitched hum which modulates to the lights flashing. Is there anything I can do - reset button maybe?
4 REPLIES 4
05-17-2016 02:30 PM
HP Recommended
Hi SR2016,
I'm sorry to hear your printer is in an error state. Do you get any specific error messages?
This document walks you through moving the carriage to ensure it can move freely, and also removing and re-inserting the ink cartridges.
Ultimately you are trying to get the printer to print a status report which is described in the document.
If you are unable to clear the error state you will have to replace the printer.
I hope the steps in this document help resolve the issue.
Jean
I am an HP Employee
05-20-2016 02:57 PM
HP Recommended
I haven't received a response to my last post on 5/17. I cannot try your suggested action as the link in your email does not work. It only opens up a blank tab. I would like to try to fix this printer before I give up on and buy another brand.
05-24-2016 08:57 AM
HP Recommended
Hi SR2016,
I apologize,
I have been away for a few days: Not sure why the link is not working so I will post the details here: I hope this helps.
Jean
Solution one: Make sure that the carriage can move freely
Follow these steps to make sure that the carriage moves freely across the width of the printer.
- Press the Power button to turn on the printer, if it is not already on.
- Open the cartridge access door.
note:
The carriage might try to move into the access area. If it does, allow it to move to that position.Figure : Open the cartridge access door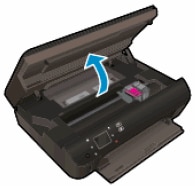
- With the printer turned on, disconnect the power cord from the rear of the printer.
warning:
To avoid the risk of electrical shock, you must unplug the power cord before moving the carriage by hand and resetting the paper feed mechanism. - Check for, and then remove, any loose paper or objects that might be restricting the carriage.
note:
Use a flashlight to thoroughly check for torn pieces of paper that might remain inside the printer. If any torn pieces of paper remain inside the printer, more jams might occur. - Reach into the cartridge access area, and then manually move the carriage.
- If the carriage is stuck on the right side of the printer, move the carriage to the left side of the printer.
- If the carriage is stuck on the left side of the printer, move the carriage to the right side of the printer.
- If the carriage is stuck in the middle of the printer, move the carriage to the right side of the printer.
- Remove any additional loose paper or objects.
- Make sure that the carriage can move freely across the width of the printer by gently pushing the carriage to the left, and then to the right.
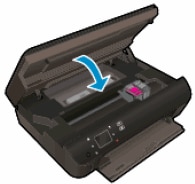
- Close the cartridge access door.Figure : Close the cartridge access door
- Reconnect the power cord to the rear of the printer.
- Press the Power button to turn on the printer.
- Touch OK to clear any messages on the printer control panel.
Step two: Print a Printer Status Report
Print a test page to make sure that the hardware functions correctly.
- Load plain white paper in the input tray, if it is not already loaded.
note:
Make sure that the input tray door remains open while you are printing.Figure : An example of the printer with the input tray door open
- On the printer control panel, touch the Settings icon (
 ), and then touch Tools.
 - Touch Printer Status Report. The printer prints the test page.Figure : Example of a Printer Status Report

- If these steps resolved the issue and the test page prints, you can stop troubleshooting.
- If these steps did not resolve the issue or the test page did not print, continue to the next solution.
Solution two: Remove and reinsert the cartridges
Improper placement or installation of the cartridges can cause the printer to indicate a carriage jam error. Follow these steps to remove, and then reinsert the cartridges.
Step one: Remove and reinsert the cartridges
- Press the Power button to turn the printer on, if it is not already on.
- Open the cartridge access door. The carriage moves to the cartridge access area. Wait until the carriage is idle and silent before continuing.Figure : Open the cartridge access door
- To release the cartridge, lift the lid on the cartridge slot, and then gently push the lid back until it stops.
- Pull up on the cartridge to remove it from the slot.Figure : Remove the cartridge
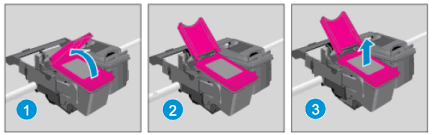
- Lift the lid
- Gently push the lid back
- Pull up on the cartridge
caution:
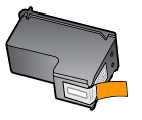
Do not touch the copper-colored contacts or the ink nozzles. Touching these parts can result in clogs, ink failure, and bad electrical connections.Figure : Do not touch the contacts or nozzle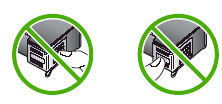
- Remove any protective tape that still might be on the nozzles.Figure : Remove any protective tape that still might be on the nozzles
caution:
Do not try to remove the copper-colored electrical strip. - Hold the cartridge at a slight upward angle with the cartridge contacts facing the rear of the printer, and then slide the cartridge into the empty slot.
- Close the lid on the cartridge slot to secure the cartridge into place.
note:
Insert the color cartridge in the slot on the left. Insert the black cartridge in the slot on the right.Figure : Insert the cartridge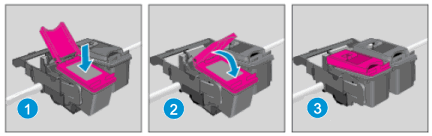
- Insert the cartridge
- Close the lid
- The color cartridge is on the left, and the black cartridge is on the right
- Repeat the previous steps to remove, and then reinsert the other cartridge.
- Close the cartridge access door.Figure : Close the cartridge access door
Step two: Print a Printer Status Report
Print a test page to make sure that the hardware functions correctly.
How to print a Printer Status Report
- Load plain white paper in the tray, if it is not already loaded.
note:
Make sure that the input tray door remains open while you are printing.Figure : An example of the printer with the input tray door open - On the printer control panel, touch the Settings icon (), and then touch Tools.
- Touch Printer Status Report. The printer prints the test page.
- If these steps resolved the issue and the test page prints, you can stop troubleshooting.
- If these steps did not resolve the issue or the test page did not print, continue to the next solution.
Solution three: Plug the printer directly into a wall outlet
Follow these steps to plug the printer directly into a wall outlet, and then print a test page.
- Disconnect the power cord from the rear of the printer.
- Unplug the power cord from any power strips or surge suppressors.
- Plug the power cord directly into an electrical outlet.
- Reconnect the power cord to the rear of the printer.
- Turn on the printer.
Step two: Print a Printer Status Report
Print a test page to make sure that the hardware functions correctly.
How to print a Printer Status Report
- Load plain white paper in the tray, if it is not already loaded.
note:
Make sure that the input tray door remains open while you are printing.Figure : An example of the printer with the input tray door open - On the printer control panel, touch the Settings icon (), and then touch Tools.
- Touch Printer Status Report. The printer prints the test page.
- If these steps resolved the issue and the test page prints, you can stop troubleshooting.
- If these steps did not resolve the issue or the test page did not print, continue to the next solution.
Solution four: Service the printer
Contacting HP for service in all countries/regions except Asia Pacific.
If you completed all the preceding steps and your product still has an issue, service the product.
Check your product warranty to determine if your product is still under warranty, and then go to Contact HP Support to schedule a repair or replacement.
I am an HP Employee
† The opinions expressed above are the personal opinions of the authors, not of HP. By using this site, you accept the Terms of Use and Rules of Participation.


Didn't find what you were looking for?
Ask the community
† The opinions expressed above are the personal opinions of the authors, not of HP. By using this site, you accept the <a href="https://www8.hp.com/us/en/terms-of-use.html" class="udrlinesmall">Terms of Use</a> and <a href="/t5/custom/page/page-id/hp.rulespage" class="udrlinesmall"> Rules of Participation</a>.