-
×InformationNeed Windows 11 help?Check documents on compatibility, FAQs, upgrade information and available fixes.
Windows 11 Support Center.
-
×InformationNeed Windows 11 help?Check documents on compatibility, FAQs, upgrade information and available fixes.
Windows 11 Support Center.
- HP Community
- Printers
- JetAdvantage, Printing Applications and Services
- Cannot sign up for Instant Ink - no code or printer e-mail a...
Create an account on the HP Community to personalize your profile and ask a question
01-30-2019 07:24 AM - edited 01-30-2019 07:27 AM
I cannot sign up for Instant Ink as my printer won't produce a code or its e-mail address.
In Stage 3 of the Instant Ink setup page, you must press the Info and Cancel buttons at the same time on the printer to produce a code. However, the pages printed (as I have tried multiple times thereby wasting ink) do not contain a code. Returning to the webpage instructions, I clicked on 'My page doesn't have a code'. This pop-up tells me to look for the printer's e-mail address printed on the page... but the printed pages don't contain an e-mail either! Ridiculous.
The page that has printed reads:
'Congratulations!
More cool ways to use your web-connected printer
www.hp.com/go/mobile printing
I've searched through the 'Device Information' tab in the HP DJ 2600 (Network) Toolbox for my printer's e-mail. I have also searched the printer's homepage or Embedded Web Server, where all Web Services are on/connected and appear to be working.
01-30-2019 02:22 PM
Hey there! @sottoinsu, Thank you for visiting the HP Support Community! A great place where you can find solutions for your issues, with help from the community!
Don't worry I'll try to help you out.
Did you make any changes to your printer?
Have you turned on the web services?
Have you enrolled your printer to instant ink subscription?
Please share the printer model and operating system you are running on your PC to assist you better.
Diable and enable web services again to the claim code.
Using cancel button and info button provides
Depending on Web Services status, Web Services
Reports provide different instructions to help you turn
on Web Services, set up Web Services, or fix connection
issues, and more.
Turn on the web services on your printer.
Sign up and use the printer claim code to add your printer to HP Instant Ink
-
Go to HP Instant Ink and click Sign Up Now to get started.
-
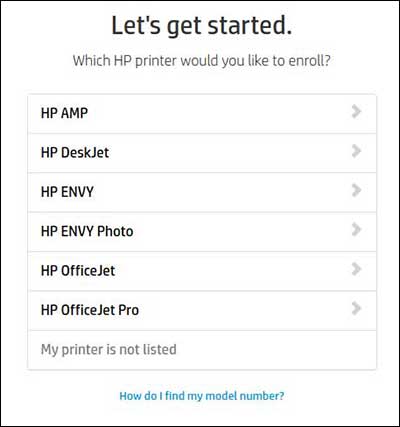
Select your printer from the list.
-
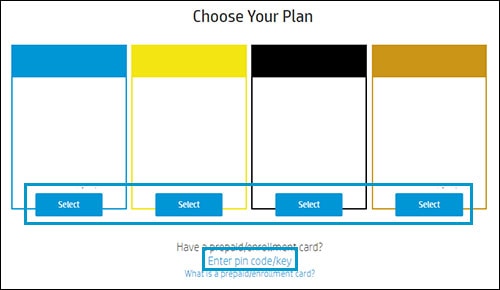
Choose a plan or click Enter pin code/key to enter an enrollment/prepaid key.
-
If you purchased an enrollment card or a prepaid card from a participating retailer, click Enter pin code/key and then type the key found under the scratch-off portion of the enrollment or prepaid card.
Make sure you type the code/pin exactly as it displays on the card, or the enrollment cannot complete.
-
If you have not purchased an enrollment card, select from the available plans.
-
-
Fill in the information to create an HP Connected account, or if you already have one, click Sign In and then Enroll Another Printer on your account page. An HP Connected account is required for HP Instant Ink.
-
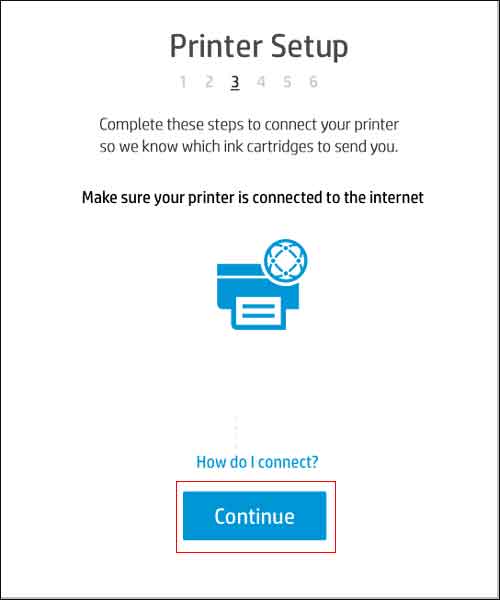
Make sure your printer is connected to the Internet. For help, click How do I connect? When the printer is connected, click Continue.
-
To use HP Instant Ink, Web Services must be turned on. Follow the onscreen instructions for your printer to enable Web Services. If prompted, install any printer firmware updates.
-
After you turn on Web Services, wait for the printer to print an information page containing the printer claim code. After the page prints, click Continue. If the page does not contain a code, click My page doesn't contain a code.
-
Locate the printer claim code on the information sheet.
If the information page lists an email such as abc234vbn3434@hpeprint.com, then the printer claim code is the number and characters before @hpeprint.com. For example, abc234vbn3434 would be the printer claim code.
Deskjet 3630 series: If the page does not contain an email address or printer claim code, follow the instructions on the page to enable Web Services. After you enable Web Services, another page prints with the email address and printer claim code.
-
Type the printer claim code exactly as it is displays on the information page, and then click Apply. If you have trouble with this step, click the 'Having trouble locating or entering your claim code?' link.
Refer this article to know more information about finding printer claim code. Click Here
Refer this article to know more information about enrolling in instant ink. Click Here
Hope this helps!
Have a great day ahead! 🙂
Please click “Accept as Solution” if you feel my post solved your issue, it will help others find the solution.
Click the “Kudos, Thumbs Up" on the bottom right to say “Thanks” for helping!
A4Apollo
I am an HP Employee