• ×
    Information
    Need Windows 11 help?
    Check documents on compatibility, FAQs, upgrade information and available fixes.
    Windows 11 Support Center.
  • post a message
  • ×
    Information
    Need Windows 11 help?
    Check documents on compatibility, FAQs, upgrade information and available fixes.
    Windows 11 Support Center.
  • post a message
Guidelines
Are you having HotKey issues? Click here for tips and tricks.
Check out our WINDOWS 11 Support Center info about: OPTIMIZATION, KNOWN ISSUES, FAQs, VIDEOS AND MORE.
HP Recommended
K8U06PA#ACJ
Microsoft Windows 10 (64-bit)

whenever i insert a disc in my laptop it says insert a disc again instead of showing its contents

1 REPLY 1
HP Recommended

@priyanshi12

Thank you for joining HP Forums. 

This is a great place to get support, find answers to your technical queries.


I understand that the notebook is not detecting the disk, need not worry I'll be glad to assist you.


To provide you with an accurate solution, I'll need a few more details:

Did you try using a different Disk?

Are you facing this issue after an update?

How long are you facing this issue?


However, follow the below steps that could resolve the issue.


Step 1: Checking if the drive is in Device Manager

If the CD/DVD drive of your computer cannot read discs, make sure that the device is listed in Device Manager. To check that the drive is in Device Manager, follow these steps:

  1. In Windows, search for and open Device Manager.

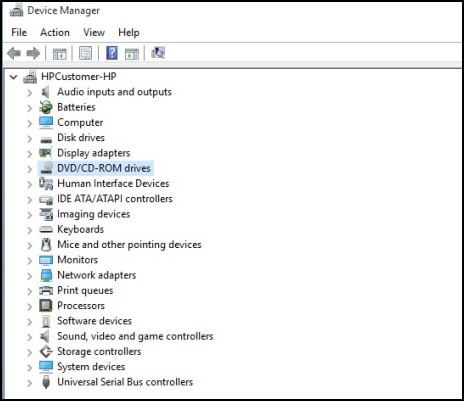
  2. Double-click DVD/CD-ROM drives to expand the category.

    Figure : Device Manager: DVD/CD-ROM drives

    Image of Device Manager window showing location of DVD/CD-ROM drives
  3. If a name for a CD/DVD drive does not appear, or it is listed with errors, close Device Manager and use the HP support document CD/DVD Drive Is Not Detected (Windows 10, 😎 (in English).

    If the CD/DVD drive is listed, make sure AutoPlay is enabled.

Step 2: Making sure AutoPlay is set

If AutoPlay is set to take no action when discs are inserted, or if AutoPlay is not enabled, nothing may happen when a disc is inserted. Even though you may want to open discs through File Explorer or other software means, use the following steps to make sure AutoPlay is enabled so that discs can be more easily tested in future steps:

  1. In Windows, search for and open Control Panel.

  2. Click Hardware and Sound, and then select AutoPlay.

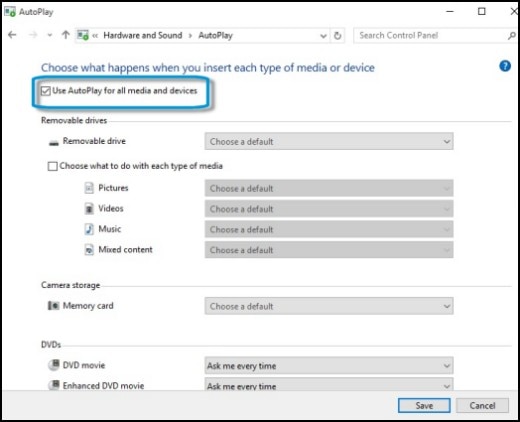
  3. Make sure Use AutoPlay for all media and devices is selected. If not, select it.

    Figure : Use AutoPlay for all media and devices

     Autoplay window, Use AutoPlay for all media and devices selected
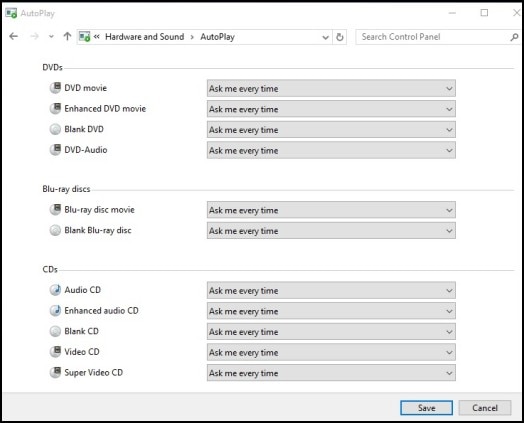
  4. Click the drop-down menus and select Ask me every time next to every DVD, Blu-ray, and CD item, and then click Save.

    Figure : Ask me every time

     AutoPlay window, Ask me every time

Step 3: Checking the discs

Poorly manufactured discs often make it impossible for CD/DVD drives to read the discs. Plastic discs can be easily scratched and the data on the disc can be destroyed if left in the sun. Discs damaged by sun must be replaced. If a disc is scratched, try to clean or repair the disc. Most home electronics stores offer repair and cleaning kits for discs at minimal cost.

   CAUTION:

When using disc repair kits, allow extra drying time beyond that required by the manufacturer. If the liquid from the repair kit has not dried thoroughly, the liquid may come off of the disc when the disc spins up. This can damage the optics inside the drive and make matters much worse.

Use the following steps to help determine if discs or the drive need further attention:

  1. Insert a software CD (like a game or business software) into the CD/DVD drive and note what happens.

    • If an AutoPlay window opens, the drive is able to read the disc. The data stored on the disc may still be bad, but an AutoPlay window proves that the drive can read data on the disc.

    • If nothing happens or the computer stops responding, the laser is unable to read the initial startup information on the disc. Press the eject button to retrieve the disc and unlock the computer.

  2. Try more software CDs to get an idea for how the drive is functioning. Insert at least three more software discs in the same manner. Use discs that are in good condition and are known to work in other drives. Note what happens.

    • If any discs fail to open, set the failed discs aside.

    • If all discs pass, the drive can read the startup data on the discs and the drive is good. Bad data, scratches, or smudges on discs are preventing the drive from reading the data. Repair or replace the bad discs.

  3. Repeat these steps using music CDs and DVDs (if your computer has a DVD drive). Use discs from different manufacturers and recording labels. This can help determine if the drive has a problem reading certain types of disc formats.

  4. Once you have tested several types of discs, try using the failed discs in another drive in another computer to see if they can be read.

    • If the discs fail in another drive on another computer, the discs are probably bad.

    • If the discs can be read in the other computer, continue using these steps to troubleshoot the drive.

Step 4: Reading a disc from a command prompt

If your computer cannot read discs, confirm that the drive can read discs from a command prompt. Use the following steps to test the discs and the drive from a command prompt:

  1. In Windows, search for and open Command Prompt.

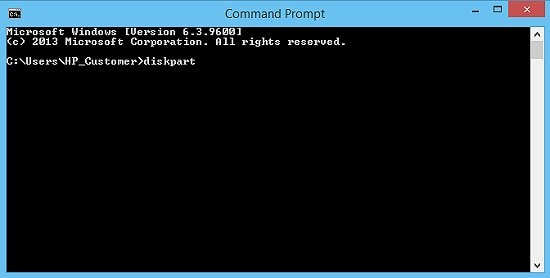
  2. Type diskpart at the command prompt and press Enter.

    If you are prompted for an Administrator password or confirmation, type the password or provide confirmation.

    Figure : Command Prompt: diskpart

    Command Prompt window with diskpart entered
  3. Insert a disc that contains files into the drive that is having the problem. Use a type of disc that is not being recognized in the drive. Good discs to use are game or software discs that were purchased from a store. Do not use music CDs. If the DVD drive can read CDs but not DVDs, insert a DVD movie.

  4. Wait about 20 seconds for the disc to achieve full spin velocity.

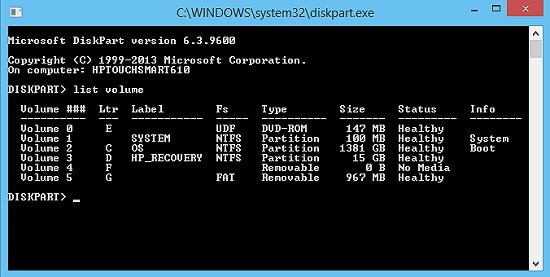
  5. Type list volume at the command prompt.

  6. Press the Enter key and look at the list.

    Under the Ltr column, find and remember the drive letter next to the CD/DVD drive that contains the disc.

    Figure : List Volume

    Volume window
  7. Type Exit and press the Enter key to return to the command prompt.

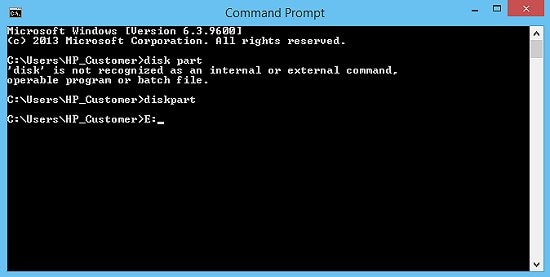
  8. Make sure you type the correct drive letter for the drive that contains the disc, followed by a colon (:). For example, if the drive letter was listed as E in the diskpart list, you would type the following:

    E:

    Figure : Drive letter

    Drive letter entry in Command Prompt
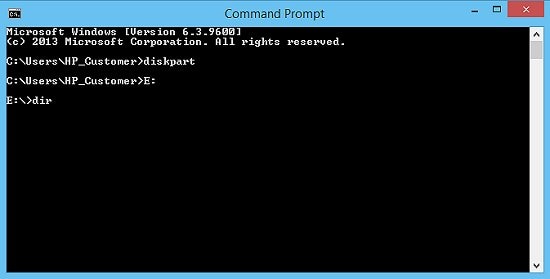
  9. Press the Enter key, and then type the following at the new command prompt:

    dir

    Figure : Drive directory command

    Command Prompt window with drive letter and "dir" command entered
  10. Press the Enter key. A list of files and folders should display on the screen.

  11. Do one of the following tasks depending on what is shown on the screen:

    • If a list of filenames and folders is shown on the screen, the disc data is recognized by the drive. The issue is not likely related to the drive or the disc. It is probably related to the software configuration in Windows. Continue to Step 5: Reinstalling the CD/DVD drive in Device Manager.

    • If the message "device is not ready" is shown, or the screen fails to update after 30 seconds, the disc or the drive may be bad. Repeat these steps with a few other discs of the same type to make sure the problem is not related to the disc. If other discs of the same type cannot be read, skip to Step 8 to test the drive to see if the drive has truly failed.

Step 5: Reinstalling the CD/DVD drive in Device Manager

Use the following steps to remove and reinstall the drive name in Device Manager:

  1. Remove any discs that may be in the drive.

  2. In Windows, search for and open Device Manager.

  3. Double-click DVD/CD-ROM drives.

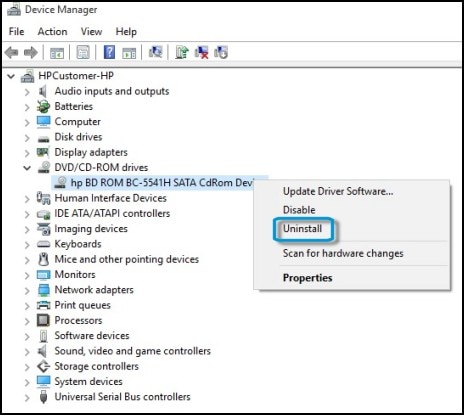
  4. Right-click the drive name and select Uninstall.

    Figure : Uninstall DVD/CD-ROM drive in Device Manager

     Device Manager window, uninstall DVD/CD-ROM drive
  5. Click Yes or OK to remove the drive listing, and then close Device Manager.

  6. Right-click Start, select Shut down or sign out, then select Restart.

    Wait for the computer to restart and boot into Windows.

  7. When Windows opens, the drive is automatically configured, and the listing is restored in Device Manager.

  8. When done, use the CD or DVD drive again to see if it can read discs. If it works, you are done. If it does not work, use the Hardware and Devices troubleshooter.

Step 6: Using the Hardware and Devices troubleshooter

Windows 10 and 8 includes a troubleshooter that checks hardware, such as CD or DVD drives, for problems. Follow these steps to use the Hardware and Devices troubleshooter to check for problems:

  1. In Windows, search for and open Find and Fix Problems.

  2. Under System and Security, click Find and fix problems.

    Figure : Find and fix problems in Control Panel

    Image of Control Panel window, Find and fix problems
  3. Under Hardware and Sound, click Configure a device.

    Figure : Configure a device

    Image showing Troubleshooting window, Configure a device selected

    If you are prompted for an Administrator password or confirmation, type the password or provide confirmation.

  4. Click Next.

  5. Windows checks for problems. If the troubleshooter detects problems, follow the instructions to fix the problem.

Keep me posted, how it goes! 

If the information I've provided was helpful, give us some reinforcement by clicking the Accepted Solution and Kudos buttons, that'll help us and others see that we've got the answers!

Have a great day!

Cheers:)

Raj1788
I am an HP Employee 

† The opinions expressed above are the personal opinions of the authors, not of HP. By using this site, you accept the <a href="https://www8.hp.com/us/en/terms-of-use.html" class="udrlinesmall">Terms of Use</a> and <a href="/t5/custom/page/page-id/hp.rulespage" class="udrlinesmall"> Rules of Participation</a>.