-
×InformationNeed Windows 11 help?Check documents on compatibility, FAQs, upgrade information and available fixes.
Windows 11 Support Center. -
-
×InformationNeed Windows 11 help?Check documents on compatibility, FAQs, upgrade information and available fixes.
Windows 11 Support Center. -
- HP Community
- Notebooks
- Notebook Operating System and Recovery
- TDP ( Intel Dynamic Platform and Thermal ) Settings missing ...

Create an account on the HP Community to personalize your profile and ask a question
Your account also allows you to connect with HP support faster, access a personal dashboard to manage all of your devices in one place, view warranty information, case status and more.
Check out our WINDOWS 11 Support Center info about: OPTIMIZATION, KNOWN ISSUES, FAQs, VIDEOS AND MORE.

It has been a while since anyone has replied. Simply ask a new question if you would like to start the discussion again.
12-07-2018 06:18 AM
 HP Recommended
Product: HP Pavilion -15 - ab032tx
Operating System: Microsoft Windows 10 (64-bit)
Hey..
I recently got my Hard Disk Replaced and so had to clean install everything.
Now.... everthing is working fine....just 1 problem...
HP RECOMMEDED POWER PLAN is missing from power options and in "BALANCED" power option, TDP settings are missing.
I have already updated all the drivers including Intel Dynamic Thermal Framwork and also BIOS.
Still nothing happens.
Without this option, Whenever i play Games for 15 minutes the CPU temperature rises to 100 "C and soon thermal shutdown.
I changed MAX Processor state to 99% but now the game always lags in intervals as Processor slows down to reduce temperature.
SO ... How to add TDP or HP RECOMMENDED POWER PLAN...?
11 REPLIES 11
12-08-2018 11:36 AM
HP Recommended
Welcome to HP Forums,
This is a great place to get support, find answers and tips,
Thank you for posting your query, I'll be more than glad to help you out 🙂
I see that computer shut down unexpectedly while playing games,
Don't worry as I'll be glad to help, however, to provide an accurate resolution, I need a few more details:
- How did you reinstall Windows (Retail version or HP Recovery Media)?
- Where did you purchase the hard drive from?
- Are you getting any error message before your notebook shut down?
- Does this happen with other applications or games?
- Have you tried playing the game in the Windows Game Mode?
To launch Windows Game Mode, press Windows key + G.
Keep me posted for further assistance.
ECHO_LAKE
I am an HP Employee
12-09-2018 07:13 AM
HP Recommended
Hey.... The answers :
1. I installed retail Windows on a new HDD bought from HP Official Store.
2. No message is displayed before Laptop shut downs.... I measured the temperature using different softwares while gaming and its always reaches to 102 "C and soon laptop shuts down.
3. It only happens while gaming.
4.Yes, i tried both Game Mode ON and Game Mode OFF.
12-09-2018 08:13 AM
HP Recommended
@Mohit58
Thank you for posting back.
As you've mentioned the computer temperature reaches higher while playing games this means The CPU and the Graphics Processing Unit all are working at the same time as a result of high power consumption and the higher power consumption means higher heat production in the components. Gaming can result in higher temperatures, especially as they often require most of GPUs and also, the Hard drive can contribute to heat generation.
Hope this helps! Keep me posted for further assistance.
ECHO_LAKE
I am an HP Employee
12-09-2018 09:16 AM
HP Recommended
Thanks 4 the info.... BUT THIS IS NOT THE CASE..
Before replacing my hard drive.... The max CPU temperature was around 75 "C while gaming.... But now it goes to 102 "C...!
Leading to thermal shutdown.
It may be because of HP Recommended Power Plan which was present before but now due to clean install it is removed.
HP Recommended Power plan also contained TDP Settings ( Intel Dynamic and Thermal Framework ) which helped in controlling CPU temperature....
But now there is no such option in BALANCED Power Plan...
I have already Updated Intel Dynamic and Thermal Framwork but still no luck...
So please Provide a link for HP RECOMMENDED POWER PLAN.
12-09-2018 10:23 AM - edited 12-09-2018 10:28 AM
HP Recommended
@Mohit58
Thank you for posting back.
The HP Power Plan Utility can be used to change the power settings. It will also display a message if you made any changes using the standard Windows power options controls.
Click Here HP Power Plan Utility.
Keep me posted for further assistance.
ECHO_LAKE
I am an HP Employee
12-10-2018 03:33 AM
HP Recommended
Hey....
HP Power plan Utility isn't installed in my laptop as i clean install my windows...
Further HP POWER PLAN UTILITY was available in older models and has been since removed from new models...
WHAT I WaNT IS THIS :

12-10-2018 09:50 AM
HP Recommended
Thank you for posting back.
I appreciate your efforts to try and resolve the issue. Let's try to create Custom Power Plan in Power Options and check.
- Right, click or press and hold on the Power icon in the notification area, click/tap on Power options.
- Open the Control Panel (icons view), click/tap on the Power Options icon.
- Open the Win+X Quick Link menu, click/tap on Power Options, click/tap on the Additional power settings.
- Click/tap on the Create a power plan link on the left side. (see screenshot below)
- Select (dot) an existing power plan to create the new custom plan on, type in a plan name you want, and click/tap on Next.
- Click/tap on Create.
- Your new custom power plan is now your current active plan. Click/tap on Change plan settings to make any changes you want to the new custom power plan.
Hope this helps! Keep me posted for further assistance.
ECHO_LAKE
I am an HP Employee
12-11-2018 03:13 AM
HP Recommended
I have already tried this and it can just create 3 different power plans --> Balanced , High Performance and Power Saver...
What is want is the missing Intel Dynamic and thermal Control option as already shown in the pic...

12-11-2018 03:40 PM
HP Recommended
@Mohit58
Thank for the posting back.
I appreciate your efforts to try and resolve the issue.
Let's try updating the system bios and check:
-
Turn on the original computer with the issue, and then immediately press the Esc key repeatedly until the Startup Menu opens.
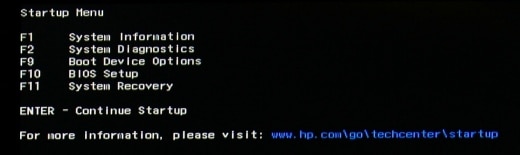
-
Press the F1 key to open System Information.
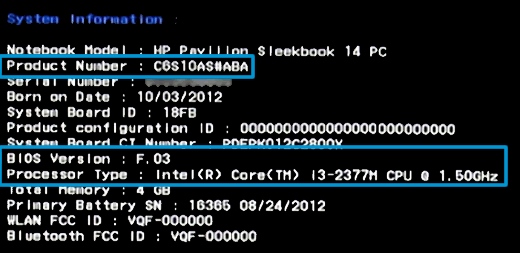
-
Write down the Product Number, BIOS Version number, and Processor Type.
Step 2: Set up the BIOS update on a USB flash drive
Use a second computer with Internet access to create a BIOS recovery USB flash drive.
-
Insert a blank USB flash drive into an available port on the second computer.
-
Go to HP Software & Driver Downloads and enter the product number of the original computer.
-
Look through the available software for BIOS, click it, and then confirm it is a higher version number and it is for your processor type.
-
If the update is correct, click Download, and then click Run.
-
If the update is not correct, view details of other BIOS updates in the list. If there are no other updates, the computer does not require a BIOS update.
-
If BIOS is not in the list of available software, an update is currently unavailable.
-
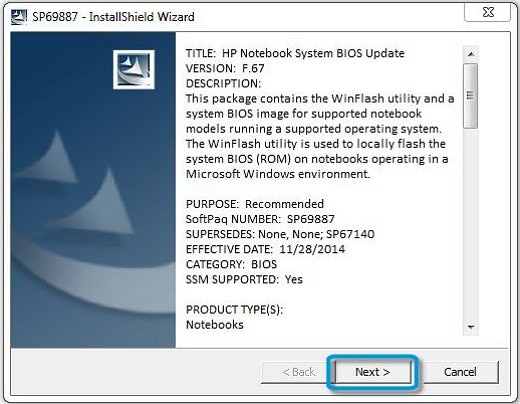
-
In the InstallShield Wizard window, click Next.
-
Select I accept the terms in the license agreement, and then click Next.
-
In the License to Save Files window, click Change, select the USB flash drive, click OK, and then click Next. The HP System BIOS Update Utility opens.
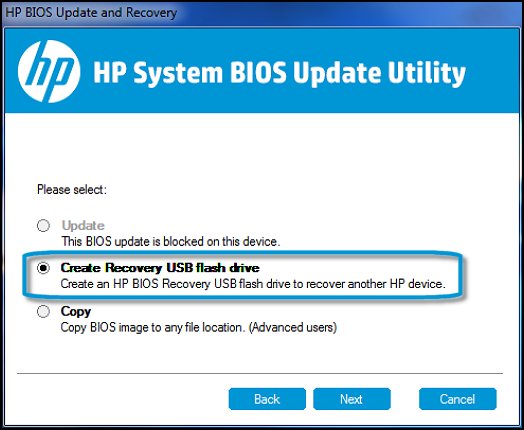
-
Click Next, select Create Recovery USB flash drive, and then click Next.
-
Select your USB flash drive, and then click Next.
-
Wait while the BIOS files copy to the drive.
-
When 'The recovery flash drive was created successfully' displays, click Finish.
-
Click Cancel to close the update utility.
Step 3: Get the System Board ID
Get the System Board ID on the original computer to identify the correct BIOS file to install.
-
Turn on the original computer, and then immediately press the F10 key repeatedly until the BIOS settings menu opens.
NOTE: For some computers, press the F2 or F6 key to open the menu.
-
Click the Main tab, and then write down the System Board ID.

-
Press the F10 key to exit BIOS, and then shut down the computer.
Step 4: Update the BIOS
Use the Hardware Diagnostics UEFI on the original computer to update the BIOS.
-
Turn on the original computer, and then immediately press the Esc key repeatedly, about once every second, until the Startup Menu opens.
-
Press the F2 key to open the Hardware Diagnostics UEFI menu.
-
Make sure the power cord is connected to the notebook. Keep it connected during the BIOS update process.
-
Insert the USB flash drive that contains the BIOS update into an available USB port on the notebook.
-
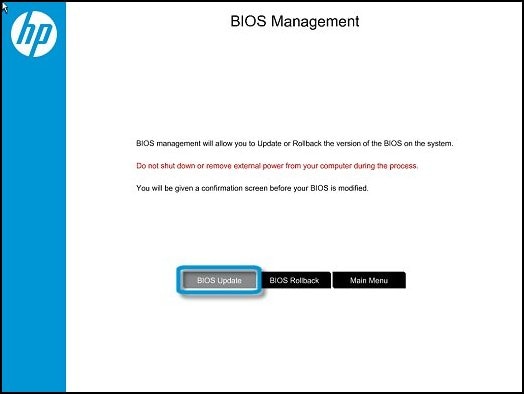
Click Firmware Management or BIOS Management.
-
Click BIOS Update.
-
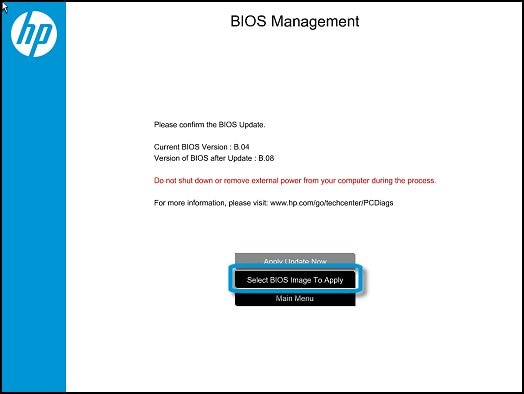
Click Select BIOS Image To Apply.
-
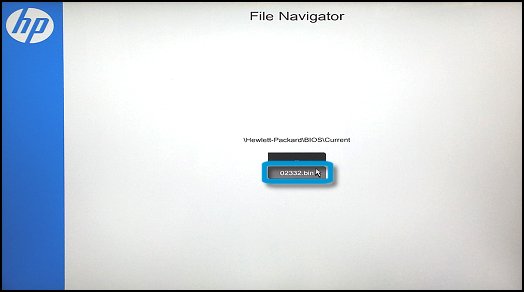
Click HP_TOOLS, and then click HEWLETT_PACKARD.
-
Browse to the BIOS image. The file is in the BIOSUpdate, CURRENT, NEW, or PREVIOUS folder.
-
Select the BIOS update file that matches the System Board ID. The ID has a "0" before the board ID (Example: 02291.bin).
-
Click Apply Update Now. Type the administrator password if prompted.
Keep me posted for further assistance.
ECHO_LAKE
I am an HP Employee
Be alert for scammers posting fake support phone numbers and/or email addresses on the community.
If you think you have received a fake HP Support message, please report it to us by clicking on "Flag Post".
† The opinions expressed above are the personal opinions of the authors, not of HP. By using this site, you accept the Terms of Use and Rules of Participation.


Didn't find what you were looking for?
Ask the community
† The opinions expressed above are the personal opinions of the authors, not of HP. By using this site, you accept the <a href="https://www8.hp.com/us/en/terms-of-use.html" class="udrlinesmall">Terms of Use</a> and <a href="/t5/custom/page/page-id/hp.rulespage" class="udrlinesmall"> Rules of Participation</a>.