-
×InformationNeed Windows 11 help?Check documents on compatibility, FAQs, upgrade information and available fixes.
Windows 11 Support Center. -
-
×InformationNeed Windows 11 help?Check documents on compatibility, FAQs, upgrade information and available fixes.
Windows 11 Support Center. -
- HP Community
- Notebooks
- Notebook Video, Display and Touch
- Laptop power on but no display

Create an account on the HP Community to personalize your profile and ask a question
08-05-2020 03:33 AM
Hi @Santosh22,
I'd like to help with your computer issue.
I suggest you try below steps for no display issue-
Step 1: Performing a hard reset
Resetting the computer can resolve many issues that cause a blank screen. Go to How to Power Reset Your Laptop for detailed steps to reset your notebook.
Continue to the next step if a hard reset did not resolve the issue.
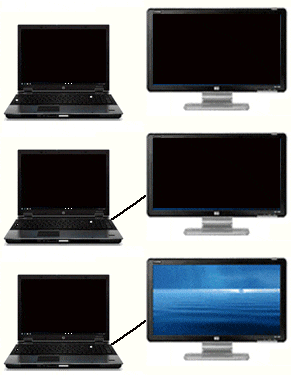
Step 2: Connecting an external monitor to test the display
The screen might remain black when there is a corrupted graphics driver or a problem with the LCD display back light. To test the display, attach an external monitor and restart the computer. This test is helpful if the display is black but you can hear that the computer is operating.

-
Connect an external monitor to the notebook. For instructions, see Connecting a Monitor, Projector, or TV (Windows 10, 😎.
-
If the computer screen does not display on the external monitor, press F4 (or the key with this symbol
 ) until the screen image displays.
 -
If an image displays on the external monitor, there might be a graphics driver conflict with the notebook LCD display. With the external monitor connected, go to HP Customer Support - Software and Driver Downloads. Download and install the latest graphics and chipset drivers for your specific computer. If an updated BIOS version is available, see Updating the BIOS for steps to install it.
-
If the screen is still black after updating the chipset and graphics drivers and BIOS, the LCD might be defective. Contact HP for technical assistance or send the notebook for service.
-
If you can hear sounds of operation but no image is visible on either display, go to the next step.
Step 3: Recovering the notebook BIOS using a key press combination
When you upgrade the BIOS on your notebook, your hard drive stores a copy of the previous BIOS version. As long as the hard drive remains functional, you can recover and install the last good version of the BIOS.
Use these steps even if you cannot see anything on the monitor:
-
Turn off the computer.
-
Connect the notebook to a power source using the power adapter.
- Press and hold the Windows key
 and the B key at the same time while the computer is off.
 -
While still pressing both keys, hold down the Power button for one second, and then release the Power button and the keys.
The power LED light remains on, and the screen remains blank for about 40 seconds. You might hear beeping sounds. Afterwards, an HP BIOS Update screen displays, and the BIOS update begins.
If recovering the BIOS did not resolve the blank screen problem, continue to the next step.
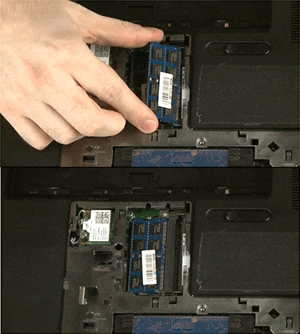
Step 4: Reseating the memory modules
A loose memory module might cause your notebook to fail to start. To fix this, take the memory module out of the memory slot and then reseat it.
See your User Guide or Service and Maintenance Guide for the location of memory modules on your notebook.
NOTE:Removing and reseating memory modules requires the use of tools to partially disassemble the computer. If necessary, take the computer to an HP authorized service provider for technical service.
Use the following steps to remove and reseat the memory modules:
-
Turn off the computer, and then disconnect the power cord.
CAUTION:
Electrostatic discharge (ESD) can damage electronic components. Before beginning any procedure, touch a grounded metal object to discharge static electricity.
-
Remove the cover to access the memory.
Your computer might look different than the computer in the graphic.
NOTE:
Some computers might not have a cover that provides access to the memory. Have the computer serviced if you cannot access the memory.

-
Retention screws (2)
-
Direction to remove compartment cover
-
-
Remove memory modules in the computer.

-
Reinsert all memory modules.
-
Notch alignment
-
Direction to insert the module
-
Direction to seat module
-
-
Replace the cover, battery, and power cord.
-
Turn on the computer.
-
Perform any tests to verify that the computer can start up and run in the Windows operating system.
If the computer fails to boot to the Windows desktop, contact HP for support
Hope this helps! Let me know how this goes!
And, Welcome to the HP Support Community.
Please click “Accept as Solution” if you feel my post solved your issue, it will help others find the solution.
Click the “Kudos, Thumbs Up" on the bottom right to say “Thanks” for helping
