-
×InformationNeed Windows 11 help?Check documents on compatibility, FAQs, upgrade information and available fixes.
Windows 11 Support Center. -
-
×InformationNeed Windows 11 help?Check documents on compatibility, FAQs, upgrade information and available fixes.
Windows 11 Support Center. -
- HP Community
- Archived Topics
- Notebooks Archive
- How to change system language to English?

Create an account on the HP Community to personalize your profile and ask a question
Your account also allows you to connect with HP support faster, access a personal dashboard to manage all of your devices in one place, view warranty information, case status and more.

12-27-2016 06:43 AM
Product: HP Pavilion - 15-p213nk
Operating System: Microsoft Windows 8.1 (64-bit)
Hello
I know that this may seems out of topic since it's not related to HP, but my system language is Ukranian and I want to change it back to English.
Thank you
1 REPLY 1
12-27-2016 07:34 AM
@revolutionbig wrote:Hello
I know that this may seems out of topic since it's not related to HP, but my system language is Ukranian and I want to change it back to English.
Thank you
Hi,
Can you check if you could follow the steps below?
http://support.hp.com/us-en/document/c03471369
HP PCs - Changing Languages (Windows 😎
This document pertains to HP and Compaq computers and tablets with Windows 8.
The language on an HP computer is part of the product design. For the best computing experience, purchase a computer that matches your primary language. If you already have a computer that does not match your primary language and you cannot find or install a Language Pack, you might be able to install a new full version of Windows that matches your primary language.
caution:If you change the language and then contact HP Support, HP might not be able to help if the language is different than the language that shipped with the product. The language is part of the product design, and HP support services are set up to match the design of the product.
In Windows 8, you can change the display language in apps, settings, menus, and other areas in Windows. People sharing a computer can each select different display languages for their user accounts, or one person can add multiple languages to one user account and switch between them.
note:Installing multiple language packs might affect how much hard disk space is available, as well as system performance. Install only the language packs you will use.
Finding and installing a language pack
Over a hundred languages are listed in the Language section in Control Panel. Many of the languages have a number of dialects, which are called regional variants in Windows. If you add a language but find that no language pack is available for download, check periodically to see if Microsoft has created a language pack for the language you want.
Follow the steps below to change languages or install additional languages.
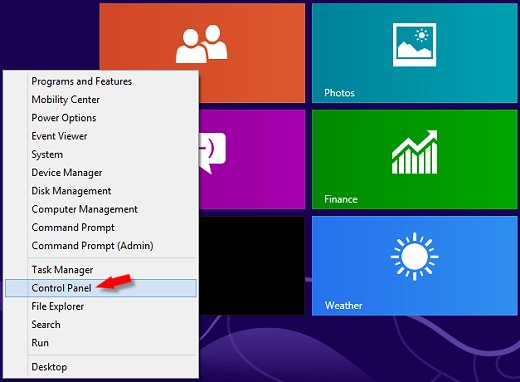
- Move the mouse pointer to the lower left corner of the screen, right-click, and select Control Panel from the menu.Figure : Control panel
- Under Clock, Language, and Region, click Add a language.Figure : Clock, Language, and Region
- In the Language window, click the Add a language button.Figure : Language window
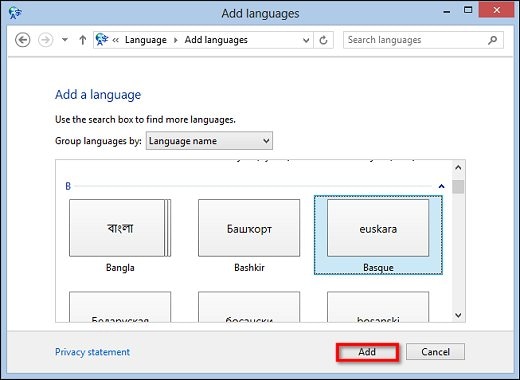
- On the Add languages window, scroll down to find the language you want.
- Select the language: If the language has no regional variants, click Add.Figure : Language with no regional variants
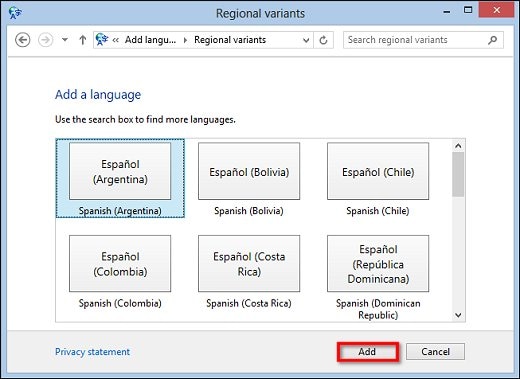
- If the language has multiple regional variants, click Open, select the regional variant you want, and then click Add.Figure : Language that has regional variantsThe Language window reopens with the new language on the list.
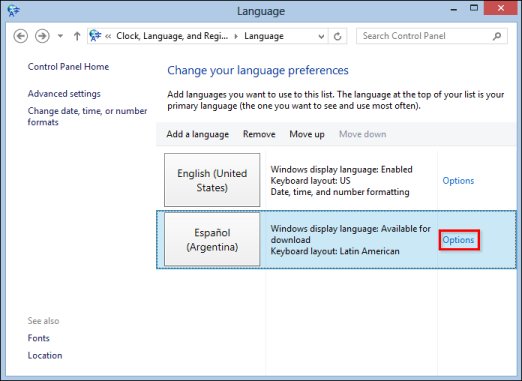
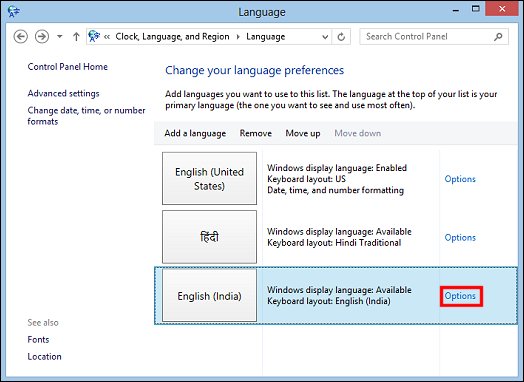
- Click Options next to the language you are adding.Figure : Options for adding languagesThe Language options window opens with any available language packs listed under Windows display language.
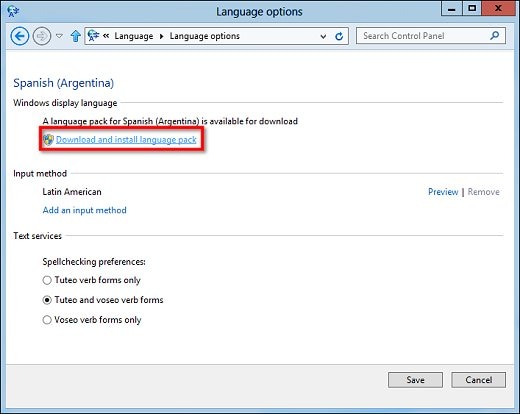
- If a language pack is available, click Download and install language pack.Figure : Language pack available for download
- If prompted, sign in as an administrator.
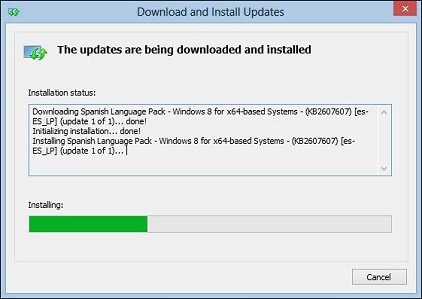
- When prompted, click Yes to allow Microsoft Windows Language Pack Installer to make changes to the computer.The language pack begins to install. This might take several minutes.Figure : Language pack installationThe new language is available to everyone who shares the computer.
Changing the display language
Once the language pack has downloaded, you can switch between display languages.
- Sign in to your user account.
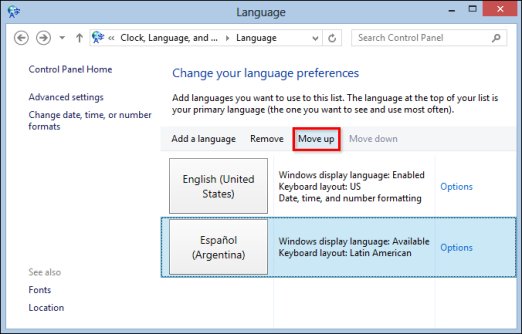
- In the Language window, select the language you want to set as a primary language and click Move up until the language is at the top of the list.Figure : Display language preference
- Restart the computer.
- Log in to your account.The computer restarts with the new display language appearing in apps, settings, menus, and other areas in Windows.
- To switch between languages, open the Language window, move the desired language to the top of the list, and then restart the computer.Other people using the computer can choose different primary display languages by signing in to their accounts, following the steps in Finding and installing a language pack, and then following the steps in this section.
Changing the keyboard language
Once a language is on the language list, an appropriate input method is automatically added. You can add input methods in other languages or select a different keyboard layout.
- Move the mouse pointer to the lower left corner of the screen, right-click, and select Control Panel from the menu.
- Under Clock, Language, and Region, click Change input methods.Figure : Clock, Language, and RegionThe Language window opens.
- To add a new keyboard layout, click Options next to the language.Figure : Options for adding input methods
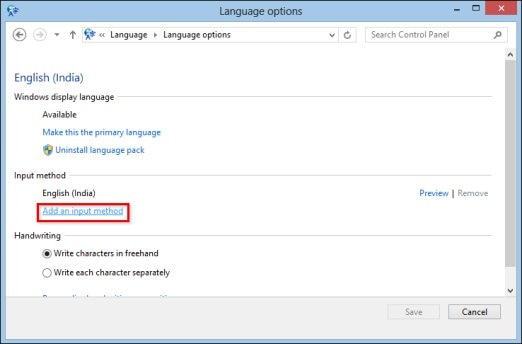
- On the Language options window, click Add an input method.Figure : Add an input method in Language options
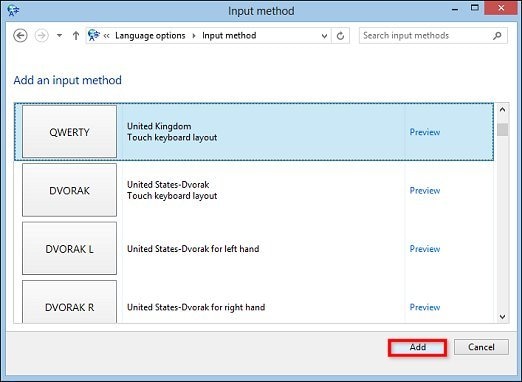
- On the Input method window, select the desired keyboard language and layout from the list, and then click Add.Figure : Keyboard language and layout
- On the Language options window, click Save.Once you've chosen keyboard languages, you can switch between keyboards by pressing the Windows
+ SPACE BAR keys.
note:
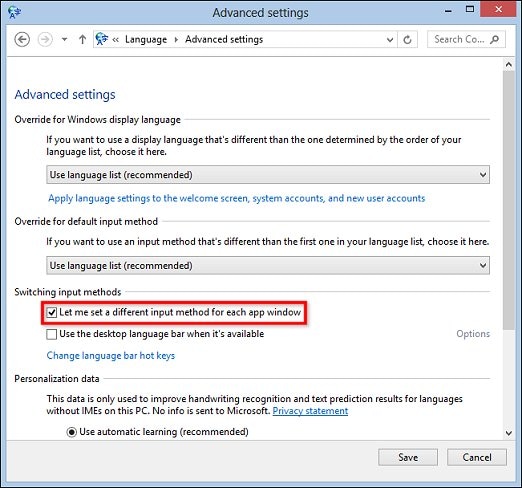
Switching between keyboards only changes the language of the input. Follow the steps in Changing the display language to change the display language for apps, settings, menus, and other areas in Windows. - If you would like each app to utilize a specific keyboard, in the Language window, click Advanced settings.
- Under Switching input methods, select the check box next to Let me set a different input method for each app window.Figure : Input methods for individual apps
- Click Save.
Applying the display language to more areas of Windows
Apply the language you installed to the Welcome screen and other accounts.
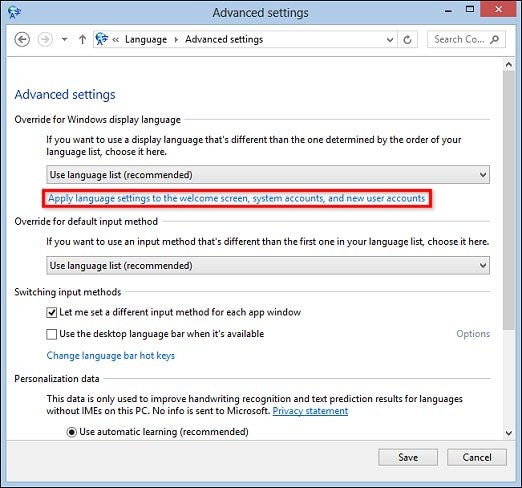
- From the Language window, click Advanced settings.
- Click Apply language settings to the welcome screen, system accounts, and new user accounts.Figure : Language Advanced settingsThe Region window opens.
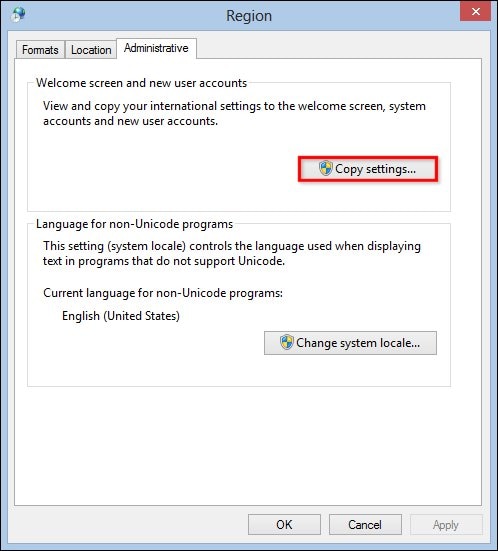
- On the Administrative tab, click the Copy settings button.Figure : Copy settings in Region window
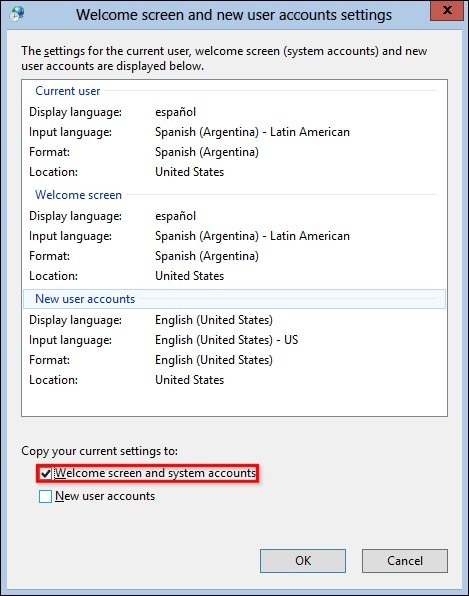
- On the Welcome screen and new user accounts settings window, select the check box next to Welcome screen and system accounts to apply your display language choice to the Welcome screen and system accounts.Figure : Welcome screen settings
- If that is the only change you want to make, click OK.
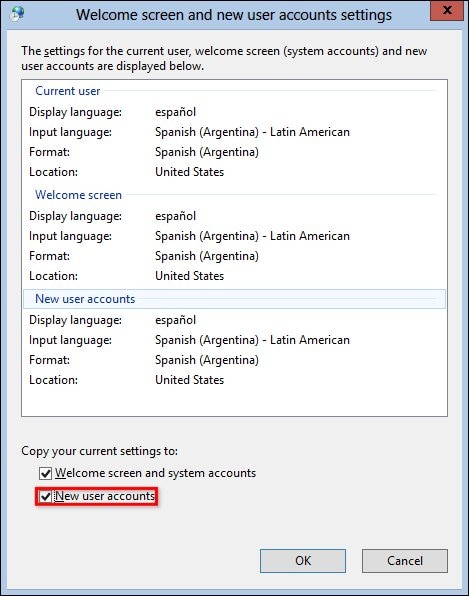
- If you also want to apply your display language choice to all new user accounts, select the check box next to New user accounts.Figure : New user accounts settings
- Click OK on Welcome screen and new user accounts settings window.
- Click OK on the Region window.
- If prompted, click Restart.
Uninstalling language packs
Installing multiple language packs might affect how much hard disk space is available, as well as system performance. Follow the steps below to uninstall an unneeded language pack.
- Move the mouse pointer to the lower left corner of the screen, right-click, and select Control Panel from the menu.The Control Panel window opens.
- Under Clock, Language, and Region, click Add a language.The Language window opens.
- Click Options next to the language you are uninstalling.The Language options window opens.
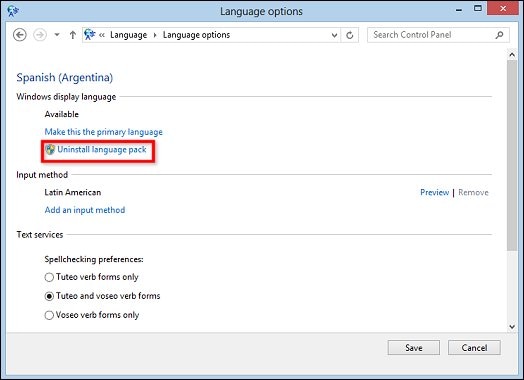
- On the Language options window, click Uninstall language pack.Figure : Language options window
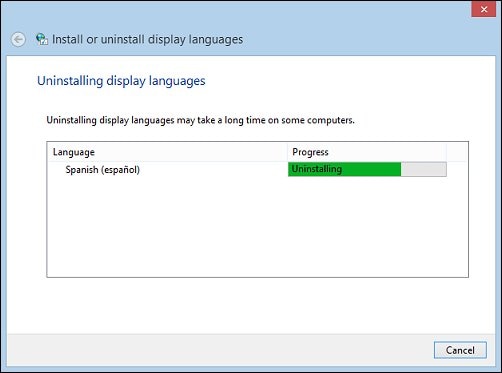
- The Install or uninstall display languages window opens and Windows begins uninstalling the language. This might take several minutes.Figure : Uninstall display languages
- Once the language has finished uninstalling, click Restart now when prompted.The computer restarts.
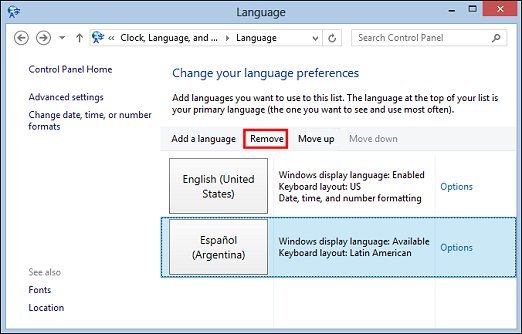
- On the Language window, select the language from the list, and then click Remove.Figure : Remove a language from a list of language preferences
- If prompted, click Restart.
- Open the Language window, and click Advanced settings.
- Click Apply language settings to the welcome screen, system accounts, and new user accounts.The Region window opens.
- On the Administrative tab, click the Copy settings button.
- On the Welcome screen and new user accounts settings window, select the check boxes next to Welcome screen and system accounts and New user accounts.
- Click OK on Welcome screen and new user accounts settings window.
- Click OK on the Region window.
- If prompted, click Restart.
- The language and all associated input methods are now removed from the user account.
Regards,
Norman
"Education costs money; so does Ignorance"
If my post has helped you, click the Kudos Thumbs up!
If it solved your issue, Click the "Accept as Solution" button so others can benefit from the question you asked!
If my post has helped you, click the Kudos Thumbs up!
If it solved your issue, Click the "Accept as Solution" button so others can benefit from the question you asked!

† The opinions expressed above are the personal opinions of the authors, not of HP. By using this site, you accept the Terms of Use and Rules of Participation.
Didn't find what you were looking for?
Ask the community
† The opinions expressed above are the personal opinions of the authors, not of HP. By using this site, you accept the <a href="https://www8.hp.com/us/en/terms-of-use.html" class="udrlinesmall">Terms of Use</a> and <a href="/t5/custom/page/page-id/hp.rulespage" class="udrlinesmall"> Rules of Participation</a>.