• ×
    Information
    Need Windows 11 help?
    Check documents on compatibility, FAQs, upgrade information and available fixes.
    Windows 11 Support Center.
  • post a message
  • ×
    Information
    Need Windows 11 help?
    Check documents on compatibility, FAQs, upgrade information and available fixes.
    Windows 11 Support Center.
  • post a message
Guidelines
We have new content about printers, Click here to check it out!
HP Recommended
HP ENVY 4525 All-in-One Printer
Microsoft Windows 10 (64-bit)

I have a paper jam problem, I have made all possible attempts, but I cannot resolve it, keep giving me the error.
Can you help me?

1 REPLY 1
HP Recommended

@Marcolori


Welcome to the HP support community.


I understand that you are getting a paper jam error, I am glad to assist you.

Make sure the carriage can move freely

  • Make sure the carriage moves freely across the width of the printer.
  • Turn on the printer, if it is not already on.
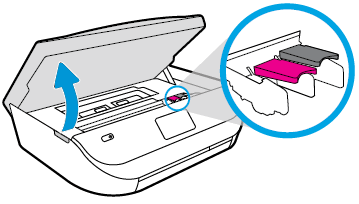
  • Gently grasp the handles on either side of the printer, and then raise the ink cartridge access door until it locks into place.
  • The carriage moves to the center of the printer.
  • Image: Opening the ink cartridge access door.
  • Wait until the carriage is idle and silent before you continue.
  • With the printer turned on, disconnect the power cord from the rear of the printer.
  • Use a flashlight to check for any paper or objects that might be restricting the carriage, and then remove any paper or objects that you find.
  •   CAUTION: If the paper tears when you remove it from the rollers, check the rollers and wheels for torn pieces of paper that might remain inside the printer. If pieces of paper remain in the printer, more paper jams can occur.
  • Reach inside the printer through the ink cartridge access door, and then manually move the carriage.
  • If the carriage is stuck on the right side of the printer, move the carriage to the left side of the printer.
  • If the carriage is stuck on the left side of the printer, move the carriage to the right side of the printer.
  • If the carriage is stuck in the middle of the printer, move the carriage to the right side of the printer.
  • Remove any paper or obstructions found.
  • Make sure the carriage can move freely across the width of the printer. Firmly push the carriage to the left side of the printer, and then push it to the right side.
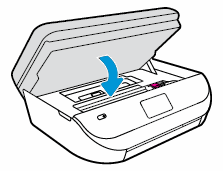
  • Close the ink cartridge access door.
  • Image: Closing the ink cartridge access door.
  • Reconnect the power cord to the rear of the printer, and then turn on the printer.

Manually clean the paper feed rollers

  • Dust, paper fiber, and other debris might accumulate on the paper feed rollers and cause paper jams and paper feed issues. Clean the rollers inside the printer, and then try to print again.
  • Gently grasp the handles on either side of the printer, and then raise the ink cartridge access door until it locks into place.
  • The carriage moves to the center of the printer.
  • Image: Opening the ink cartridge access door.
  • Wait until the carriage is idle and silent before you proceed.
  • Turn off the printer.
  • Disconnect the power cord from the rear of the printer.
  • Disconnect the USB cable, if it is not already disconnected.
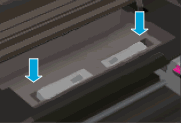
  • Locate the paper path cover in the area behind the ink cartridge access area.
  • Image: Example of the paper path cover.
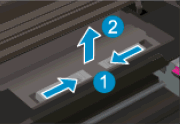
  • To remove the paper path cover, pinch the tabs together, and then lift up.
  • Image: Removing the paper path cover.
  1. Pinch the tabs together
  2. Lift up
  • Lightly dampen a lint-free cloth with distilled water, and then squeeze any excess liquid from the cloth.
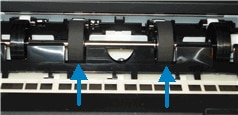
  • Press the cloth against the rollers inside the printer, and then rotate them upward with your fingers.
  • Apply a moderate amount of pressure to remove dust or dirt buildup.
  • Image: Example of  rollers inside the printer
  • Allow the rollers to dry completely (approximately 10 minutes).
  • Replace the paper path cover.
  • Image: Replacing the paper path cover.
  • Close the ink cartridge access door.
  • Reconnect the power cord to the rear of the printer, and then turn on the printer.
  • Reconnect the USB cable to the printer if necessary.

Refer to this HP document for further assistance:- Click here


Keep me posted.

If this helps, please mark the public post as an accepted solution so that it benefits several others. 

Cheers.

Sandytechy20
I am an HP Employee

† The opinions expressed above are the personal opinions of the authors, not of HP. By using this site, you accept the <a href="https://www8.hp.com/us/en/terms-of-use.html" class="udrlinesmall">Terms of Use</a> and <a href="/t5/custom/page/page-id/hp.rulespage" class="udrlinesmall"> Rules of Participation</a>.