-
×InformationHP Solution Center Adobe Flash player error
Please check this document to find the workaround solution for Print and Scan - HP Solution Center doesn't open
InformationFix Windows 10 Update IssuesResolve Windows 10 or update issues on HP computer or printer– Click Here
-
-
×InformationHP Solution Center Adobe Flash player error
Please check this document to find the workaround solution for Print and Scan - HP Solution Center doesn't open
InformationFix Windows 10 Update IssuesResolve Windows 10 or update issues on HP computer or printer– Click Here
-
- HP Community
- >
- Printers
- >
- Printer Paper Jams & Feed Issues
- >
- papet does not feed
- Subscribe to RSS Feed
- Mark Topic as New
- Mark Topic as Read
- Float this Topic for Current User
- Bookmark
- Subscribe
- Mute
- Printer Friendly Page

papet does not feed
10-19-2020 01:24 PM

- Mark as New
- Bookmark
- Subscribe
- Subscribe to RSS Feed
- Permalink
- Email to a Friend
- Flag Post
error message said load paper even do the paper is loaded
10-22-2020 03:55 PM

- Mark as New
- Bookmark
- Subscribe
- Subscribe to RSS Feed
- Permalink
- Email to a Friend
- Flag Post
@MikeWRS Welcome to HP Community!
I understand that the printer will not feed the paper.
Please perform the below steps.
Solution one: Reset the All-in-One
-
Disconnect the power cord from the back of the product.
-
Wait 30 seconds.
-
Reconnect the power cord to the back of the product.
-
Press the Power button (
) to turn on the product.
-
Try to print a self-test report. See the steps on how to print a self-test report at the top of this document.
-
If these steps resolved the issue, and the test page prints, there is no need to continue troubleshooting.
-
If the issue persists, continue with the next solution.
-
If the test page does not print, continue with the next solution.
Solution two: Check the paper
The condition of the paper or the amount of paper loaded might prevent the rollers from picking it up and feeding it through the product. Use the following steps to check the paper in the input tray.
-
Remove any wrinkled or damaged paper from the input tray.
-
Make sure that all the paper is the same size and type.
-
Tap the stack of paper on a flat surface to align the edges.
- Make sure that the stack of paper contains from 10 to 25 sheets of paper.
note:
Do not overload the input tray. Make sure the stack of paper is shorter than the top of the paper width guide.
-
Insert the stack of paper into the product, and then gently push the paper width guide snugly against the paper.
Figure : Load paper
-
Load paper
-
Adjust the paper width guide
-
-
Try to print a self-test report. See the steps on how to print a self-test report at the top of this document.
-
If these steps resolved the issue, and the test page prints, there is no need to continue troubleshooting.
-
If the issue persists, continue with the next solution.
-
If the test page does not print, continue with the next solution.
Solution three: Check the print settings
The paper settings in the print driver must match the paper size and type loaded in the product. Use the following instructions to adjust the paper settings.
-
In the software program you are printing from, click File.
- Click Print, and then click Setup, Properties, or Preferences.
note:
The specific options might vary depending on the software program.
-
Click the Features tab.
-
In the Basic Options pane, select More from the Paper sizes drop-down list.
-
Select the size of paper loaded in the product, and then click OK.
-
In the Basic Options pane, select More from the Paper type drop-down list.
- Select the type of paper that you loaded, and then click OK.
note:
These changes do not change the default print settings. The print settings revert to the default settings the next time you open the program.
-
Change any other print settings necessary, and then click OK.
-
Click OK to print.
-
Try to print a self-test report. See the steps on how to print a self-test report at the top of this document.
-
If these steps resolved the issue, and the test page prints, there is no need to continue troubleshooting.
-
If the issue persists, continue with the next solution.
-
If the test page does not print, continue with the next solution.
Solution four: Clean the rollers
Follow these steps to clean the rear rollers and the pick rollers on the HP product.
Step One: Clean the rear rollers
-
Press the Power button (
) to turn off the product.
-
Disconnect the power cord from the rear of the product.
-
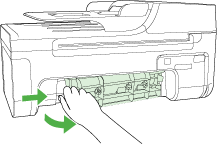
Remove the rear access door. Press in the tab on the left side of the door, and then pull the door away from the product.
Figure : Remove the rear access door
-
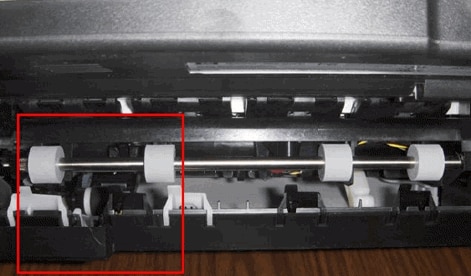
Lightly moisten a lint-free cloth with distilled or bottled water, and then wipe the paper rollers. Rotate the rollers with your fingers to clean all the way around.
Figure : Clean the rollers
-
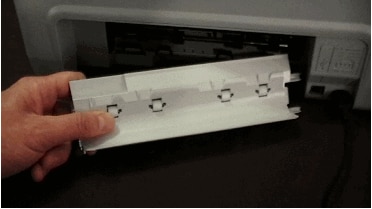
Make sure that the paper feed rollers on the rear access door are clean, free of paper bits, and rotate freely.
Figure : Access door rollers
-
Allow the rollers to dry completely.
-
Reattach the rear access door. Push the door forward until it snaps into place.
Step two: Clean the pick roller
-
Remove any paper from the paper tray.
-
Remove the rear access door. Press in the tab on the left side of the door, and then pull the door away from the product.
Figure : Remove the rear access door
Figure : Rear rollers and location of pick roller
-
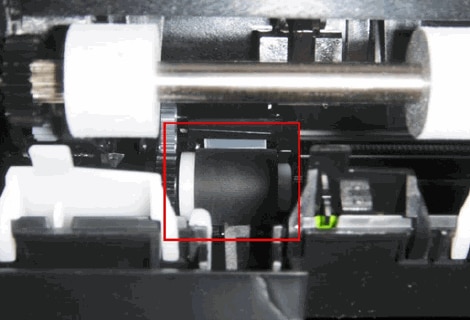
Lightly moisten a lint-free cloth with distilled or bottled water, and then wipe the pick roller. Rotate the pick roller upward with your fingers to clean all the way around.
Figure : Pick roller
-
Make sure that the pick roller and the rollers around it are clean, free of paper bits, and rotate freely.
-
Allow the pick roller to dry completely.
-
Reattach the rear access door. Push the door forward until it snaps into place.
-
Load the tray with plain white paper.
-
Reconnect the power cord to the rear of the product.
-
Press the Power button (
) to turn on the product.
-
Try to print a self-test report. See the steps on how to print a self-test report at the top of this document.
Keep us posted,
If you would like to thank us for our efforts to help you,
Give us a virtual high-five by clicking the 'Thumbs Up' icon below, followed by clicking on the "Accept as solution" on this post,
Have a great day!

Didn't find what you were looking for? Ask the community