-
×InformationNeed Windows 11 help?Check documents on compatibility, FAQs, upgrade information and available fixes.
Windows 11 Support Center. -
-
×InformationNeed Windows 11 help?Check documents on compatibility, FAQs, upgrade information and available fixes.
Windows 11 Support Center. -
- HP Community
- Archived Topics
- Printers Archive
- 8, [(1,0, -2147221164)] Error

Create an account on the HP Community to personalize your profile and ask a question
Your account also allows you to connect with HP support faster, access a personal dashboard to manage all of your devices in one place, view warranty information, case status and more.
06-10-2013 09:32 AM
 HP Recommended
Hi Dilha,
Windows 7 and Windows Vista allows you to have multiple users sharing the same computer under their own individual accounts. This allows each individual user to have their own location on the computer where they can store their personal documents, pictures, videos, saved games, and other personal data. This also allows the owner of the computer to assign certain accounts the ability to perform administrative tasks like installing software, while limiting other user's abilities.
This tutorial will walk you through creating a new account in Windows 7 and Windows Vista.
- Click on the Start button. This is the small round button (
 ) in the lower left corner of your screen that has a Windows flag on it.
- Click on the Control Panel menu option.
- When the control panel opens you will see a screen similar to Figure 1 below.
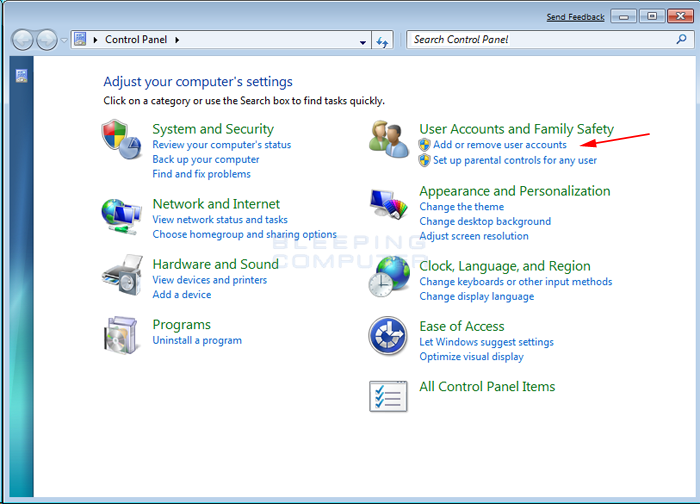
Figure 1. Windows 7 Control Panel
- Click on the Add or remove user accounts control panel option as shown by the red arrow in figure 1.
- You will now be in the Manage Accounts control panel as shown in Figure 2 below.
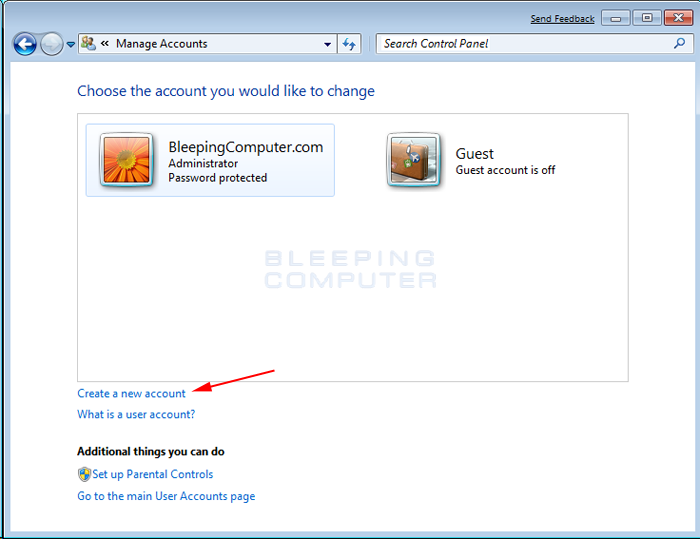
Figure 2. Manage Accounts screen in Windows 7
This screen shows all the accounts currently on your computer. To create a new account, click on the Create a new account option as shown by the red arrow above.
- You will now be at the Create New Account screen.
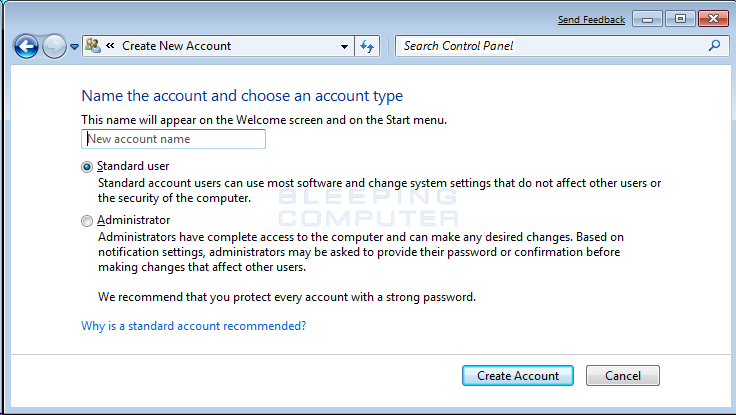
Figure 3. Create New Account screen
In the New account name field enter the name of the new account that you would like to create. This could be a person's first name, full name, or whatever other designation you would like to give. You then need to decide which of the two types of accounts you would like to create. An Administrator account has full access to the computer and can make all changes, install software, and create and delete accounts. The other type of account is Standard user and has limited privileges as to what settings and changes it can make to the computer. It is suggested that for all users, you set them as a Standard User account and have one administrator account that you can logon to as needed. This will protect your computer from malware and other harmful activities.
When you have finished selecting a name and the type of account you wish to setup, you should click on the Create Accountbutton.
- Your new account will have been created and you will see it listed in the Manage Accounts screen.
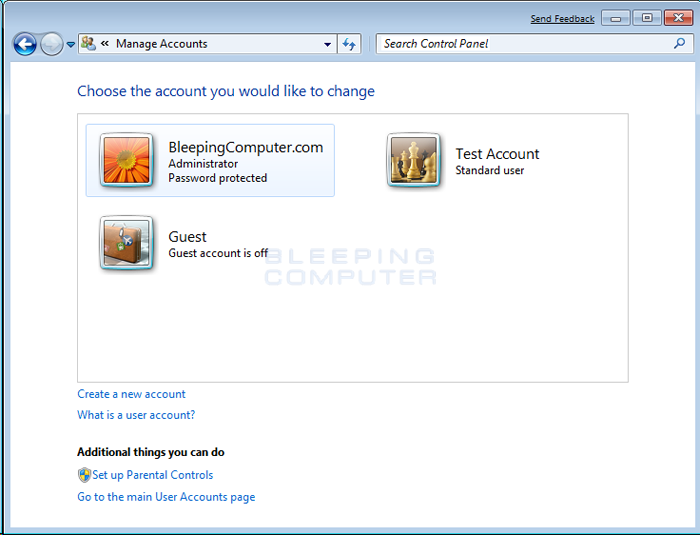
Figure 4. New user has been created
As you can see our new user, named Test Account, has been created.
Now when you start Windows 7 or Vista, you will see the additional account listed in the logon screen. That user can then select their login name and login into their profile so they can access their private data.
Install the printer on the newly created user account, and let me know if you experience the same issues?
I am an HP employee.
Say Thanks by clicking the Kudos Star in the post that helped you.
Please mark the post that solves your problem as "Accepted Solution"
Say Thanks by clicking the Kudos Star in the post that helped you.
Please mark the post that solves your problem as "Accepted Solution"
11-01-2013 07:45 PM - edited 11-01-2013 08:55 PM
HP Recommended
Provost,
I am having the same issue the folks have posted and have done everything Sickdude posted. My printer is an HP Officejet Pro 8500 Premier All-in-One Printer - A909n and as with Sickdude, I have it installed on four other computers with zero problems at all out of any of those computers. At first I thought the problem was specific to Win- 7, 64 bit; however, I do not believe that is the case as two of my other computers are also running the same OS. You say you are an HP employee, can you help solve this issue?
Thanks in advance,
birimbao171
PS. I can scan to email directly from the printer through the glass and the feeder. Scan feature does not work through the Solution Center.
11-05-2013 07:46 AM
HP Recommended
Hi Birimbao171,
I do see the error you have supplied on your Post. I do have a few questions.
Just to confirm you can make a copy ok.
Make sure the printer is connected to a direct wall outlet (no surge protectors or power bars).
Under Services
First try to click the Windows icon, type services in the Search box, and then click or tap View Local Services. Scroll down to the Windows Installer. Startup type should be - Automatic, and Service Status should be - started Apply.
Now look at Windows Image Acquisition (WIA) Startup type should be - Automatic, and Service Status should be - started Apply.
Uninstall the Software all from the Control panel.
Restart the computer after this step and try installing again.
Here is a link to the Drivers.
Hope it helps.
Thanks
Please click “Accept as Solution ” if you feel my post solved your issue, it will help others find the solution.
Click the “Kudos, Thumbs Up" on the bottom left to say “Thanks” for helping.:smileyhappy:
I work on behalf of HP
11-06-2013
06:53 AM
- last edited on
02-24-2017
11:38 AM
by
![]() OscarFuentes
OscarFuentes
HP Recommended
Here is a similar troubleshooting document but it is for XP - should be about the same instructions however. And here's a forum post about it. Lastly, here is a link to one of my forum posts with some more information as to how this issue was resolved. Good luck!
Don't forgot to say thanks by giving "Kudos" if I helped solve your problem.
When a solution is found please mark the post that solves your issue.
 Every problem has a solution!
11-09-2013 09:45 AM
HP Recommended
Mrstenter,
Thanks for the attempt. Your solution didn't work. The error appeared again. What I find most frustrating is that HP makes no attempt whatsoever to help or provide an educated solution. All they offer is the collection of funds before assisting.
Once again, thanks for responding to my post.
Thanks for the attempt. Your solution didn't work. The error appeared again. What I find most frustrating is that HP makes no attempt whatsoever to help or provide an educated solution. All they offer is the collection of funds before assisting.
Once again, thanks for responding to my post.
11-09-2013 03:47 PM
HP Recommended
VisionAiry,
Thanks for posting. Your recommended solutions didn't work. I tried all of them but note that the last link you sent didn't get past the "search for Scan.msi and BpdScan.msi" No such thing found on the Start search bar. I am still getting the same error (see below).
Thanks again.
![HP Imaging Device not found Error 8, [1,0, -2147221164)].JPG](https://h30434.www3.hp.com/t5/image/serverpage/image-id/65977i97C37F0A913A145E/image-size/original?v=mpbl-1&px=-1 "HP Imaging Device not found Error 8, [1,0, -2147221164)].JPG")
11-11-2013 08:25 AM
HP Recommended
Sorry to hear that didn't work. .MSI files are found deep in the Program Files of the HP software.
Allow me to lead you to a better written set of instructions by clicking this link. Thank you for providing an image because that helps me to know exactly what the error is. If the instructions in the above link doesn't help, it may be that you have some corrupt registry files. This next link may help you but be careful following the instructions in the link below. Simply take your time, back up your files, and use a registry cleaning software like CCleaner if you are not comfortable doing it yourself. Lastly, when you get to the step where you can choose an L2, L3, or L4 uninstall, if you have an HP computer, only do the L3 uninstall because an L4 will remove essential components. --Version 14 Full Scrub-- If you have any questions about a process, it may be best to ask and wait for a response before proceeding and I will do my best to respond quickly if you do.
Good luck!
Don't forgot to say thanks by giving "Kudos" if I helped solve your problem.
When a solution is found please mark the post that solves your issue.
Every problem has a solution!
11-13-2013 09:27 AM
HP Recommended
Just going to list a procedure I used to hook up an Officejet pro L7590 to my computer.
I need someone to try this out and tell me if it worked for them ( it worked for both of my computers ).
1...
- uninstall the printer if installed and use the HP unistall to remove the software.
- Reboot to complete the uninstall.
2...
- Download and install CCleaner and run it to repair registry issues.
3...
- Download and run "Windows Installer cleanup utility"
- "If you have the program installed, open it in Start - All Programs - Windows Install Cleanup. It then opens up and you should see a list of many program name. Please have a look there if you find the following entries "32/64 bit HP Cio installer", "bpd_scan", "scan". If you find this, please select the program and press the "remove"."
- Restart computer.
4...
- Search the computer C drive program files for the folder HP, look inside and if it has the folders marked CIO, Digital Imaging and software updater, then go back to the HP folder and delete it.
5...
- Load newest version of HP software
- at the review installation options box - click on "select software" then uncheck everything except for the top two and OCR then click on OK then Next.
- When the connect device now window opens check the box that says "unable to connect now" and hit next and then look for the install shortcut on desktop and make sure its checked then hit finish.
6...
- Restart computer
7...
- Use the desktop HP short cut "install new device".
- use USB connect and hit next
- When connect device now appears use the "connect using USB cable"
-Hit finish button
- Cancel the register product now window.
- Cancel the registration now window
-at the end of device install use "print test page" to confiem install
- NOW install more software using the button that says " More software "
-then press the "more" button and select the "Solutions center software "
-Click finish and exit.
8...
- Double click the HP Solutions desktop shortcut and test your new capabilities.
Please respond to tell me how it worked out ???
Thank you for testing.
† The opinions expressed above are the personal opinions of the authors, not of HP. By using this site, you accept the Terms of Use and Rules of Participation.


Didn't find what you were looking for?
Ask the community
† The opinions expressed above are the personal opinions of the authors, not of HP. By using this site, you accept the <a href="https://www8.hp.com/us/en/terms-of-use.html" class="udrlinesmall">Terms of Use</a> and <a href="/t5/custom/page/page-id/hp.rulespage" class="udrlinesmall"> Rules of Participation</a>.