• ×
    Information
    Need Windows 11 help?
    Check documents on compatibility, FAQs, upgrade information and available fixes.
    Windows 11 Support Center.
  • post a message
  • ×
    Information
    Need Windows 11 help?
    Check documents on compatibility, FAQs, upgrade information and available fixes.
    Windows 11 Support Center.
  • post a message
Guidelines
Ready to level up? Join the Expert Program—
Archived This topic has been archived. Information and links in this thread may no longer be available or relevant. If you have a question create a new topic by clicking here and select the appropriate board.
HP Recommended

Is HP willing to post a resolution to this forum?  Why does the solution have to be private between user and HP - can't HP see that everyone who ever bought this printer can't print photos?

HP Recommended

Hello! I'm so sorry to see there are so many issues with printing on photo paper.


Before printing, please remember to remove any plain paper from the main paper tray, and then make sure the photo tray is properly loaded.


Secondly, make sure the photo paper loaded in the photo tray is 4" x 6". To print on larger photo paper, please load the paper in the main tray instead. The photo tray supports only 4" x 6" photo paper. See the ENVY 5540 Paper Handling specifications for more information.


Finally, make sure the print settings are correct for the print job:


Setting
Location
Portrait or landscape orientation
Select Portrait for vertical prints or Landscape for horizontal prints.
Orientation menu on the Layout, Finishing, or Features tab
Paper tray or source
Select the tray you loaded the photo paper into, if your printer has more than one tray.
Source or Paper source menu on the Paper/Quality or Features tab
Photo paper type
Set the paper type you are using, such as HP photo paper, glossy, or matte finish, so the printer properly handles and prints on the paper.
Type, Paper Type, or Media menu on the Paper/Quality or Features tab
Paper size
Select the paper size you loaded in the printer, such as 4 x 6, 5 x 7, or 8 x 10 paper.
Size or Paper Size menu in Advanced Options or on the Features tab
Some newer printers support more paper options. Go to Creating Custom Paper Sizes for more information.
Add or remove a border
Add a white border around the photo or print to the very edge of the paper, if supported by your printer.
Borderless Printing or Paper Size menu in Advanced Options
The Printing Shortcut tab might include shortcuts to print with or without a border


For more information on printing photos, see the following documents:

-- ReverseTalk
I work on behalf of HP.
Click the thumbs up + button to thank me. Mark Accepted Solution if I solved your inquiry.
HP Recommended

@David1936 wrote:

I  repeatedly have the same problem, which seems to be quite widespread and a fundamental design fault. And HP had the nerve to want to charge me $25 for a solution from Technical Support. I have always used HP printers (for many years) and I know that my photo paper was loaded correctly and the settings were correct. Yet I repeatedly got an "out of paper" message. It seems to me possible that after you have pushed the photo tray right in to the back firstly there is no clip or such keeping it there and secondly the slightest vibration when you successfully print one photo is enough to move the photo tray slightly away from the back, giving you an "out of paper" message when you try to print your next photo. The only solution I have discovered, assuming that it will continue to work, is to open up and push the photo tray right back for each and every single photo. That is, to say the least, a completely unacceptable technology. Also if that is the problem, the message should read "photo tray not fully back to rear".  Any suggestions?


Hi, David! You're absolutely right. That is very annoying. If the printer continues to throw an Out of Paper message, try the steps in this document: 'Out of Paper' Displays and Printer Does Not Pick Paper.  It might resolve the issue.

-- ReverseTalk
I work on behalf of HP.
Click the thumbs up + button to thank me. Mark Accepted Solution if I solved your inquiry.
HP Recommended

Why is it necessary to remove the paper from the A4 page? Because I typically print a page of A4 text then a photo or two, then a page of text, and so on, it is extremely inefficient for me to keep remvoing the paper from the main tray and putting it back again. My understandable preference is to be able to do everything from my computer without even looking at the printer, which might be even in a different room.

HP Recommended

Fascinating

In addition to myself, a number of people who own an Envy 5540 all attest to the what is basically the same problem. This printer will not willingly print material from the 4x6 photo tray. The common problem being that even after selecting this tray, the selection is subsequently altered because 'of a conflict with another printer setting'.

And so 6 months or so into the discussion all we get are the same old instructions from those associated with HP,....take the paper out of the main tray or better still print 4x6 photos on letter sized photo paper.

This printer in its present state will not do the job it advertised itself as being able to do, which is print directly onto 4x6 photo paper directly from the photo tray.

I think it would be more helpful if HP addressed that issue rather than providing us with these fixes that clearly as your frustrated users have continually pointed out do not work. 

HP Recommended

Hi David,


I wish I had an answer for that question. For your needs, this is definitely a tedious process, and I wish it were more simple. Unfortunately, I only help troubleshoot and am not involved in the printer design process.


Does the printer in fact print from the photo tray if you remove all paper from the main tray? If the printer does not print from the photo tray even with all other paper removed, we can move on to other troubleshooting.


Thank you for your patience.

-- ReverseTalk
I work on behalf of HP.
Click the thumbs up + button to thank me. Mark Accepted Solution if I solved your inquiry.
HP Recommended

No. I tried removing all paper except from the photo tray.

The printer doesn't even give the option for 4 x 6 photo paper.

HP Recommended


I am not David but I seem to share the same problems as him and your other correspondents.

In answer to your question. No, the printer will not print from the photo tray when the paper has been removed from the main tray. 

In my case, the reason for that would appear to be as follows.

When using the photo app in Windows 10, once the print button is activated a settings box will be displayed where print preferences can be chosen. As has been pointed out before, in addition to paper size one can also choose which paper tray will be used for the job.  The problem is that once the job starts a message comes up above the print tray section in settings informing the user that, that tray cannot be used because of a conflict with another print setting. The app subsequently resets the preference back to the main tray option

In addition to the above, if one goes ahead with the print job, an additional message will now be displayed on the Envoy 5540 stating the obvious, that the main tray is out of paper


HP Recommended

Thanks, Mike! This is excellent, detailed information. Let me see what I can dig up. Be back shortly.

-- ReverseTalk
I work on behalf of HP.
Click the thumbs up + button to thank me. Mark Accepted Solution if I solved your inquiry.
HP Recommended

Hi Mike,


This is a long shot, but see if these steps help:


Make sure the photo tray is seated correctly

Errors can occur if the printer trays are installed incorrectly. Make sure the printer is located on a flat surface, then make sure the photo tray moves smoothly within the paper tray guides.
  1. Make sure the printer is positioned on a flat surface.
  2. Push in the output tray extender.
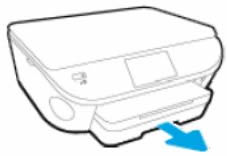
  3. Pull out the input tray, but do not remove it.
    Figure : Pull out the input tray
    Image: Pull out input tray
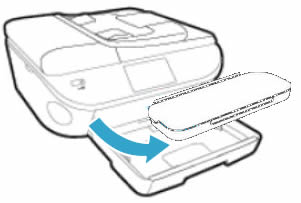
  4. Remove the output tray.
    Figure : Remove the output tray
    Image: Remove the output tray
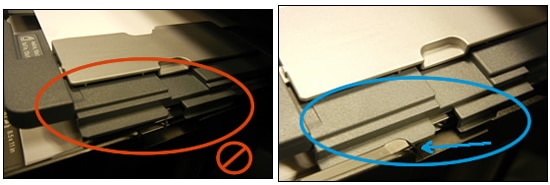
  5. Make sure the photo tray is seated correctly, and that the photo tray guide tabs (grey) are sliding beneath the main tray guides (black) on both the left and right side of the input tray.
    Figure : Make sure the photo tray is seated correctly
    Image: Photo tray properly functioning
    Figure : Make sure the tabs are sliding beneath the main tray guides
    Image: Tabs outside and inside guide rails
    If they are not in the correct position, gently move the photo tray to align the tab gaps, then gently press the tabs back into position.
    The photo tray should move freely with no resistance.
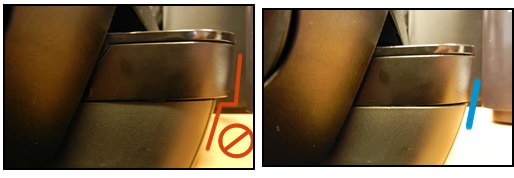
  6. Reinstall the output tray, then make sure the edges line up with the input tray.
    Figure : Line up the tray edges
    Image: Line up the edges
  7. Try to print.
    If the issue persists, try printing or copying a document with the output tray removed.
    If the error only happens with the output tray installed, the output tray might need to be replaced.

If these steps don't work, report back to me, please.  : o ) 

-- ReverseTalk
I work on behalf of HP.
Click the thumbs up + button to thank me. Mark Accepted Solution if I solved your inquiry.
Archived This topic has been archived. Information and links in this thread may no longer be available or relevant. If you have a question create a new topic by clicking here and select the appropriate board.
† The opinions expressed above are the personal opinions of the authors, not of HP. By using this site, you accept the <a href="https://www8.hp.com/us/en/terms-of-use.html" class="udrlinesmall">Terms of Use</a> and <a href="/t5/custom/page/page-id/hp.rulespage" class="udrlinesmall"> Rules of Participation</a>.