• ×
    Information
    Windows update impacting certain printer icons and names. Microsoft is working on a solution.
    Click here to learn more
    Information
    Need Windows 11 help?
    Check documents on compatibility, FAQs, upgrade information and available fixes.
    Windows 11 Support Center.
  • post a message
  • ×
    Information
    Windows update impacting certain printer icons and names. Microsoft is working on a solution.
    Click here to learn more
    Information
    Need Windows 11 help?
    Check documents on compatibility, FAQs, upgrade information and available fixes.
    Windows 11 Support Center.
  • post a message
Guidelines
The HP Community is where owners of HP products, like you, volunteer to help each other find solutions.
Archived This topic has been archived. Information and links in this thread may no longer be available or relevant. If you have a question create a new topic by clicking here and select the appropriate board.
HP Recommended
Officejet 5740
Microsoft Windows 8.1 (64-bit)

My Officejet 5740 will not print on 4x6 photo paper. I have several sheets of the paper and not just one.  The printer keeps indicating the paper tray is empty. It does not recognize there is 4x6 paper loaded.

2 REPLIES 2
HP Recommended

Hi @layor,


Welcome to the HP Forums!


I noticed that you cannot print 4x5 photos with your HP Officejet 5740, and I am happy to help! 


Learn about photo printing settings, paper tray selection, and options with Windows Photo Viewer. These steps describe printing 4 x 6 borderless photos, but you can choose other settings based on your print job.
 
 
Follow these steps to load photo paper in the photo paper tray.
 
  1. Turn the printer on if it is not already on.
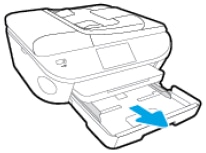
  2. Pull the photo tray inside the input tray toward you to open it as far as possible.
     NOTE:
    If you do not see the photo tray inside the input tray, remove the output tray, and then open the photo tray.
    Figure : Pull out the photo tray inside the input tray
    Image: Pull out the photo tray inside the input tray
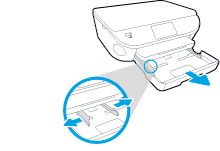
  3. Slide the paper width guides to their outermost positions.
    Figure : Slide the paper-width guides to their outermost positions
    Image: Slide the paper-width guides to their outermost positions
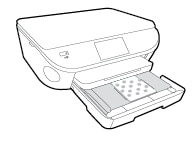
  4. Load the photo paper with the short edge forward and the print side down into the photo tray.
     NOTE:
    For photo paper with a perforated tab, load the paper in the tray print-side down with the perforated tab closest to you.
    Figure : Load photo paper in the paper tray with the print side down
    Image: Load photo paper in the paper tray with the print side down
  5. Slide the paper forward until it stops.
     NOTE:
    Make sure that the stack of photo paper is not higher than the top edges of the paper width guides.
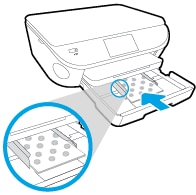
  6. Slide the paper width guides inward so that they lightly rest against the edges of the photo paper and make sure that the photo paper is centered in the tray.
    Figure : Adjust the paper-width guides
    Image: Adjust the paper-width guides
  7. Reinstall the output tray on the input tray, if you removed it, and then push the input tray into the printer until it locks into place.
 
Step 2: Adjust the print settings, and then print the photo
 
Use Windows Photo Viewer to setup the print job and to ensure that the paper in the photo paper input tray is used.
 NOTE:
Changing some print settings makes them the default settings for all print jobs. You might need to manually change settings in the Printer Properties for other print jobs if you change paper type or size, or if you are printing documents. Make sure to select the appropriate paper tray.
  1. Right-click the photo that you want to print, and then click Print, or click Open with, click Windows Photo Viewer, and then click Print.
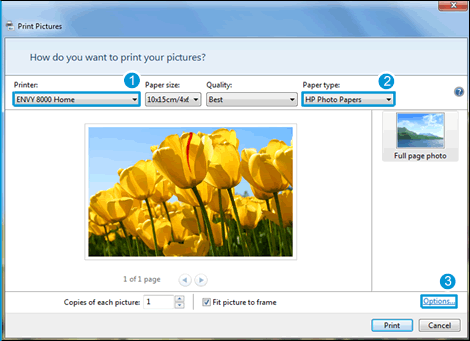
  2. From the drop-down menus above the photo, select your printer, paper size, and print quality. For the Paper type select HP Photo Papers, and then click Options....
    Figure : Example of Windows Photo Viewer Print Pictures menu
    Image: Example of Windows Photo Viewer Print Pictures menu
    1. Select your printer
    2. Select HP Photo Paper
    3. Click Options
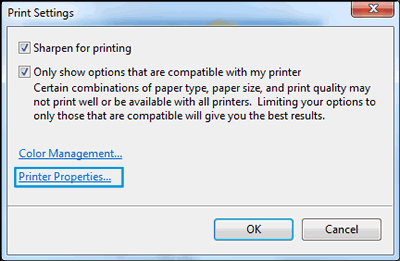
  3. In the Print Settings window, click Printer Properties....
     NOTE:
    Changing some settings makes them the default settings for all print jobs. You might need to manually change the some of the following settings if you change paper type or size, or if you are printing documents. Make sure to select the appropriate paper tray.
    Figure : Example of the Print Settings window
    Image: Example of the Print Settings window
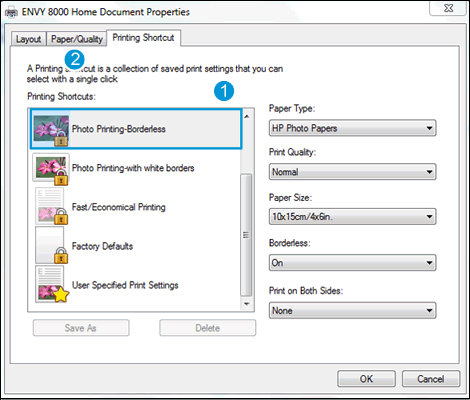
  4. For borderless photos, click the Printing Shortcut tab, click Photo Printing-Borderless, and then click the Paper/Quality tab.
    Figure : Example of the printer Document Properties window
    Image: Example of the printer Document Properties window
    1. Click Photo Printing-Borderless
    2. Click the Paper/Quality tab
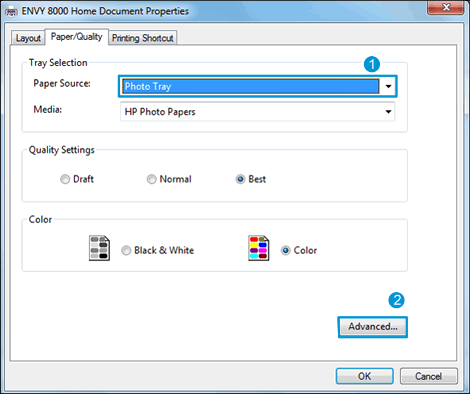
  5. On the Paper/Quality tab, select Photo Tray from the Paper Source drop-down menu, and then click Advanced.
    Figure : Example of the Document Properties Paper/Quality window
    Image: Example of the Document Properties Paper/Quality window
    1. Select Photo Tray
    2. Click Advanced
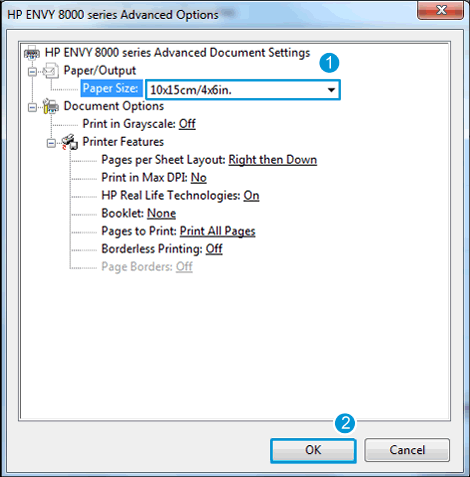
  6. In the Advanced Options window, select 10×15cm/4×6in. in the Paper Size drop-down menu, and then click OK.
    Figure : Example of the Advanced Options window
    Image: Example of the Advanced Options window
    1. Select 10×15cm/4×6in.
    2. Click OK
  7. In the Document Properties window, click OK.
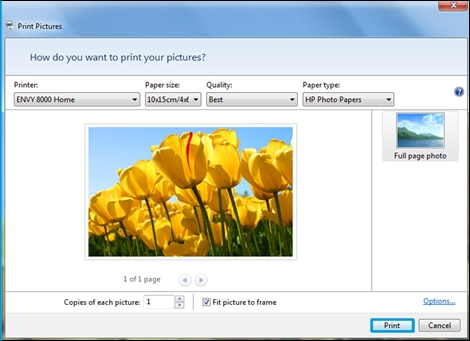
  8. In the Print Pictures window, click Print.
    Figure : Example of the Print Pictures window
    Example of the Print Pictures window
  9. After printing, remove unused photo paper from the paper tray. Store the photo paper so it does not start to curl. Curling paper could reduce the quality of your printout.


Source: Printing Photos


If this, or any of the posts on this thread, has helped you to resolve the issue, please click on "Accept as Solution" on said post. To show that you 'like', or are thankful of my post, kindly click the thumbs up below. If there is anything else I can do to help, please be sure to let me know!


Hope this helps, and have a nice day! :generic:

RnRMusicMan
I work on behalf of HP

Please click “Accept as Solution ” if you feel my post solved your issue, it will help others find the solution.
Click the “Kudos Thumbs Up" to say “Thanks” for helping!

HP Recommended

I'm using a Mac and had same probs as everyone else.  Over 5000 views on this page so obviously there's a problem.  I don't think it matters which computer type you're using.  


All I did was fill the 4x6 photo paper tray, removed all the regular 8.5x11" paper and selected "Photo Tray" from the "Feed From" box.  See screenshots below.  


DON'T TRY TO PULL OUT THE TRAY DESPITE WHAT THE ONLINE INSTRUCTIONS SAY!  The instructions above are terrible.  Perhaps the HP people posting here should put their hands on their products before posting incorrect instructions that could lead people to accidentally damaging their brand new printer!  Ugh!  


Screen Shot 2016-03-11 at 12.31.53 AM.png


Screen Shot 2016-03-11 at 12.32.13 AM.png

Darryl J. Gebien
Archived This topic has been archived. Information and links in this thread may no longer be available or relevant. If you have a question create a new topic by clicking here and select the appropriate board.
† The opinions expressed above are the personal opinions of the authors, not of HP. By using this site, you accept the <a href="https://www8.hp.com/us/en/terms-of-use.html" class="udrlinesmall">Terms of Use</a> and <a href="/t5/custom/page/page-id/hp.rulespage" class="udrlinesmall"> Rules of Participation</a>.