-
×InformationNeed Windows 11 help?Check documents on compatibility, FAQs, upgrade information and available fixes.
Windows 11 Support Center. -
-
×InformationNeed Windows 11 help?Check documents on compatibility, FAQs, upgrade information and available fixes.
Windows 11 Support Center. -
- HP Community
- Archived Topics
- Printers Archive
- HP Laserjet Pro M203de & Double Sided Printing Toner Problem

Create an account on the HP Community to personalize your profile and ask a question

03-05-2017 02:43 PM
Single page printing produces no toner stains on pages. However double side printing ends up producting a line of black toner on the entire edge of the front but not the back page. I have gone through the leaning process twice and checked the cartridge. Doesn't appear to be a leakage of toner from the cartridge. Any solution(s) would be appreciated.
03-06-2017 12:15 PM
Let me take a moment to thank you for posting on the HP Support Forums. I take this opportunity to reply to your post again. 🙂
I read that on your HP LaserJet Pro M203dw Printer, the double side printing ends up producing a line of black toner on the entire edge of the front but not the back page. However, the single page printing produces no toner stains on pages. I'll do my bets to help you here.
I would like to know the following information to assist you better:
- Did this issue start recently or has been there for a long time.
- Any changes that took place inside the printer (like toner replacement, etc.) after which this issue may have started?
Meanwhile, I have some suggestions that should help us:
- Below mentioned is the paper handling capacity of the duplexer:
- Inspect the toner cartridge and imaging drum
-
Remove the toner cartridge and imaging drum, and then inspect both for damage on HP LaserJet Pro M102, M104, and M203 printers.
-
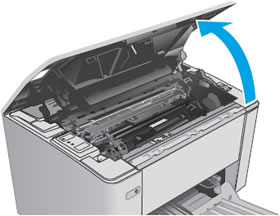
Open the top cover.
Figure : Opening the top cover
-
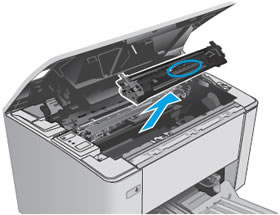
Grasp the toner cartridge handle, and then pull to remove the toner cartridge.
Figure : Removing the toner cartridge
-
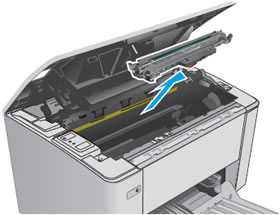
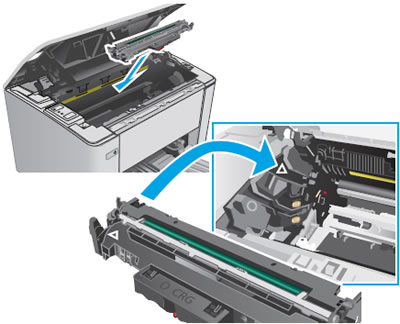
Remove the imaging drum.
Figure : Removing the imaging drum
-
Examine the memory chips for damage.
If a memory chip is damaged, refer to the steps earlier in this document to replace the toner cartridge or skip to the step to replace the imaging drum.
Figure : Imaging drum and toner cartridge memory chips
-
Imaging drum
-
Memory chips
-
Toner cartridge
-
-
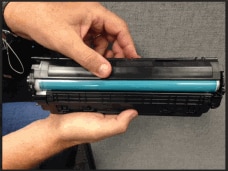
Slide back the cover to expose the imaging drum surface.
CAUTION:
Do not touch the green glass. Fingerprints on the imaging drum can cause print quality problems.
Figure : Sliding back the imaging drum cover
-
Examine the surface of the imaging drum.
-
If you see any scratches, fingerprints, or other damage on the imaging drum, skip to the next step to replace the imaging drum.
-
If the imaging drum is not damaged, close the imaging drum cover.
-
-
Reinstall the imaging drum.
Figure : Reinstalling the imaging drum
-
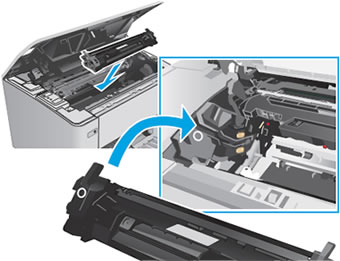
Reinstall the toner cartridge.
Figure : Reinstalling the toner cartridge
-
Close the top cover.
If the issue still persists post performing the above steps then I suggest you to review the steps as described in detail from this link: Fixing Poor Print Quality
Let me know the outcome. Thanks for your patience. Cheers! 🙂