-
×InformationNeed Windows 11 help?Check documents on compatibility, FAQs, upgrade information and available fixes.
Windows 11 Support Center. -
-
×InformationNeed Windows 11 help?Check documents on compatibility, FAQs, upgrade information and available fixes.
Windows 11 Support Center. -
- HP Community
- Archived Topics
- Printers Archive
- Hp 5524 wont print black from scan .

Create an account on the HP Community to personalize your profile and ask a question
Your account also allows you to connect with HP support faster, access a personal dashboard to manage all of your devices in one place, view warranty information, case status and more.
04-16-2017 04:50 AM
 HP Recommended
Product: Hp photosmart 5524
Refuses to print black ink from scan . But prints black when i ask for a quality report . Changed ink 3 times and done 5 head cleans . This seems to be a problem with this model . . So do i throw it away and buy another one ( considering i hardly use it ) or has anyone found out what the problem is ...
Ive had no luck with the gp help pages as i cant get them .. also from the quality report the black box is empty but the black line of the box is printing .. ggrr
Ive had no luck with the gp help pages as i cant get them .. also from the quality report the black box is empty but the black line of the box is printing .. ggrr
3 REPLIES 3
04-16-2017 09:34 AM
HP Recommended
The diagnostic pages actually use a mixture of black and color inks to print the black areas on the page. This is so the information will be readable even if black or one or more colors are not printing properly. You can force similar behavior by selecting "photo paper" in the driver settings, even if you are actually printing on plain paper. In that case color will be used to print even black text because the pigmented black ink is not compatible with photo paper.
To address the issue see the troubleshooting steps in the document here. You mentioned you could not get to these so I copied some of the more important items into the post below.
If the standard troubleshooting did not resolve black not printing I would suggest removing the black cartridge. Turn it over and examine the area around the ink port. There are four orange plastic spots, left over from the protective cap. Make sure these are flush with the cartridge body, if not carefully trim them flush. If the plastic nubs protrude they can prevent the cartridge from seating properly. Before replacing the cartridge in the printer dribble a few (maybe four) drops of hot water into the ink port in the printer and two drops into the ink port on the cartridge then snap the cartridge back in position.
It may also help to manually clean the printhead as described in the post here.
I have also seen cases where leaving the printer overnight after the cleaning cycles allows black to recover.
If none of the above restores black printing your printer will likely require repair or replacement.
Here are copies from the troubleshooting document:
If the vent on the top of the ink cartridge is clogged or obstructed, the ink cartridge might not work properly. If you found defects on the Print Quality Diagnostic report, check that the ink cartridges are properly vented and correctly seated.
- Press the Power button to turn on the printer, if it is not already turned on. Wait until the printer is idle and silent before continuing.
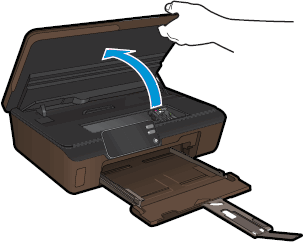
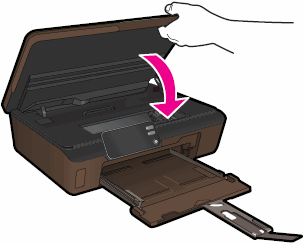
- Open the cartridge access door. The carriage moves to the access area.Figure : Open the cartridge access door
- Press the tab on the front of the cartridge inward to release it, and then pull up on the cartridge to remove it from the slot.Figure : Remove the cartridge from the slot
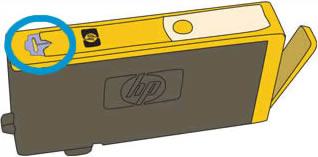
- Examine the vent area on each cartridge, above the HP logo on the top of the cartridge.Figure : Vent area on the top of the cartridge
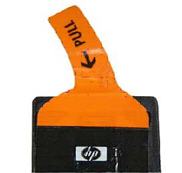
- If the cartridge still has the orange pull-tab attached, pull to remove it.Figure : Orange pull tab
- If the vent is clogged, use a straight pin to gently remove excess adhesive from the vent.Figure : Clean the clogged vent with a pin
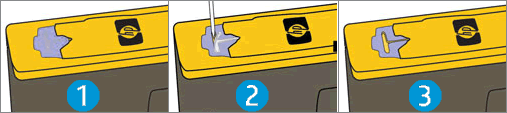
- Clogged vent
- With a straight pin, gently remove excess adhesive from the vent
- Unclogged vent
- With the nozzle and contacts facing down, slide the cartridge into its slot. Press down on the cartridge until it clicks into place.
NOTE:
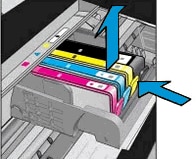
Make sure that each cartridge is installed in the correct slot. Match the shape of the icon and the color of the cartridge with the slot that has the same shaped icon and color.Figure : Reinsert the cartridge
- Repeat these steps to inspect the vents on each of the cartridges.
- Make sure that each cartridge is firmly in place in its slot. Run your finger along the top of the cartridges to feel for any that are protruding, and if any are, press down firmly until each cartridge snaps into place.
- Close the cartridge access door.Figure : Close the cartridge access door
- Try the print job again.
If inspecting the vents on the ink cartridges did not resolve the issue, continue to the next step.
Step 10: Clean the printhead
If you found defects on the Print Quality Diagnostic report, run an automated tool to clean the printhead.
- Make sure that plain white U.S. letter or A4 size paper is loaded in the tray.
- From the control panel home screen, touch the Settings icon (
 ), and then touch Tools.
 - Touch the Down Arrow (
 ), and then touch Clean Printhead. The product cleans the printheads, and then prints a test page.
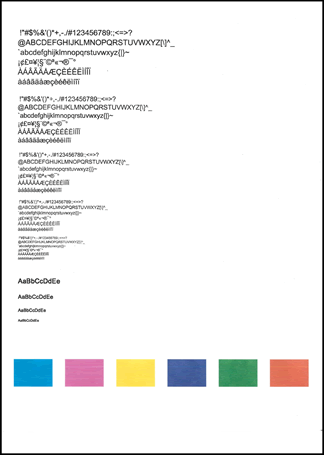
 - Review the print quality on the test page.Figure : Example of the printhead cleaning test page
- If the print quality on the test page is satisfactory, return to the current print job.
- If the print quality on the test page is unsatisfactory, perform a secondary cleaning of the printhead.If the printhead is badly clogged, it might require another cleaning cycle. If so, wait 30 minutes after the last cleaning stage to start the first stage of the cleaning process over again.
- If these steps resolved the issue, there is no need to continue troubleshooting. The following precautions might prevent the issue in the future.
- Avoid leaving unprotected ink cartridges out of the printer for an extended period of time.
- Always use the Power button to turn off the printer. This protects the ink cartridges from exposure to air.
Bob Headrick, HP Expert
I am not an employee of HP, I am a volunteer posting here on my own time.
If your problem is solved please click the "Accept as Solution" button
If my answer was helpful please click "Yes" to the "Was this post helpful" question.
04-16-2017 10:03 AM
HP Recommended
Hi. Yes i have done all of that . Still no black ink .
I read in another post that if i take the printer apart i should should remove the little plugs that connect to the pcb... then reconnect... i can only imagine that this is to reset the printer ..
I read in another post that if i take the printer apart i should should remove the little plugs that connect to the pcb... then reconnect... i can only imagine that this is to reset the printer ..
04-16-2017 10:40 AM
HP Recommended
The printer can be reset as follows: turn on the printer, open the lid and remove the cartridges. Without turning off the printer unplug the power cord and USB cable (if applicable). Wait a minute or two, then plug the printer back in, turn it on and wait to be prompted to insert the cartridges.
You can find various posts on YouTube or in the forum here about disassembling the printer to manually clean the printhead. I have seen too many of these result in damage to recommend any of them. (The most common damage is to the encoder strip, used to keep track of the printhead position. If this is not properly replaced after removing the printhead the carriage may slam to one side at power on and give a carriage jam message. If you choose to go down this path I would suggest taking plenty of pictures of the encoder strip and how the cables are connected.)
Bob Headrick, HP Expert
I am not an employee of HP, I am a volunteer posting here on my own time.
If your problem is solved please click the "Accept as Solution" button
If my answer was helpful please click "Yes" to the "Was this post helpful" question.
† The opinions expressed above are the personal opinions of the authors, not of HP. By using this site, you accept the Terms of Use and Rules of Participation.


Didn't find what you were looking for?
Ask the community
† The opinions expressed above are the personal opinions of the authors, not of HP. By using this site, you accept the <a href="https://www8.hp.com/us/en/terms-of-use.html" class="udrlinesmall">Terms of Use</a> and <a href="/t5/custom/page/page-id/hp.rulespage" class="udrlinesmall"> Rules of Participation</a>.