-
×InformationNeed Windows 11 help?Check documents on compatibility, FAQs, upgrade information and available fixes.
Windows 11 Support Center. -
-
×InformationNeed Windows 11 help?Check documents on compatibility, FAQs, upgrade information and available fixes.
Windows 11 Support Center. -
- HP Community
- Archived Topics
- Printers Archive
- Ink leaking into printer

Create an account on the HP Community to personalize your profile and ask a question
Your account also allows you to connect with HP support faster, access a personal dashboard to manage all of your devices in one place, view warranty information, case status and more.
04-10-2017 09:55 AM
 HP Recommended
Product: Hp photosmart B110a
Operating System: Mac OS X 10.11 El Capitan
My printer started producing smudges of black ink on my print copy. So I cleaned the printheads, then cleaned everything else I could access, but still no change. So I opened up the cartridge compartment again and looked inside the printer with a torch and saw that underneath where the cartridge cradle sits when it's at rest, a whole lot of ink had collected beneath the cartridge cradle. I cleaned up what I could but really the whole thing needs dismantling and cleaning properly. Is it possible to do this myself? I suspect a proper service is not economical with a printer this age.
7 REPLIES 7
04-10-2017 10:13 AM
HP Recommended
The area you are seeing is the service station. It is normal for there to be ink in this area. It is not necessary or desirable to clean the service station, doing so can be messy and can cause other issues.
Where are the smudges on your copies? It would help if you could scan a sample and post it here.
Bob Headrick, HP Expert
I am not an employee of HP, I am a volunteer posting here on my own time.
If your problem is solved please click the "Accept as Solution" button
If my answer was helpful please click "Yes" to the "Was this post helpful" question.
04-10-2017 11:02 AM
HP Recommended
the smudges are usually down either side but sometimes an odd smudge comes out top or bottom or a row down the middle. Sometimes they look distinctly like a roller mark (ie a row of horizontal equally spaced bands) but sometimes they are more like a kind of ink blot.
Not sure how I would add a photo to this post.
04-10-2017 03:19 PM - edited 04-10-2017 04:31 PM
HP Recommended
To upload a scan or picture here first save it to your computer, then use the Insert/Edit Image icon in then toolbar above. The icon you need is two spaces to the right of the gray smiley face.
Without seeing a sample it sounds like you may have a few different issues:
- There may be an ink buildup on the rollers. I would suggest cleaning the rollers as shown in Solution four of the document here.
- Three may be ink and/or paper fibers built up on the printhead. Remove the ink cartridges, then [edit - better document] clean the printhead as shown in the document here. Use a lint free wipe (a damp clean coffee filter works well) to clean any excess ink around the nozzles.
Figure : Three areas to clean
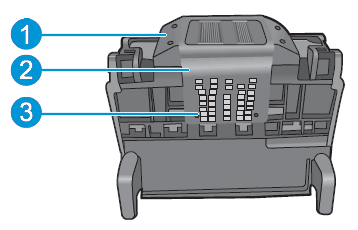
- Plastic ramp on the side of the ink nozzles
- Edge between the ink nozzles and the electrical contacts
- Electrical contacts
Bob Headrick, HP Expert
I am not an employee of HP, I am a volunteer posting here on my own time.
If your problem is solved please click the "Accept as Solution" button
If my answer was helpful please click "Yes" to the "Was this post helpful" question.
04-12-2017 04:07 AM
HP Recommended
Thanks Bob. I'll try uploading here. There's one picture taken looking into the printer at the right side where the ink is collecting and two sheets showing the blotches. I'm finding it seems to vary quite a bit, so the first few sheets today were quite bad, then gradually improved almost to normal. Then a further random sheet suddenly had the marks again. I cleaned all the roller heads when I first looked at it but perhaps not adequately.


04-12-2017 09:32 AM
HP Recommended
Wow. OK, I will take back what I said about not cleaning the service station. Normally this is designed to handle all the waste ink for the life of the printer. In this case it is full to capacity and beyond. Likely the service station ink is scraping on the underside of the printhead and being transferred to the rollers.
The following cleaning process is messy and should be done with care.
To clean the printer we will need a few supplies: a few disposable plastic spoons, a dozen or more foam tipped swabs, rubber or plastic disposable gloves, plenty of newspaper, and a few disposable cups, one filled half full of water for dampening the swabs..
Prepare the work area, Put down a thick layer of newspaper (I would use a newspaper opened up to provide plenty of area, and about 10 sheets thick.) Turn on the printer and open the lid as if you were going to access the cartridges, then unplug the printer. Put the printer and supplies on the newspaper.
Before starting the process take a good look at the printer. In the area at the top of the picture below there will be a plastic strip about 1/4" wide that runs the width of the printer, about 1" above the metal bar. This is the encoder strip. It contains thousands of fine lines used to keep track of the position of the printhead. It is very important to not touch this strip, and do not get any ink on the encoder strip.
Now let's begin the cleaning process. Remove the ink cartridges and set them aside. Remove the printhead by releasing the latch handle on the right side. Set the printhead aside with the nozzles facing upward.
Start with area 1 in the picture below. Carefully use a plastic spoon to scoop out a glob of ink sludge and put the spoon and sludge in one of the disposable cups. Be very careful to not drop the sludge in the printer or on your clothes, carpet, or anywhere else you do not want damaged. Use a second clean spoon and repeat the process. It may take several spoon of gunk removal to get things cleaned up. You do not need to get this area clean completely, but remove the major buildup. Clean the top surfaces of the perimeter edge of area 1 with damp swabs.

Next move to area 2 in the picture. Clean the ink from the white plastic rollers with damp swabs. Turn the rollers as you clean them to get all around them. The gray rollers beneath them should also be cleaned. Repeat this process for all the rollers, getting fresh swabs as needed. Wipe area 3 with swabs or a damp paper towel.
When the areas above have been cleaned clean the printhead as shown in my previous post above. Areas 1 and 2 in the printhead picture will probably nave ink that needs cleaning. Reinstall the printhead in the printer, then secure the latch. Reinstall the print cartridges. Also, remove the duplex unit from the rear of the printer and examine (and clean if necessary) the rollers there.
Carefully dispose of the messy used supplies. Plug the printer back in and run a few test sheets. There may be ink on the rollers in area 2 that will require some additional cleaning as the rollers below turn and transfer gunk to the white rollers.
There are a few things to consider for the future to avoid excess servicing ink usage:
- Always keep the printer connected to a live outlet. If an external switch (such as an outlet switch or power strip switch) is used to disrupt power to the printer it will use additional ink at startup.
- Do not run cleaning cycles manually from the front panel or toolbox unless necessary (which is practically never). Manual cleaning cycles will use ink (that ends up in the service station area) and are rarely necessary.
Bob Headrick, HP Expert
I am not an employee of HP, I am a volunteer posting here on my own time.
If your problem is solved please click the "Accept as Solution" button
If my answer was helpful please click "Yes" to the "Was this post helpful" question.
04-12-2017 10:25 AM
HP Recommended
The process is straightforward but can be messy. Be careful :-).
Bob Headrick, HP Expert
I am not an employee of HP, I am a volunteer posting here on my own time.
If your problem is solved please click the "Accept as Solution" button
If my answer was helpful please click "Yes" to the "Was this post helpful" question.
† The opinions expressed above are the personal opinions of the authors, not of HP. By using this site, you accept the Terms of Use and Rules of Participation.


Didn't find what you were looking for?
Ask the community
† The opinions expressed above are the personal opinions of the authors, not of HP. By using this site, you accept the <a href="https://www8.hp.com/us/en/terms-of-use.html" class="udrlinesmall">Terms of Use</a> and <a href="/t5/custom/page/page-id/hp.rulespage" class="udrlinesmall"> Rules of Participation</a>.