• ×
    Information
    Need Windows 11 help?
    Check documents on compatibility, FAQs, upgrade information and available fixes.
    Windows 11 Support Center.
  • post a message
  • ×
    Information
    Need Windows 11 help?
    Check documents on compatibility, FAQs, upgrade information and available fixes.
    Windows 11 Support Center.
  • post a message
Guidelines
The HP Community is where owners of HP products, like you, volunteer to help each other find solutions.
Archived This topic has been archived. Information and links in this thread may no longer be available or relevant. If you have a question create a new topic by clicking here and select the appropriate board.
HP Recommended
Officejet 4650
Microsoft Windows 10 (64-bit)

My printer was connected to my computer when I set it up before with the new computer.  All of a sudden, the scan doctor popped up and prompted a new set up.  The computer found the printer but couldn't connect to the computer via wireless connection even though the network address is the same.  I then uninstalled the software and reinstall but it failed again.

1 REPLY 1
HP Recommended

@tsih


A very warm welcome to the HP community. A very good day to you. 


I understand that you have an HP OfficeJet 4650 All-in-One Printer and it no longer communicates wirelessly after the HP print and scan doctor suggested a new setup. The computer is able to find the printer but cannot connect to it. You have uninstalled and reinstalled the drivers but that did not help. I appreciate the steps you have performed and have certainly done a good job.


To provide an accurate resolution, I need a few more details: 

  • Is the wireless light steady or blinking on the printer?
  • Does the printer print from any other devices that are connected to the network?

If the printer appears to have a steady light and appears to be connected to the wireless network then I suggest you to assign a static IP address to the printer by following the below steps:

  • Locate the printer's IP address. If you do not know the IP address then print a network configuration page from the printer.

  • The printer's IP address will be printed on the network configuration page. If the IP address is 0.0.0.0, the printer is not connected to a wireless network. Reconnect your printer to the wireless network, and then print a new Network Configuration Page. Make sure the report shows the status as Connected.
  • On your computer, open an Internet browser.
  • Type the URL address for the EWS in the browser address bar, and then press Enter. Make sure to type the IP address into the Internet browser's address box. If typed into a toolbar search box or search engine, the EWS does not open.
  • If a website security certificate displays in the Internet browser, click Continue. The EWS webpage for the printer opens, which confirms that the printer is on the same network as the computer.

  • On the EWS webpage, click the Network tab.

  • In the Wireless section, click Wireless (802.11), and then click Manual IP.

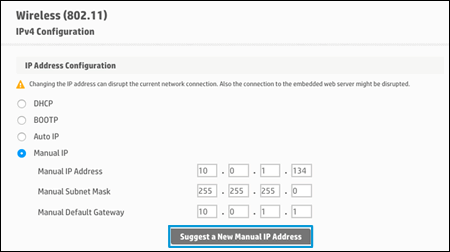
    • If a Suggest a Manual IP Address option is available, click it, click Apply, and then reconnect your printer. If the wireless connection drops, continue to the next step.

    • If a Suggest a Manual IP Address option is not available, continue troubleshooting.


Figure : Example of clicking Suggest a Manual IP Address

Clicking Suggest a Manual IP Address

  • On the Network Configuration Page, locate the IP AddressSubnet Mask, and Default Gateway.

Figure : Example of the IP Address, Subnet Mask, and Default Gateway

Example of the IP Address, Subnet Mask, and Default Gateway

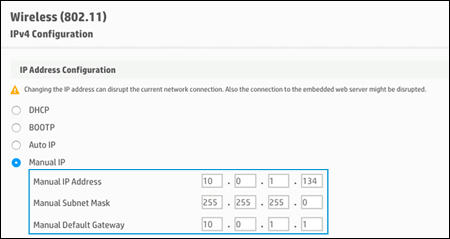
  • On the EWS webpage, type the IP Address, Subnet Mask, and Default Gateway numbers from the Network Configuration Page in the matching fields, and then click Apply. If the wireless connection drops, continue to the next step.

Figure: Example of typing the IP Address, Subnet Mask, and Default Gateway numbers

Typing the IP Address, Subnet Mask, and Default Gateway numbers


If the printer does not appear to be connected yet then add TCP/IP port as described below:

  • Search Windows for devices, and then select “Devices and Printers” in the list of results.  
  • Right-click the name of your printer, and then select “Printer Properties”. 
  •  The Properties window opens. 
  • Click the “Ports” tab, and then click “Add Port”. 
  • Select “Standard TCP/IP Port”, and then click “New Port”. 
  • Type the printer’s IP address that you wrote down earlier, and then click “Next”. 
  • Select the new “Standard TCP/IP Port” from the list, and then click “OK”. 
  • Follow the on-screen instructions to finish the setup. Now try printing. 

I sincerely hope this fixes the issue. Feel free to let me know the results. Cheers! 

Archived This topic has been archived. Information and links in this thread may no longer be available or relevant. If you have a question create a new topic by clicking here and select the appropriate board.
† The opinions expressed above are the personal opinions of the authors, not of HP. By using this site, you accept the <a href="https://www8.hp.com/us/en/terms-of-use.html" class="udrlinesmall">Terms of Use</a> and <a href="/t5/custom/page/page-id/hp.rulespage" class="udrlinesmall"> Rules of Participation</a>.