-
×InformationNeed Windows 11 help?Check documents on compatibility, FAQs, upgrade information and available fixes.
Windows 11 Support Center. -
-
×InformationNeed Windows 11 help?Check documents on compatibility, FAQs, upgrade information and available fixes.
Windows 11 Support Center. -
- HP Community
- Archived Topics
- Printers Archive
- OfficeJet Pro 6968 - printhead problem

Create an account on the HP Community to personalize your profile and ask a question
Your account also allows you to connect with HP support faster, access a personal dashboard to manage all of your devices in one place, view warranty information, case status and more.
02-22-2018 10:07 AM
 HP Recommended
Product: OfficeJet Pro 6968
Operating System: Microsoft Windows 10 (64-bit)
Unit is only 2 months old wiht minimal printing. I have completed all steps as suggested by virtual HP tech assistant. Ink is full, probably only printed about 75 pages but will not print at all any more. It does not appear that I have removeable printhead, as there is no blue lever.....need my printer asap 🙂 Thanks in advance
Solved! Go to Solution.
1 ACCEPTED SOLUTION
Accepted Solutions
03-01-2018 08:00 AM
HP Recommended
I understand that the issue persists and you are unable to reach our Phone Support for Warranty Service.
I will send you a Private Message with the Direct Number for our Phone Support and you can contact them for Warranty Service.
Thank you 🙂
KrazyToad
I Am An HP Employee
5 REPLIES 5
02-23-2018 01:35 PM
HP Recommended
Welcome to HP Support Forums. A really great platform for posting all your questions and finding solutions.
I understand that you are getting a Printhead error on your OfficeJet Pro 6968.
I'd like to help.
Please ensure that the cartridges are Well Vented and seated
-
Gather the following materials:
-
A pin to clean any clogged vents
-
A clean, lint-free cloth
-
A clean, dry cotton swab
-
Distilled or bottled water
CAUTION: Do not use tap water because it might contain contaminants that can damage the printhead.
-
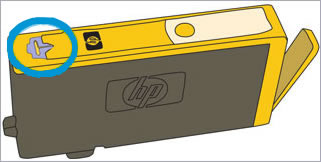
- Examine the vent area located on top of the ink cartridge, next to the HP logo.
Figure : Example of the vent area
-
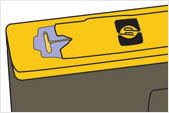
If any of the ink cartridges have clogged vents, use a pin to clean the vents.
Figure : Example of a clogged vent

Figure : Example of a clean vent
-
Use a fresh, lightly dampened, lint-free cloth to wipe any accumulated ink and debris on the copper-colored contact on the ink cartridge.
CAUTION: Be careful to wipe only the ink cartridge contacts. Do not smear any ink or debris elsewhere on the ink cartridge.
Figure : Example of the contacts on the ink cartridge
-
Ink cartridge contacts
-
-
Wipe the contact with a dry, lint-free cloth before proceeding to the next step.
-
Repeat the steps to clean each ink cartridge contact.
-
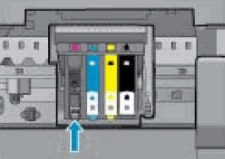
Use a fresh, lightly dampened, lint-free swab to wipe any accumulated ink and debris on the copper-colored contact on the printhead.
Figure : Example of the copper-colored contact on the printhead
-
Wipe the contact with a dry, lint-free swab before you proceed to the next step.
-
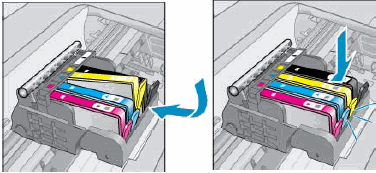
Carefully reinsert each of the ink cartridges into its slot, and then push the ink cartridge down and forward until it snaps into place.
Make sure each colored dot on the ink cartridge label matches the colored dot on the carriage.
Figure : Snapping the ink cartridge into place
-
Run your finger along the top of the ink cartridges to make sure none of them protrude.
If any ink cartridges protrude, press down firmly until each ink cartridge snaps into place.
-
Close the ink cartridge access door.
-
Check the printer control panel display for the error message.
-
If the message is to Replace the
 ,
,  ,
,  , or
, or  Ink Cartridge, remove the specified ink cartridge(s) and clean the copper-colored contact again, and then reinsert the ink cartridge(s).
-
-
Then perform a Printer Reset
(1) Turn the printer on, if it is not already on.
(2) Wait until the printer is idle and silent before you continue.
(3) With the printer turned on, disconnect the power cord from the rear of the printer.
(4) Unplug the power cord from the wall outlet.
(5) Wait at least 60 seconds.
(6) Plug the power cord back into the wall outlet.
NOTE: HP recommends connecting the printer power cord directly to the wall outlet.
(7) Reconnect the power cord to the rear of the printer.
(8) Turn on the printer, if it does not automatically turn on.
The printer might go through a warm-up period. The printer lights might flash, and the carriage might move.
Wait until the warm-up period finishes and your printer is idle and silent before you proceed.
You can also update the Firmware from Here
Please refer to this Link
If the issue persists, please contact our Phone Support for Service Options
Step 1. Open link: www.hp.com/contacthp/
Step 2. Enter Product number or select to auto detect
Step 3. Scroll down to "Still need help? Complete the form to select your contact options"
Step 4. Scroll down and click: HP contact options - click on Get phone number and phone number appear.
Thank you. 🙂
If the information I've provided was helpful, give us some reinforcement by clicking the "Solution Accepted" and "Kudos" Buttons.
KrazyToad
I Am An HP Employee
03-01-2018 08:00 AM
HP Recommended
I understand that the issue persists and you are unable to reach our Phone Support for Warranty Service.
I will send you a Private Message with the Direct Number for our Phone Support and you can contact them for Warranty Service.
Thank you 🙂
KrazyToad
I Am An HP Employee
04-12-2019 01:09 PM
HP Recommended
I received the "There is a problem with the printhead" message after only a few months and minimal printing. I have followed all the instructions I could find online to no avail. Still won't print. I tried to update firmware by clicking on the link provided and was told to come back later, it was not available. What to do?
@KrazyToad wrote:
Welcome to HP Support Forums. A really great platform for posting all your questions and finding solutions.
I understand that you are getting a Printhead error on your OfficeJet Pro 6968.
I'd like to help.
Please ensure that the cartridges are Well Vented and seated
Gather the following materials:
A pin to clean any clogged vents
A clean, lint-free cloth
A clean, dry cotton swab
Distilled or bottled water
CAUTION: Do not use tap water because it might contain contaminants that can damage the printhead.
- Examine the vent area located on top of the ink cartridge, next to the HP logo.
Figure : Example of the vent area
If any of the ink cartridges have clogged vents, use a pin to clean the vents.
Figure : Example of a clogged vent
Figure : Example of a clean vent
Use a fresh, lightly dampened, lint-free cloth to wipe any accumulated ink and debris on the copper-colored contact on the ink cartridge.
CAUTION: Be careful to wipe only the ink cartridge contacts. Do not smear any ink or debris elsewhere on the ink cartridge.
Figure : Example of the contacts on the ink cartridge
Ink cartridge contacts
Wipe the contact with a dry, lint-free cloth before proceeding to the next step.
Repeat the steps to clean each ink cartridge contact.
Use a fresh, lightly dampened, lint-free swab to wipe any accumulated ink and debris on the copper-colored contact on the printhead.
Figure : Example of the copper-colored contact on the printhead
Wipe the contact with a dry, lint-free swab before you proceed to the next step.
Carefully reinsert each of the ink cartridges into its slot, and then push the ink cartridge down and forward until it snaps into place.
Make sure each colored dot on the ink cartridge label matches the colored dot on the carriage.
Figure : Snapping the ink cartridge into place
Run your finger along the top of the ink cartridges to make sure none of them protrude.
If any ink cartridges protrude, press down firmly until each ink cartridge snaps into place.
Close the ink cartridge access door.
Check the printer control panel display for the error message.
If the message is to Replace the
Then perform a Printer Reset
(1) Turn the printer on, if it is not already on.
(2) Wait until the printer is idle and silent before you continue.
(3) With the printer turned on, disconnect the power cord from the rear of the printer.
(4) Unplug the power cord from the wall outlet.
(5) Wait at least 60 seconds.
(6) Plug the power cord back into the wall outlet.
NOTE: HP recommends connecting the printer power cord directly to the wall outlet.
(7) Reconnect the power cord to the rear of the printer.
(8) Turn on the printer, if it does not automatically turn on.
The printer might go through a warm-up period. The printer lights might flash, and the carriage might move.
Wait until the warm-up period finishes and your printer is idle and silent before you proceed.
You can also update the Firmware from Here
Please refer to this Link
If the issue persists, please contact our Phone Support for Service Options
Step 1. Open link: www.hp.com/contacthp/
Step 2. Enter Product number or select to auto detect
Step 3. Scroll down to "Still need help? Complete the form to select your contact options"
Step 4. Scroll down and click: HP contact options - click on Get phone number and phone number appear.
Thank you. 🙂
If the information I've provided was helpful, give us some reinforcement by clicking the "Solution Accepted" and "Kudos" Buttons.
† The opinions expressed above are the personal opinions of the authors, not of HP. By using this site, you accept the Terms of Use and Rules of Participation.


Didn't find what you were looking for?
Ask the community
† The opinions expressed above are the personal opinions of the authors, not of HP. By using this site, you accept the <a href="https://www8.hp.com/us/en/terms-of-use.html" class="udrlinesmall">Terms of Use</a> and <a href="/t5/custom/page/page-id/hp.rulespage" class="udrlinesmall"> Rules of Participation</a>.