-
×InformationNeed Windows 11 help?Check documents on compatibility, FAQs, upgrade information and available fixes.
Windows 11 Support Center. -
-
×InformationNeed Windows 11 help?Check documents on compatibility, FAQs, upgrade information and available fixes.
Windows 11 Support Center. -
- HP Community
- Archived Topics
- Printers Archive
- Streaky printing

Create an account on the HP Community to personalize your profile and ask a question
Your account also allows you to connect with HP support faster, access a personal dashboard to manage all of your devices in one place, view warranty information, case status and more.
03-22-2017 01:44 PM
 HP Recommended
Product: Officejet Pro 6835
Operating System: Microsoft Windows 10 (64-bit)
I have an hp officejet Pro 6835. Getting bad printing in black. Have cleaned head 3X and aligned head 3X also. Printing ok on first 2 pages then goes south.
Solved! Go to Solution.
1 ACCEPTED SOLUTION
Accepted Solutions
03-22-2017 01:46 PM - edited 03-22-2017 01:47 PM
HP Recommended
Step 1: Print a Print Quality Diagnostic Page
Use the Print Quality Diagnostic Page to identify and troubleshoot specific print quality issues.
- Load plain white paper into the tray.
- On the printer control panel, swipe the display to scroll to Setup, and then touch the Setup icon (
 ). The Setup menu displays.
 - Swipe the display to scroll to Reports, and then touch Reports.
- Touch Print Quality Report. The printer prints the report.Figure : Example of a Print Quality Diagnostic Page
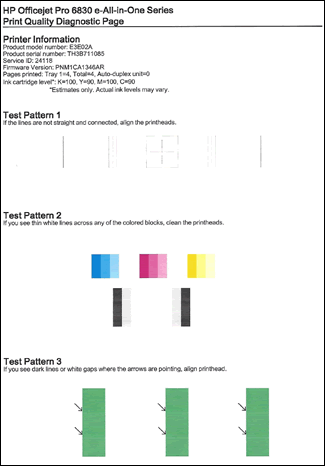
Step 2: Examine Test Pattern 1
Evaluate Test Pattern 1 on the Print Quality Diagnostic Page to make sure that the lines are straight and connected.
Figure : Test Pattern 1
- If the lines in Test Pattern 1 are straight and connected, skip to the step to examine Test Pattern 2.
- If the lines in Test Pattern 1 are not straight and connected, continue to the next step to align the printhead.
Step 3: Use an automated tool to align the printhead
If the lines in Test Pattern 1 are not straight and connected, align the printhead from the printer control panel to troubleshoot the issue, and then print another Print Quality Diagnostic Page.
- Load plain white paper into the tray.
- On the printer control panel, swipe the display to scroll to Setup, and then touch the Setup icon (). The Setup menu displays.
- Swipe the display to scroll to Printer Maintenance, and then touch Printer Maintenance.
- Touch Align Printhead.
- After the printer prints the alignment page, touch OK, and then recycle or discard the alignment page.
- Print another Print Quality Diagnostic Page to see if the issue is resolved.
- If the lines in Test Pattern 1 are straight and connected, continue to the next step to examine Test Pattern 2.
- If the lines in Test Pattern 1 are not straight and connected, skip to the solution to service the printer.
Step 4: Examine Test Pattern 2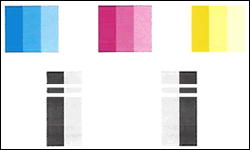
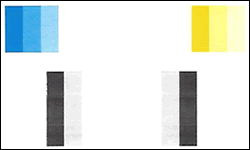
Examine the color blocks in Test Pattern 2 on the Print Quality Diagnostic Page.
Figure : Test Pattern 2 with white lines in a color bar
Figure : Test Pattern 2 with a missing color block
- If the color blocks in Test Pattern 2 do not show white lines, and are not faded or missing, skip to the step to examine Test Pattern 3.
- If any of the color blocks in Test Pattern 2 show white lines or are faded or missing completely, continue to the next step to vent the cartridges.
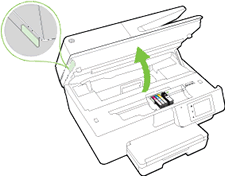
Step 5: Make sure that the cartridges are properly vented and seated correctly
If the color blocks in Test Pattern 2 display white lines or are faded or missing completely, check the vents on the top of the cartridges. If they are clogged or obstructed, the cartridges might not work properly, which can affect print quality.
- Press the Power button to turn on the printer, if it is not already on.
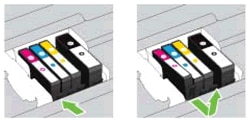
- Place your fingers into the slot on the left side of the printer, and then gently lift up to open the cartridge access door. The carriage moves to the cartridge access area. Wait several seconds until the carriage is idle and silent before you continue.Figure : Open the cartridge access door
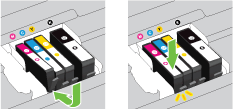
- Press the tab inward on the front of the old cartridge to release it, and then pull up on the cartridge to remove it from the slot.Figure : Remove the cartridge from its slot
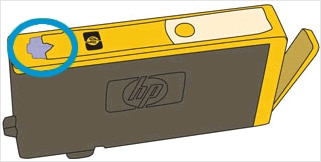
- Examine the vent area above the HP logo on the top of the cartridge.Figure : Examine the vent area on the cartridge
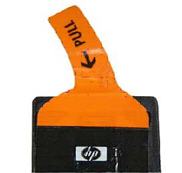
- If the cartridge still has the orange pull-tab attached, pull to remove it.Figure : Remove the orange pull-tab
- If the vent is clogged, use a straight pin to gently remove excess adhesive from the vent.Figure : Clean the clogged vent with a pin
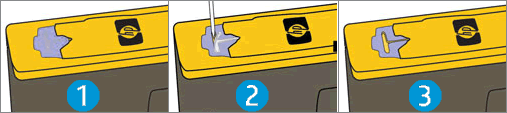
- Clogged vent
- With a straight pin, gently remove excess adhesive from the vent
- Unclogged vent
- Turn the cartridge so that the cartridge contacts face downward, and then match the label color with the color dot on the carriage.
- Slide the cartridge into its slot, and then gently press the cartridge down until it clicks into place.Figure : Install the cartridge
- Repeat these steps to inspect the vents on each of the cartridges.
- Make sure that each cartridge is firmly installed in its slot. Run your finger along the top of the cartridges to feel for any that are protruding, and if any are, press down firmly until each cartridge snaps into place.
- Close the cartridge access door.Figure : Close the cartridge access door

Step 6: Use an automated tool to clean the printhead
After checking the vents on top of the cartridges, clean the printhead from the control panel, and then print another Print Quality Diagnostic Page.
CAUTION:Never turn off the printer when ink cartridges are missing. Make sure you replace any missing ink cartridges as soon as possible to avoid print quality issues and possible extra ink usage or damage to the ink system. To avoid issues that require cleaning the printhead, always turn the printer off with the Power button on the printer itself.
- Load plain white paper into the tray.
- On the printer control panel, swipe the display to scroll to Setup, and then touch the Setup icon (). The Setup menu displays.
- Swipe the display to scroll to Printer Maintenance, and then touch Printer Maintenance.
- Touch Clean Printhead. There are three cleaning stages. A test page (different from the Print Quality Diagnostics page) prints between each cleaning stage.
- Examine the test page for print quality.
- If the print quality is unacceptable, touch Proceed when prompted to continue the next level of cleaning. Repeat these steps for each cleaning stage, if necessary.
NOTE:
If the printhead is badly clogged, it might require another cleaning cycle. If so, wait 30 minutes before you perform all three levels of cleaning again. - If the print quality is acceptable, touch Done when prompted to continue the next level of cleaning.
- Print another Print Quality Diagnostic Page to see if the issue is resolved.
- If there are no defects in Test Pattern 2, continue to the next step to examine Test Pattern 3.
- If there are defects in Test Pattern 2, try cleaning the printhead again.
- If there are still defects in Test Pattern 2 after another cleaning, you can try to clean the printhead again or skip to the solution to service the printer.
Step 7: Examine Test Pattern 3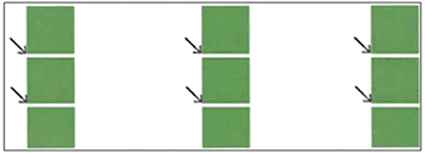
Examine the green columns in Test Pattern 3 on the Print Quality Diagnostic Page.
Figure : Test Pattern 3 with white gaps in the columns
- If the columns in Test Pattern 3 do not display dark lines or white gaps where the arrows are pointing, skip to the Tips to improve print quality section.
- If the columns in Test Pattern 3 display dark lines or white gaps where the arrows are pointing, continue to the next step to align the printhead.
Step 8: Use an automated tool to align the printhead
If the columns in Test Pattern 3 display dark lines or white gaps, align the printhead from the printer control panel to troubleshoot the issue, and then print another Print Quality Diagnostic Page.
- Load plain white paper into the tray.
- On the printer control panel, swipe the display to scroll to Setup, and then touch the Setup icon (). The Setup menu displays.
- Swipe the display to scroll to Printer Maintenance, and then touch Printer Maintenance.
- Touch Align Printhead.
- After the printer prints the alignment page, touch OK, and then recycle or discard the alignment page.
- Print another Print Quality Diagnostic Page to see if the issue is resolved.
- If there are no defects on the page but the print quality is unacceptable, continue to the Tips to improve print quality section.
- If there are still dark lines or white gaps where the arrows are pointing in Test Pattern 3, skip to the solution to service the printer.
-- ReverseTalk
I work on behalf of HP.
Click the thumbs up + button to thank me. Mark Accepted Solution if I solved your inquiry.
I work on behalf of HP.
Click the thumbs up + button to thank me. Mark Accepted Solution if I solved your inquiry.
5 REPLIES 5
03-22-2017 01:46 PM - edited 03-22-2017 01:47 PM
HP Recommended
Step 1: Print a Print Quality Diagnostic Page
Use the Print Quality Diagnostic Page to identify and troubleshoot specific print quality issues.
- Load plain white paper into the tray.
- On the printer control panel, swipe the display to scroll to Setup, and then touch the Setup icon (). The Setup menu displays.
- Swipe the display to scroll to Reports, and then touch Reports.
- Touch Print Quality Report. The printer prints the report.Figure : Example of a Print Quality Diagnostic Page
Step 2: Examine Test Pattern 1
Evaluate Test Pattern 1 on the Print Quality Diagnostic Page to make sure that the lines are straight and connected.
Figure : Test Pattern 1
- If the lines in Test Pattern 1 are straight and connected, skip to the step to examine Test Pattern 2.
- If the lines in Test Pattern 1 are not straight and connected, continue to the next step to align the printhead.
Step 3: Use an automated tool to align the printhead
If the lines in Test Pattern 1 are not straight and connected, align the printhead from the printer control panel to troubleshoot the issue, and then print another Print Quality Diagnostic Page.
- Load plain white paper into the tray.
- On the printer control panel, swipe the display to scroll to Setup, and then touch the Setup icon (). The Setup menu displays.
- Swipe the display to scroll to Printer Maintenance, and then touch Printer Maintenance.
- Touch Align Printhead.
- After the printer prints the alignment page, touch OK, and then recycle or discard the alignment page.
- Print another Print Quality Diagnostic Page to see if the issue is resolved.
- If the lines in Test Pattern 1 are straight and connected, continue to the next step to examine Test Pattern 2.
- If the lines in Test Pattern 1 are not straight and connected, skip to the solution to service the printer.
Step 4: Examine Test Pattern 2
Examine the color blocks in Test Pattern 2 on the Print Quality Diagnostic Page.
Figure : Test Pattern 2 with white lines in a color bar
Figure : Test Pattern 2 with a missing color block
- If the color blocks in Test Pattern 2 do not show white lines, and are not faded or missing, skip to the step to examine Test Pattern 3.
- If any of the color blocks in Test Pattern 2 show white lines or are faded or missing completely, continue to the next step to vent the cartridges.
Step 5: Make sure that the cartridges are properly vented and seated correctly
If the color blocks in Test Pattern 2 display white lines or are faded or missing completely, check the vents on the top of the cartridges. If they are clogged or obstructed, the cartridges might not work properly, which can affect print quality.
- Press the Power button to turn on the printer, if it is not already on.
- Place your fingers into the slot on the left side of the printer, and then gently lift up to open the cartridge access door. The carriage moves to the cartridge access area. Wait several seconds until the carriage is idle and silent before you continue.Figure : Open the cartridge access door
- Press the tab inward on the front of the old cartridge to release it, and then pull up on the cartridge to remove it from the slot.Figure : Remove the cartridge from its slot
- Examine the vent area above the HP logo on the top of the cartridge.Figure : Examine the vent area on the cartridge
- If the cartridge still has the orange pull-tab attached, pull to remove it.Figure : Remove the orange pull-tab
- If the vent is clogged, use a straight pin to gently remove excess adhesive from the vent.Figure : Clean the clogged vent with a pin
- Clogged vent
- With a straight pin, gently remove excess adhesive from the vent
- Unclogged vent
- Turn the cartridge so that the cartridge contacts face downward, and then match the label color with the color dot on the carriage.
- Slide the cartridge into its slot, and then gently press the cartridge down until it clicks into place.Figure : Install the cartridge
- Repeat these steps to inspect the vents on each of the cartridges.
- Make sure that each cartridge is firmly installed in its slot. Run your finger along the top of the cartridges to feel for any that are protruding, and if any are, press down firmly until each cartridge snaps into place.
- Close the cartridge access door.Figure : Close the cartridge access door
Step 6: Use an automated tool to clean the printhead
After checking the vents on top of the cartridges, clean the printhead from the control panel, and then print another Print Quality Diagnostic Page.
CAUTION:Never turn off the printer when ink cartridges are missing. Make sure you replace any missing ink cartridges as soon as possible to avoid print quality issues and possible extra ink usage or damage to the ink system. To avoid issues that require cleaning the printhead, always turn the printer off with the Power button on the printer itself.
- Load plain white paper into the tray.
- On the printer control panel, swipe the display to scroll to Setup, and then touch the Setup icon (). The Setup menu displays.
- Swipe the display to scroll to Printer Maintenance, and then touch Printer Maintenance.
- Touch Clean Printhead. There are three cleaning stages. A test page (different from the Print Quality Diagnostics page) prints between each cleaning stage.
- Examine the test page for print quality.
- If the print quality is unacceptable, touch Proceed when prompted to continue the next level of cleaning. Repeat these steps for each cleaning stage, if necessary.
NOTE:
If the printhead is badly clogged, it might require another cleaning cycle. If so, wait 30 minutes before you perform all three levels of cleaning again. - If the print quality is acceptable, touch Done when prompted to continue the next level of cleaning.
- Print another Print Quality Diagnostic Page to see if the issue is resolved.
- If there are no defects in Test Pattern 2, continue to the next step to examine Test Pattern 3.
- If there are defects in Test Pattern 2, try cleaning the printhead again.
- If there are still defects in Test Pattern 2 after another cleaning, you can try to clean the printhead again or skip to the solution to service the printer.
Step 7: Examine Test Pattern 3
Examine the green columns in Test Pattern 3 on the Print Quality Diagnostic Page.
Figure : Test Pattern 3 with white gaps in the columns
- If the columns in Test Pattern 3 do not display dark lines or white gaps where the arrows are pointing, skip to the Tips to improve print quality section.
- If the columns in Test Pattern 3 display dark lines or white gaps where the arrows are pointing, continue to the next step to align the printhead.
Step 8: Use an automated tool to align the printhead
If the columns in Test Pattern 3 display dark lines or white gaps, align the printhead from the printer control panel to troubleshoot the issue, and then print another Print Quality Diagnostic Page.
- Load plain white paper into the tray.
- On the printer control panel, swipe the display to scroll to Setup, and then touch the Setup icon (). The Setup menu displays.
- Swipe the display to scroll to Printer Maintenance, and then touch Printer Maintenance.
- Touch Align Printhead.
- After the printer prints the alignment page, touch OK, and then recycle or discard the alignment page.
- Print another Print Quality Diagnostic Page to see if the issue is resolved.
- If there are no defects on the page but the print quality is unacceptable, continue to the Tips to improve print quality section.
- If there are still dark lines or white gaps where the arrows are pointing in Test Pattern 3, skip to the solution to service the printer.
-- ReverseTalk
I work on behalf of HP.
Click the thumbs up + button to thank me. Mark Accepted Solution if I solved your inquiry.
I work on behalf of HP.
Click the thumbs up + button to thank me. Mark Accepted Solution if I solved your inquiry.
03-22-2017 01:51 PM
HP Recommended
Sorry to hear that you are having issues with the black. Sounds like you are on the right track if cleaning the print head initially fix it, it very well may go away after cleaning a few more times.
Here is a doc for specific print quality issues on these models.
I imagine that if it clears up that the ink cartridge is probably ok, but it would be interesting to see if a different black ink cartridge would make a difference. Perhaps there is something with this cartridge that is causing the print head to oversaturate.
Though I work for HP, My posts express MY opinion, and not those of HP.
† The opinions expressed above are the personal opinions of the authors, not of HP. By using this site, you accept the Terms of Use and Rules of Participation.


Didn't find what you were looking for?
Ask the community
† The opinions expressed above are the personal opinions of the authors, not of HP. By using this site, you accept the <a href="https://www8.hp.com/us/en/terms-of-use.html" class="udrlinesmall">Terms of Use</a> and <a href="/t5/custom/page/page-id/hp.rulespage" class="udrlinesmall"> Rules of Participation</a>.