-
×InformationNeed Windows 11 help?Check documents on compatibility, FAQs, upgrade information and available fixes.
Windows 11 Support Center. -
-
×InformationNeed Windows 11 help?Check documents on compatibility, FAQs, upgrade information and available fixes.
Windows 11 Support Center. -
- HP Community
- Archived Topics
- Printers Archive
- how do you print photos

Create an account on the HP Community to personalize your profile and ask a question
Your account also allows you to connect with HP support faster, access a personal dashboard to manage all of your devices in one place, view warranty information, case status and more.
03-11-2017 10:59 AM
 HP Recommended
Product: laserjet pro mfp m477fdw
Operating System: Microsoft Windows 10 (64-bit)
I'm trying to print a photo on 4" by 6" HP Advanced glossy photo paper. I used the manual feed and chose the correct size on the print prefernces, but it did not print on the photo paper and the photo paper jammed in the feeder. this happened twice.
Should I input the paper somewhere other than manual bin? It fed paper in but then it got stuck inside printer.
5 REPLIES 5
03-12-2017 11:56 AM
HP Recommended
Hi@Woodysc
These are the media types support on your printer.
1) Paper (bond, brochure, colored, glossy, letterhead, photo, plain, preprinted, prepunched, recycled, rough),
2) postcards
3) labels
4) envelopes
03-13-2017 01:35 PM
HP Recommended
Hi,
It should support -
Follow these steps :-
Open the print window and document properties to set up the print job.
- Before printing, edit the photo to improve colors, brightness, contrast and any other appearance settings.
- Right-click the photo you want to print, select Open with, then select Windows Photo Viewer or Paint.
NOTE:
For Windows 10, open the photo with Paint to use these steps. Windows Photo Viewer does not come with Windows 10 and was replaced by the Photos app. - Click Print, or click File or the menu icon
 (Paint), then click Print.The Print or Print Pictures window opens with general print job settings.
 - Open the printer Document Properties window to access more layout, quality, color, and advanced print settings.
- In the Print Pictures window in Windows Photo Viewer, click Options... in the lower right corner of the screen, then click Printer Properties... in the Print Settings window.
- In the Print window in Paint, click Preferences.
Figure : Example of printer Document Properties window with settings tabs and the Advanced settings button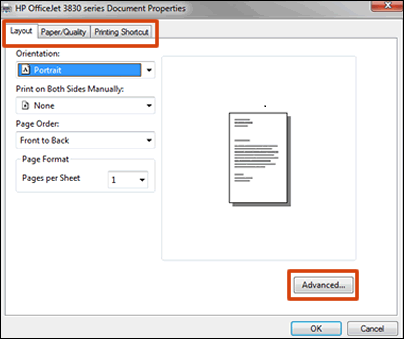
- Use this guide to find and use print job settings for photos in the Document Properties window. Menu names and available print settings vary by printer.
NOTE:
If the Document Properties window has a Printing Shortcut tab, select one of the photo print job shortcuts that has essential settings already selected for you.SettingLocationPortrait or landscape orientationSelect Portrait for vertical prints or Landscape for horizontal prints.Orientation menu on the Layout, Finishing, or Features tabPaper tray or sourceSelect the tray you loaded the photo paper into, if your printer has more than one tray.Source or Paper source menu on the Paper/Quality or Features tabPhoto paper typeSet the paper type you are using, such as HP photo paper, glossy, or matte finish, so the printer properly handles and prints on the paper.Type, Paper Type, or Media menu on the Paper/Quality or Features tabPaper sizeSelect the paper size you loaded in the printer, such as 4 x 6, 5 x 7, or 8 x 10 paper.Size or Paper Size menu in Advanced Options or on the Features tabSome newer printers support more paper options. Go to Creating Custom Paper Sizes for more information.Add or remove a borderAdd a white border around the photo or print to the very edge of the paper, if supported by your printer.Borderless Printing or Paper Size menu in Advanced OptionsThe Printing Shortcut tab might include shortcuts to print with or without a border - Change the following color and quality settings for best photo printing results.SettingLocationQuality: Measured in print resolution dots per inch (DPI). Higher DPI produces clearer and more detailed photos, but slows print speed and may use more ink. See printer specifications for print speeds (measured in pages-per-minute).
- Draft: Lowest DPI typically used when ink cartridge levels are low or when high quality prints are not needed
- Normal: Default quality setting suitable for most print jobs
- Best: Better DPI than Normal
- Max DPI: Highest DPI setting available
Quality Settings or Media menu on the Paper/Quality tabPrint in Max DPI or Output Quality menus are available in Advanced Options, depending on the printerPrinting in color or black and white: The following settings might be available, depending on the printer.- Color: Uses all cartridges to print full color photos
- Black & White, Black Ink Only, or Monochrome: Printer uses the black ink cartridge only; suitable for normal or lower quality black and white prints
- Grayscale: Printer uses ink from all cartridges to produce a wider range of black and grey tones; suitable for high quality black and white prints
There are several places to select color and black and white settings, depending on the printer.Select Color or Black & White on the Paper/Quality tabOn the Color tab, Features tab, or in Advanced Options, click the menu next to Print in Grayscale and select Off for color prints, High Quality Grayscale, or Black Ink Only - Click OK, then click Print.
- After printing, remove any photo paper from the tray and store it in the package it came in or in a plastic bag. If left in the tray for an extended time, the paper might start to curl.
Tips for printing quality photos
Read these tips and recommendations for printing the best pictures with your HP printer.
- Use HP photo paper: HP photo papers are optimized for use with inkjet printers and provide quality prints for craft projects or framing.
- Take high resolution photos: Higher resolution photographs result in clearer, more vibrant prints.
- Edit photos before printing: Before printing, use photo editing tools to crop the image and improve colors, brightness, contrast, and any other appearance settings.
- Check the computer display: If your computer monitor displays colors inaccurately, printed photo quality might be unsatisfactory. Try changing to the monitor's default color settings, or use a calibration tool to confirm the accuracy of the colors.
- Use Best or Max DPI quality in print settings: Higher print quality settings provide best results.
03-13-2017 03:57 PM
HP Recommended
I chose size and paper type in prefernces before printing. I used the manual feed tray and don't see on you steps where it discusses loading the paper.
Should it go somewhere other than the manual feed?
Have you printied photos on this printer?
† The opinions expressed above are the personal opinions of the authors, not of HP. By using this site, you accept the Terms of Use and Rules of Participation.


Didn't find what you were looking for?
Ask the community
† The opinions expressed above are the personal opinions of the authors, not of HP. By using this site, you accept the <a href="https://www8.hp.com/us/en/terms-of-use.html" class="udrlinesmall">Terms of Use</a> and <a href="/t5/custom/page/page-id/hp.rulespage" class="udrlinesmall"> Rules of Participation</a>.