• ×
    Information
    Need Windows 11 help?
    Check documents on compatibility, FAQs, upgrade information and available fixes.
    Windows 11 Support Center.
  • post a message
  • ×
    Information
    Need Windows 11 help?
    Check documents on compatibility, FAQs, upgrade information and available fixes.
    Windows 11 Support Center.
  • post a message
Guidelines
Ready to level up? Join the Expert Program—
Archived This topic has been archived. Information and links in this thread may no longer be available or relevant. If you have a question create a new topic by clicking here and select the appropriate board.
HP Recommended
Officejet 4635

I have an error "The following ink cartridges must be replaced" even when I replaced the cartridge with new ink twice.

3 REPLIES 3
HP Recommended

@amayesing1


Let me take a moment to thank you for posting on the HP Support Forums. 


I understand that you have an HP Officejet 4635 e-All-in-One Printer and it displays a message saying "The following ink cartridges must be replaced." You have replaced the cartridge twice and still the issue persists. You've done a remarkable job performing the steps. 


I would like to know the following information to assist you better:

  • Are these original HP cartridges or refilled ones?
  • Does the printer indicate whether it is the black or color cartridge?

Meanwhile, I did some research and suggest you to perform the following steps:

  • Disconnect the power cable from the printer while the printer is still ON.
  • Disconnect any other cables if connected the printer.
  • Press and hold the printer’s power button for 15 seconds.
  • The printer should be directly connected to the wall outlet and not to a surge protector. Reconnect the power cable to print and the printer should power ON by itself. If the printer doesn’t power ON then please manually power it ON.


If the issue persists then clean the cartridge contacts and the contacts inside the printer as shown below:

Gather the following materials.

  • Dry foam-rubber swabs, lint-free cloth, or any soft material that does not come apart or leave fibers (coffee filters work well)

  • Distilled, filtered, or bottled water (tap water might contain contaminants that can damage the cartridges). Do not use platen cleaners or alcohol to clean the cartridge contacts. These can damage the cartridge or the printer.

  • Press the Power button to turn on the printer, if it is not already on.

  • Remove the ink cartridges out.


Figure : Remove the cartridge

Image: Remove the cartridge.

  1. Lift the lid

  2. Gently push the lid back

  3. Pull up on the cartridge


  • Do not remove both cartridges at the same time. Remove and clean each cartridge separately. Do not leave a cartridge outside the printer for more than 30 minutes.
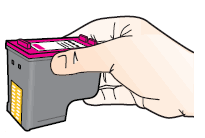
  • Hold the cartridge by its sides.

Figure : Hold the cartridge by its sides

Image: Hold the cartridge by its sides.


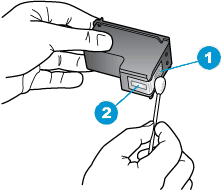
  • Inspect the cartridge contacts for ink and debris buildup.
  • Do not touch the copper-colored contacts or the ink nozzles. Touching these parts can result in clogs, ink failure, and bad electrical connections.

Figure : Do not touch the contacts or nozzles


Figure : Clean the contact

Image: Clean the contacts.


  1. Copper-colored contacts

  2. Ink nozzles (do not clean)

  • Lightly moisten another foam-rubber swab or lint-free cloth with distilled water, and then squeeze any excess water from it.

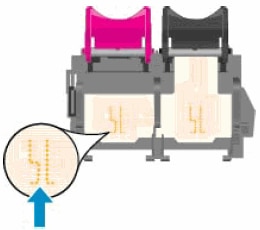
  • Use the swab or cloth to clean the electrical contacts in the carriage, located inside the printer in the cartridge slots.

Figure : The electrical contacts in the cartridge slots

Image: The electrical contacts in the cartridge slots.


  • Allow the carriage contacts to dry for about 10 minutes.

  • Hold the cartridge at a slight upward angle with the cartridge contacts facing the rear of the printer, slide the cartridge into the empty slot, and then close the lid on the cartridge slot to secure the cartridge in place. Insert the color cartridge in the slot on the left. Insert the black cartridge in the slot on the right.

Figure : Insert the cartridge


Image: Insert the cartridge.

  • Insert the cartridge

  • Close the lid

  • The color cartridge is on the left, and the black cartridge is on the right

  • Repeat the previous steps to install the other cartridge, if necessary.

  • Close the cartridge access door.

If the issue persists then it could be a printer issue. 


I hpe this information helps. Feel free to keep me posted. All the best! 🙂

HP Recommended
I have done what you suggested. I replaced with original HP cartridges and it is the COLOR cartridge that needs to be replaced.
HP Recommended

@amayesing1


Before you contact our HP phone support for the hardware service options, I suggest you to reset the printer to its factory settings and check if it helps.


I have sent you a private message with the steps to reset the printer.


All the best! 🙂

Archived This topic has been archived. Information and links in this thread may no longer be available or relevant. If you have a question create a new topic by clicking here and select the appropriate board.
† The opinions expressed above are the personal opinions of the authors, not of HP. By using this site, you accept the <a href="https://www8.hp.com/us/en/terms-of-use.html" class="udrlinesmall">Terms of Use</a> and <a href="/t5/custom/page/page-id/hp.rulespage" class="udrlinesmall"> Rules of Participation</a>.