-
×InformationNeed Windows 11 help?Check documents on compatibility, FAQs, upgrade information and available fixes.
Windows 11 Support Center. -
-
×InformationNeed Windows 11 help?Check documents on compatibility, FAQs, upgrade information and available fixes.
Windows 11 Support Center. -
- HP Community
- Desktops
- Desktop Operating Systems and Recovery
- Pavilion Desktop will not auto sleep

Create an account on the HP Community to personalize your profile and ask a question
Your account also allows you to connect with HP support faster, access a personal dashboard to manage all of your devices in one place, view warranty information, case status and more.
Check out our WINDOWS 11 Support Center info about: OPTIMIZATION, KNOWN ISSUES, FAQs, VIDEOS AND MORE.

It has been a while since anyone has replied. Simply ask a new question if you would like to start the discussion again.
10-09-2020 10:00 AM
 HP Recommended
Product: Pavilion Desktop 590-p0066
Operating System: Microsoft Windows 10 (64-bit)
I hope someone can point me in the right direction.
Since Oct 4 my Pavilion Desktop 590-p0066 will not go into sleep mode on its own. I can manually make it enter sleep.
It was working before then. I tried the power troubleshooter but all that did was change the times - and they did not work either.
The only recent changes I saw(besides defender definition updates) on update history were two items:
HP Inc. - Software Component - 1.25.2067.0
HP Inc. - Software Component - 4.2.256.0
These are both under drivers. I can't uninstall them. Doing a system restore to before Oct 3 did not change them.
The operating system is Windows 10 Home 64 bit 2004.
Thank you
Solved! Go to Solution.
1 ACCEPTED SOLUTION
Accepted Solutions
10-11-2020 10:29 AM
HP Recommended
Hi @Swamped1,
I'd like to help!
Try the below suggestions-
Step 1: Change the power settings in Windows
Power settings control how and when the computer goes into and comes out of sleep/standby mode. Choose your operating system below to make sure the power options are set so the computer can use sleep/standby mode correctly.
Windows 10
Open the Power Options menu in the Control Panel, and then adjust the power settings for computers with Windows 10.
-
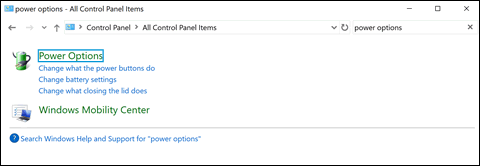
In Windows, search for and open Control panel.
-
In the Control Panel search field, type power options, and then select Power Options from the list.
-
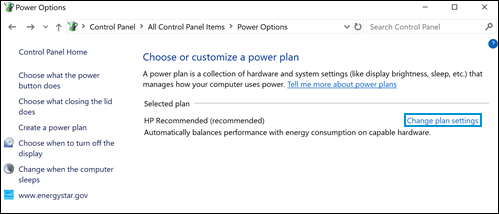
Click Change plan settings next to the plan you want to change.
-
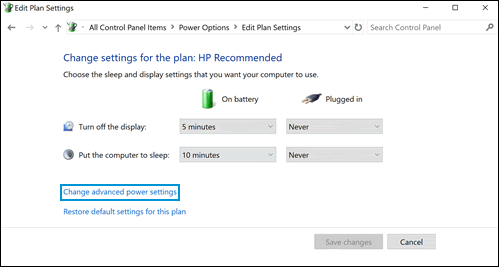
On the Change settings for the plan window, choose the display and sleep settings you want to use.
-
To change more power settings, click Change advanced power settings.
-
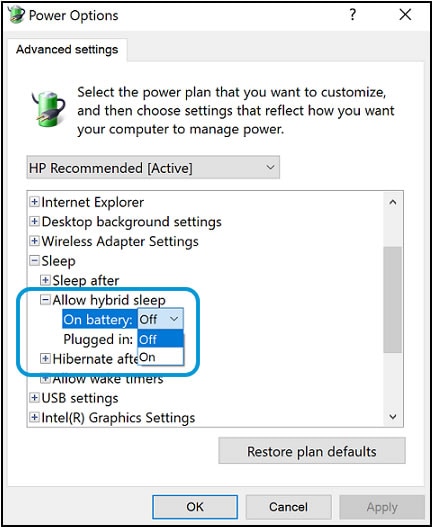
On the Advanced settings tab, select the power plan from the drop-down menu, and then expand the category you want to customize. Expand each setting you want to change, and then choose the values you want to use.
-
When done, click OK.
-
Restart the computer.
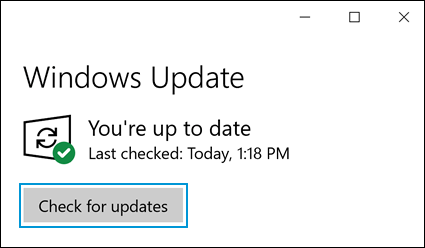
Step 2: Check for Windows updates
Having the most current software and drivers installed on your computer might resolve the issue. Choose your operating system below for steps to check for updates using Windows Update.
Find and install updated software and hardware drivers for your computer with Windows 10.
NOTE:To learn how to manage your update preferences, go to the Advanced options section.
-
In Windows, search for and open Windows Update settings.
-
Click Check for updates. If there are any available updates, they begin installing automatically.
-
After the updates install, restart your computer, if necessary.
Advanced options
Open the Advanced options menu for additional settings for Windows Update.
-
In the Windows Update window, click Advanced options.

-
In the Update options area, you can manage the delivery and installation of updates:
-
Turn on Receive updates for other Microsoft products when you update Windows to have the computer automatically update other Microsoft products drives and apps when updating Windows.
-
Turn on Download updates over metered connections (extra charges may apply) to allow updates to download over a metered connection.
-
Turn on Restart this device as soon as possible when a restart is required to install an update. Windows displays a notice prior to restarting. The computer must be turned on and plugged in for this option.
-
For more information about using Windows Update, see Updating Drivers and Software with Windows Update (Windows 10, 8, 7).
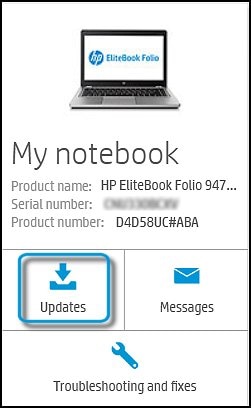
Step 3: Check for updates from HP
Having the most current software and driver updates from HP installed on your computer might resolve the issue. Use HP Support Assistant to automatically find and install the latest updates for your computer.
-
In Windows, search for and open HP Support Assistant, or click the app icon
 in the taskbar.
If the app is not installed on your computer, download the latest version from the HP Support Assistant website.
-
In HP Support Assistant, click My devices, and then click Updates in the window for your device.
-
If prompted, sign in with your HP account credentials, create a new HP account, or postpone signing in.
-
Click Check for updates and messages.
HP Support Assistant checks for the latest updates from HP.

-
If new updates are available, make sure the checkbox next to each update is checked, and then click Download and install to download and install the updates.
For more information about configuring and using HP Support Assistant, see Using HP Support Assistant (Windows).
For more information and instructions about downloading and updating software and drivers, see Downloading or updating software and drivers for HP computers.
If the issue persists after installing updates from HP, continue to the next step.
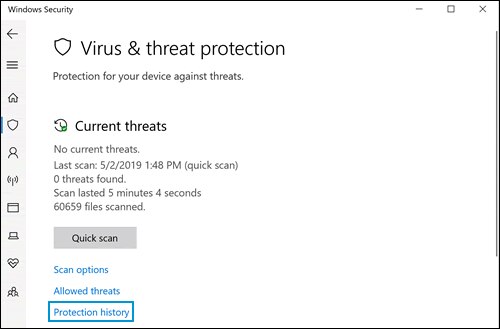
Step 4: Scan for malware
Malware applications can cause sleep/hibernate issues. Using Windows Security (Windows 10) or Windows Defender (Windows 😎 to scan the computer for malware might resolve the issue. These applications can prevent malware from infecting your computer in two ways:
-
Real-time protection: When malware tries to install itself or run on your computer, you receive a notification. You also receive a notification when applications attempt to change important settings.
-
Scanning options: Scan for malware that might be installed on your computer and automatically remove (or temporarily quarantine) detected malware.
Choose your operating system below for steps to scan the computer for malware.
Windows 10
Open the Windows Security app, and then complete a full scan for computers with Windows 10.
-
In Windows, search for and open Windows Security.
-
Click Virus & threat protection.

-
Click Scan options.

-
Select Full scan, and then click Scan now.
The scan might take over an hour to complete, and the computer might run slowly during the scan.
-
To view the scan results, search for and open Windows Security, select Virus & threat protection, and then click Protection history.
-
If no threats were detected, no action is necessary.
-
If threats were detected, click an item for more information and suggested actions.
For more information about using Windows Security, go to Using Windows Security to Prevent Virus and Spyware Problems (Windows 10).
-
Hope this helps! Keep me posted.
And, Welcome to the HP Support Community.
Please click “Accept as Solution” if you feel my post solved your issue, it will help others find the solution.
Click the “Kudos, Thumbs Up" on the bottom right to say “Thanks” for helping
1 REPLY 1
10-11-2020 10:29 AM
HP Recommended
Hi @Swamped1,
I'd like to help!
Try the below suggestions-
Step 1: Change the power settings in Windows
Power settings control how and when the computer goes into and comes out of sleep/standby mode. Choose your operating system below to make sure the power options are set so the computer can use sleep/standby mode correctly.
Windows 10
Open the Power Options menu in the Control Panel, and then adjust the power settings for computers with Windows 10.
-
In Windows, search for and open Control panel.
-
In the Control Panel search field, type power options, and then select Power Options from the list.
-
Click Change plan settings next to the plan you want to change.
-
On the Change settings for the plan window, choose the display and sleep settings you want to use.
-
To change more power settings, click Change advanced power settings.
-
On the Advanced settings tab, select the power plan from the drop-down menu, and then expand the category you want to customize. Expand each setting you want to change, and then choose the values you want to use.
-
When done, click OK.
-
Restart the computer.
Step 2: Check for Windows updates
Having the most current software and drivers installed on your computer might resolve the issue. Choose your operating system below for steps to check for updates using Windows Update.
Find and install updated software and hardware drivers for your computer with Windows 10.
NOTE:To learn how to manage your update preferences, go to the Advanced options section.
-
In Windows, search for and open Windows Update settings.
-
Click Check for updates. If there are any available updates, they begin installing automatically.
-
After the updates install, restart your computer, if necessary.
Advanced options
Open the Advanced options menu for additional settings for Windows Update.
-
In the Windows Update window, click Advanced options.
-
In the Update options area, you can manage the delivery and installation of updates:
-
Turn on Receive updates for other Microsoft products when you update Windows to have the computer automatically update other Microsoft products drives and apps when updating Windows.
-
Turn on Download updates over metered connections (extra charges may apply) to allow updates to download over a metered connection.
-
Turn on Restart this device as soon as possible when a restart is required to install an update. Windows displays a notice prior to restarting. The computer must be turned on and plugged in for this option.
-
For more information about using Windows Update, see Updating Drivers and Software with Windows Update (Windows 10, 8, 7).
Step 3: Check for updates from HP
Having the most current software and driver updates from HP installed on your computer might resolve the issue. Use HP Support Assistant to automatically find and install the latest updates for your computer.
-
In Windows, search for and open HP Support Assistant, or click the app icon
in the taskbar.If the app is not installed on your computer, download the latest version from the HP Support Assistant website.
-
In HP Support Assistant, click My devices, and then click Updates in the window for your device.
-
If prompted, sign in with your HP account credentials, create a new HP account, or postpone signing in.
-
Click Check for updates and messages.
HP Support Assistant checks for the latest updates from HP.
-
If new updates are available, make sure the checkbox next to each update is checked, and then click Download and install to download and install the updates.
For more information about configuring and using HP Support Assistant, see Using HP Support Assistant (Windows).
For more information and instructions about downloading and updating software and drivers, see Downloading or updating software and drivers for HP computers.
If the issue persists after installing updates from HP, continue to the next step.
Step 4: Scan for malware
Malware applications can cause sleep/hibernate issues. Using Windows Security (Windows 10) or Windows Defender (Windows 😎 to scan the computer for malware might resolve the issue. These applications can prevent malware from infecting your computer in two ways:
-
Real-time protection: When malware tries to install itself or run on your computer, you receive a notification. You also receive a notification when applications attempt to change important settings.
-
Scanning options: Scan for malware that might be installed on your computer and automatically remove (or temporarily quarantine) detected malware.
Choose your operating system below for steps to scan the computer for malware.
Windows 10
Open the Windows Security app, and then complete a full scan for computers with Windows 10.
-
In Windows, search for and open Windows Security.
-
Click Virus & threat protection.
-
Click Scan options.
-
Select Full scan, and then click Scan now.
The scan might take over an hour to complete, and the computer might run slowly during the scan.
-
To view the scan results, search for and open Windows Security, select Virus & threat protection, and then click Protection history.
-
If no threats were detected, no action is necessary.
-
If threats were detected, click an item for more information and suggested actions.
For more information about using Windows Security, go to Using Windows Security to Prevent Virus and Spyware Problems (Windows 10).
-
Hope this helps! Keep me posted.
And, Welcome to the HP Support Community.
Please click “Accept as Solution” if you feel my post solved your issue, it will help others find the solution.
Click the “Kudos, Thumbs Up" on the bottom right to say “Thanks” for helping
Be alert for scammers posting fake support phone numbers and/or email addresses on the community.
If you think you have received a fake HP Support message, please report it to us by clicking on "Flag Post".
† The opinions expressed above are the personal opinions of the authors, not of HP. By using this site, you accept the Terms of Use and Rules of Participation.


Didn't find what you were looking for?
Ask the community
† The opinions expressed above are the personal opinions of the authors, not of HP. By using this site, you accept the <a href="https://www8.hp.com/us/en/terms-of-use.html" class="udrlinesmall">Terms of Use</a> and <a href="/t5/custom/page/page-id/hp.rulespage" class="udrlinesmall"> Rules of Participation</a>.