-
×InformationNeed Windows 11 help?Check documents on compatibility, FAQs, upgrade information and available fixes.
Windows 11 Support Center. -
-
×InformationNeed Windows 11 help?Check documents on compatibility, FAQs, upgrade information and available fixes.
Windows 11 Support Center. -
- HP Community
- Gaming
- Gaming Notebooks
- Re: HP Omen-17 Backlight issue

Create an account on the HP Community to personalize your profile and ask a question
Your account also allows you to connect with HP support faster, access a personal dashboard to manage all of your devices in one place, view warranty information, case status and more.

It has been a while since anyone has replied. Simply ask a new question if you would like to start the discussion again.
03-23-2021 08:46 AM
 HP Recommended
Product: Omen 17
Operating System: Microsoft Windows 10 (64-bit)
Hello,
I am having a problem with my HP Omen 17 laptop. The backlight for the keyboard does not seem to be working, There was no software changes. recently. It had started to dim since a week, especially while pressing the keys around 'L' to the right side. Now it has completely turned off, the F5 key does not seem to be working. Model number- 7265NGW. Its really hard to see the keyboard since the keys are in red. Everything is up to date.
5 REPLIES 5
03-26-2021 12:40 PM
HP Recommended
Hi@Saurav_896,, Welcome to the HP Support Community!
I understand the issue with backlight keyboard on the Omen 17 notebook.
Don't worry I'll try to help you out.
Did you make any software or hardware changes on your PC?
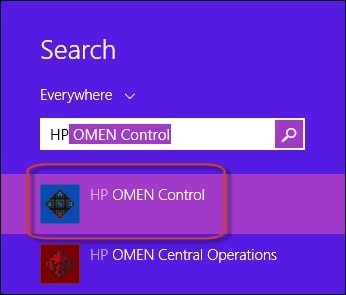
To open HP OMEN Control, at the Start screen, type HP OMEN Control to open the Search charm. Select HP OMEN Control in the Search results.
Figure : HP OMEN Control search results
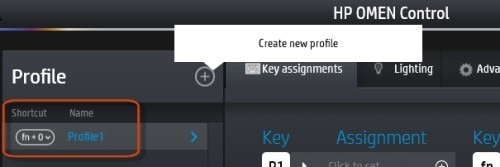
The HP OMEN Control screen appears. Use this screen to manage your keyboard profiles, assign key values, set up keyboard lighting, and use advanced keyboard features.
Figure : HP OMEN Control screen

Working with user profiles
A user profile is a group of settings that are customized and saved for a specific game or player.
To create a user profile, complete the following steps.
-
Under Profile, click the plus (+) sign.
Profile1, along with a shortcut key combination for launching the profile, display in the box.
Figure : Creating a new profile
-
To change the name, click the right arrow (
 ), and select Edit name from the drop-down menu. Then, type the new name in the Name box.
Figure : Changing the profile name

The new name displays in the Name box.
Figure : New name appears
-
To reassign the keys, see Programming the gaming keys.
-
To change the keyboard lighting for a profile, see Customizing the lighting for each keyboard zone.
-
To make changes to advanced settings, see Using the Advanced keyboard settings.
-
Repeat these steps to add more profiles.
To create a duplicate profile, right-click the profile you want to duplicate, and then select Duplicate in the Profile drop-down menu.
To delete a profile, right-click the profile you want to delete, and then select Delete in the Profile drop-down menu.
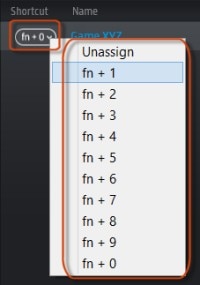
To change the shortcut keys that launch the profile, click the shortcut assignment, and then select the new shortcut keys.
Figure : Changing shortcut keys
Programming the gaming keys
The keyboard has six programmable gaming keys with up to five different settings each.
Figure : Programmable gaming keys

You can create a total of 30 different key combinations when used alone or with the fn, ctrl, alt, or shift keys.
Figure : Gaming key combinations

To program the keys, complete the following steps.
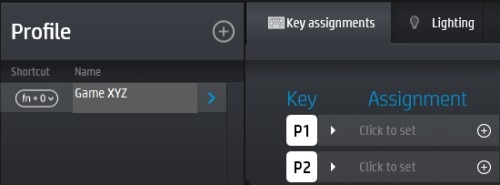
- Select the Key assignments tab, and then click the profile you want to change. Next, click Click to set in the assignment box next to the key you want to program. For example, if want to program the P1 key for the Game XYZ profile, click the box next to the P1 key.
The Click to set text changes to Enter keys.
Figure : Programming the keys

-
Type the new key assignment. For example, if you want to assign the P1 key to the Shift plus S key combination, press the Shift key and the S key on your keyboard.
The key combination displays in the assignment box.
Figure : Key combination

-
You can also reprogram the way the P1 key works when combined with the fn key, the shift key, the alt key, and the ctrl key. To do this, click the key combination and enter the function.
-
If you want to delete the key combination, click the red X in the box.
-
To change the keyboard lighting for a profile, see Customizing the lighting for each keyboard zone.
-
To make changes to advanced settings, see Using the Advanced keyboard settings.
Keyboard shortcuts: Three keyboard shortcuts can be enabled or disabled on your notebook. These keys and their functions are described in the following table.
Keyboard shortcuts
Key combination
Description
fn + f
Turns the computer fans on maximum speed.
fn + r
Turns the touchpad off and on.
fn + t
Turns the touch screen features off and on.
For information about disabling the shortcut keys, see Using the Advanced keyboard settings.
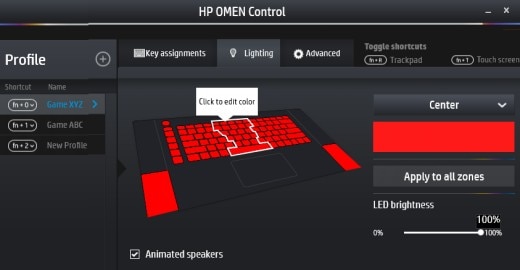
Customizing the lighting for each keyboard zone
The keyboard has programmable, lighted-keyboard zones that help you press the correct key, even when your notebook is in a low-light environment. With HP OMEN Control, you can customize the colors of each zone for each gaming profile.
NOTE:When you first set up your computer, all of the lighting zones are red.
Figure : Identifying the lighting zones
-
Power button
-
Speakers
-
Programmable gaming keys
-
Left zone
-
WASD keys
-
Center zone
-
Right zone
-
Fan
NOTE:The power button lighting is available on select models only.
NOTE:The fan color is always red.
To customize the lighting zones for a user profile, complete the following steps.
-
Select the Lighting tab.
Figure : Selecting the Lighting tab

-
On the keyboard image, click the lighting zone you want to customize.
Figure : Selecting a lighting zone from the keyboard image
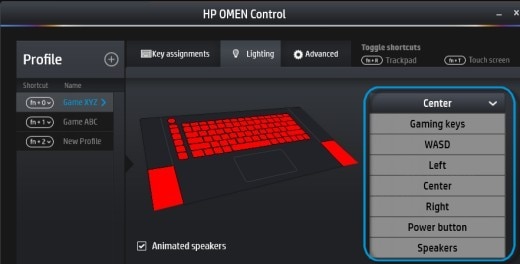
You can also select the lighting zone from the drop-down menu. To do this, click the down arrow (
 ) in the Center box and select the zone.
Figure : Selecting the lighting zone from the drop-down menu
-
To change the zone color, click the color box below Center, select a new color from the color palette, and then click OK.
Figure : Selecting a new color

-
Repeat these steps for each lighting zone you want to change for each userprofile.
TIP: You can also select one color and apply it to all the lighting zones at once.
Using the Advanced keyboard settings
You can use the Advanced keyboard setting to disable various keys, disable the touchscreen, disable the trackpad, and to control the fan speed. You can also assign function key defaults.
To change these settings, select the Advanced tab.
The Advanced settings are divided into four categories: Disable keys, Screen and trackpad, System settings, and Function key defaults.
Figure : Advanced keyboard settings

Following is a description of each category.
-
Disable keys: To disable the Windows key, the caps lock key, or the Windows menu key, select the Advanced tab, and then click the box next to the key name that you want to disable.
Figure : Disable keys category

-
Screen and trackpad:
To disable the touch screen or the trackpad when the mouse is present, click the box next to the option that you want to disable.
Figure : Screen and trackpad category
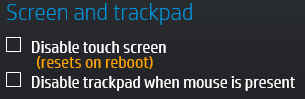
NOTE:
If you choose to disable the touch screen, the screen will automatically reset when you turn on your notebook.
-
System settings: To run the system fans at maximum speed, click the box next to Fans at maximum.
Figure : System settings category

-
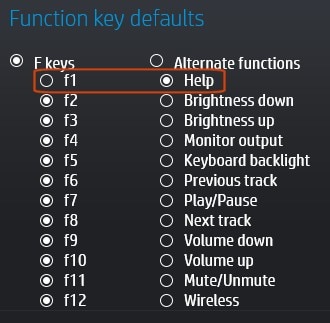
Function key defaults: To reassign an F key to an alternate function, click the F key and the alternate function that you want to assign. For example, if you want the F1 key to function as a Help key, click F1 in the F keys column, and then click Help in the Alternate functions column.
Figure : Changing an F1 key assignment
Hope this helps! Keep me posted.
Please click “Accept as Solution” if you feel my post solved your issue, it will help others find the solution.
Click the “Kudos, Thumbs Up" on the bottom right to say “Thanks” for helping!
Have a great day!
03-29-2021 07:38 PM
HP Recommended
Greetings!
This message is from the HP Support team,
Just needed to know if all your queries were resolved?
If not, I could help you get there.
If you would like to thank us for our efforts to help you, go to the public post & give us a virtual high-five by clicking the "Thumbs Up" icon below, followed by clicking on the "Accept as solution" on my public post.
Have a great day ahead!
03-30-2021 03:57 AM
HP Recommended
Hello,
The problem still persists and has not been resolved. As i said before, the laptop does not have HP control settings and it looks like the led for the backlight has fused. Is there any way to fix this issue?
03-31-2021 12:16 PM
HP Recommended
We have done the basic troubleshooting as per the document and the notebook needs to checked taking remote access so that get to know it's a hardware or software issue.
I'd suggest you contact HP in your region regarding the service options for your computer or HP Chat Support Team.
Be alert for scammers posting fake support phone numbers and/or email addresses on the community.
If you think you have received a fake HP Support message, please report it to us by clicking on "Flag Post".
† The opinions expressed above are the personal opinions of the authors, not of HP. By using this site, you accept the Terms of Use and Rules of Participation.


Didn't find what you were looking for?
Ask the community
† The opinions expressed above are the personal opinions of the authors, not of HP. By using this site, you accept the <a href="https://www8.hp.com/us/en/terms-of-use.html" class="udrlinesmall">Terms of Use</a> and <a href="/t5/custom/page/page-id/hp.rulespage" class="udrlinesmall"> Rules of Participation</a>.