• ×
    Information
    Windows update impacting certain printer icons and names. Microsoft is working on a solution.
    Click here to learn more
    Information
    Need Windows 11 help?
    Check documents on compatibility, FAQs, upgrade information and available fixes.
    Windows 11 Support Center.
  • post a message
  • ×
    Information
    Windows update impacting certain printer icons and names. Microsoft is working on a solution.
    Click here to learn more
    Information
    Need Windows 11 help?
    Check documents on compatibility, FAQs, upgrade information and available fixes.
    Windows 11 Support Center.
  • post a message
Guidelines
The HP Community is where owners of HP products, like you, volunteer to help each other find solutions.
Common problems for INSTANT INK, HP+ PLANS: INK AND TONER
We would like to share some of the most frequently asked questions about Instant Ink. Check out this link: HP INSTANT INK, HP+ PLANS: INK AND TONER. .
HP Recommended
Z6Z97A

I have a printer wl419. Now a days it shows printhead error

1 REPLY 1
HP Recommended

Hi @AM231986


Welcome to the HP Support Community. I'd be happy to assist you with the  "Problem with printhead"


Let's try a power reset on the printer


Reset the product

  • With the printer turned on, disconnect the power cord from the rear of the printer.
  • Unplug the power cord from the wall outlet.
  • Wait at least 60 seconds.
  • Plug the power cord back into the wall outlet.
  • Reconnect the power cord to the printer.
  • Turn the printer on. HP recommends plugging the printer directly into a wall outlet.

The printer might display an error if the printheads are not correctly installed.


Perform the following steps for the printhead(s) indicated by the Printhead icons  on the printer control panel.

  1. Close the output tray extender, and then rotate the output tray left to stow it in the printer.

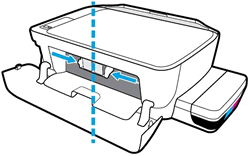
  2. Open the exterior door, and then open the printhead access door.

  3. If the carriage is not visible, press and hold the Black Color Copy button for 3 seconds.

    The carriage moves to the center of the printer.

    Access the print carriage

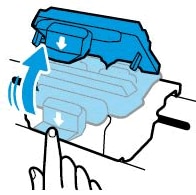
  4. Gently push down on the blue carriage latch.

    The blue carriage latch opens.

    Open the printhead carriage latch

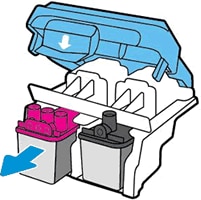
  5. Lightly press down on the printhead to release it, and then pull the printhead out of its slot.

    Removing the printheads

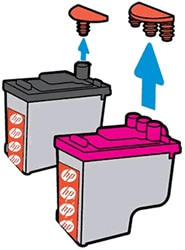
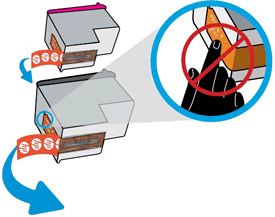
  6. Make sure the plugs on top of the printhead have been removed.

    Pull the orange plugs

  7. Make sure the tape from the printhead contacts has been removed.

       CAUTION: 

    Do not touch the copper-colored contacts or the ink nozzles. Do not replace the protective tape on the contacts. Handling these parts can result in clogs, ink failure, and bad electrical connections.

    Remove the tape

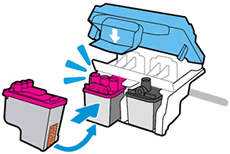
  8. Slide the printhead at a slight upward angle into the empty slot, and then gently push up on the printhead until it snaps into place.

    Insert the printheads

    • Insert the tri-color printhead into the left slot.

    • Insert the black printhead into the right slot.

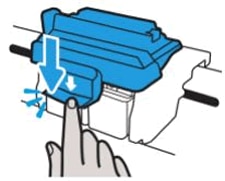
  9. Close the blue carriage latch by pushing down firmly until the latch snaps into place.

    Image: Close the latch

  10. Close the printhead access door.

  11. Close the exterior door.

    The priming process continues.

Hope this helps! Keep me posted. 


Please click “Accept as Solution” if you feel my post solved your issue, it will help others find the solution.

Click the “Kudos, Thumbs Up" on the bottom right to say “Thanks” for helping!


Have a great day! 

† The opinions expressed above are the personal opinions of the authors, not of HP. By using this site, you accept the <a href="https://www8.hp.com/us/en/terms-of-use.html" class="udrlinesmall">Terms of Use</a> and <a href="/t5/custom/page/page-id/hp.rulespage" class="udrlinesmall"> Rules of Participation</a>.