-
×InformationNeed Windows 11 help?Check documents on compatibility, FAQs, upgrade information and available fixes.
Windows 11 Support Center. -
-
×InformationNeed Windows 11 help?Check documents on compatibility, FAQs, upgrade information and available fixes.
Windows 11 Support Center. -
- HP Community
- Apps, Services & Software
- HP Instant Ink
- ink system failure 0xc19a0022

Create an account on the HP Community to personalize your profile and ask a question
08-03-2020 02:06 PM
So I recently purchased this printer USED & as I turn it on it seemed fine , tried printing something out to test it out but the paper kept getting jammed , fixed that . Then it was “printing” but there was no ink in the paper . So I opened up the printer and I see that there are ink cartridges inserted but I’m unsure if they actually do have ink ?? (Would be great if someone mentioned how to check if it does have ink) but then as I tried “fixing” the issue , this ink system failure message shows up & i got no idea what to do , tried turning it off , resetting etc . Please someone help !! I’m a college student & just wanted to buy a cheaper printer but it seems **bleep**ty so if I can get it to work it will be awesome!!
08-06-2020 03:33 AM
Hi @Erikanohemy,
I'd like to help you with the printer issue!
Look for an Ink drop icon  or
or  , a Cartridge icon
  , an Ink Levels menu, to view estimated ink or toner levels.
Clean the electrical contacts
Remove the cartridge indicated by the error message, clean the electrical contacts, and then reinsert the cartridge in its color-coded slot.
-
Turn the printer on.
-
Open the door to access the cartridges.
-
Wait until the carriage stops moving before you continue.
-
Remove the cartridge indicated in the error message from its slot, holding it by its side.
CAUTION:
Do not touch the copper-colored contacts or the ink nozzles. Touching these parts can result in clogs, ink failure, and bad electrical connections.
-
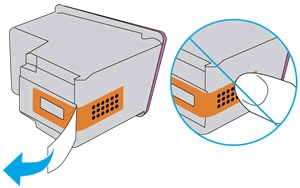
Remove any protective tape that still might be on the contacts.
CAUTION:
Do not touch or try to remove the copper electrical strip.

-
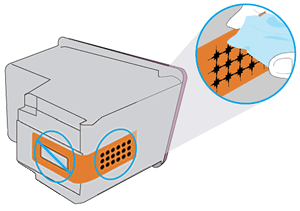
Lightly dampen a lint-free cloth with distilled water, and then clean only the copper-colored contacts on the cartridge.

-
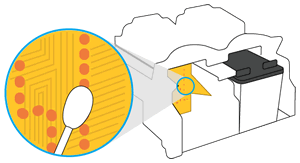
Lightly dampen a lint-free cloth with distilled water, and then clean the electrical contacts in the carriage, located inside the printer.

-
Wait 10 minutes for the contacts to dry.
-
Reinsert the cartridge.
-
Insert the black cartridge into the right slot.
-
Insert the tri-color cartridge into the left slot.
-
-
Repeat these steps for the other cartridge, if necessary.
-
Close the cartridge access door.
-
If the error persists, repeat the previous steps to clean the cartridge and carriage contacts a second time.
-
Check for the error message.
Reset the product
- With the printer turned on, disconnect the power cord from the rear of the printer.
- Unplug the power cord from the wall outlet.
- Wait at least 60 seconds.
- Plug the power cord back into the wall outlet.
- Reconnect the power cord to the printer.
- Turn the printer on. HP recommends plugging the printer directly into a wall outlet.
Check the error
Hope this helps! Keep me posted.
And, Welcome to the HP Support Community.
Please click “Accept as Solution” if you feel my post solved your issue, it will help others find the solution.
Click the “Kudos, Thumbs Up" on the bottom right to say “Thanks” for helping
