• ×
    Information
    Windows update impacting certain printer icons and names. Microsoft is working on a solution.
    Click here to learn more
    Information
    Need Windows 11 help?
    Check documents on compatibility, FAQs, upgrade information and available fixes.
    Windows 11 Support Center.
  • post a message
  • ×
    Information
    Windows update impacting certain printer icons and names. Microsoft is working on a solution.
    Click here to learn more
    Information
    Need Windows 11 help?
    Check documents on compatibility, FAQs, upgrade information and available fixes.
    Windows 11 Support Center.
  • post a message
Guidelines
The HP Community is where owners of HP products, like you, volunteer to help each other find solutions.
Common problems for INSTANT INK, HP+ PLANS: INK AND TONER
We would like to share some of the most frequently asked questions about Instant Ink. Check out this link: HP INSTANT INK, HP+ PLANS: INK AND TONER. .
HP Recommended
LaserJet M1120 MFP
Microsoft Windows 10 (64-bit)

Hello, to whom it may concern 

i have a problem with my printer Hp LaserJet M1120 MFP. When taking the second page, the page jam.

I removed the jam paper but when printing it jammed each time.

Can you reply me as fast as you can.

hope you take my mail into consideration,


Thanks,

UN

1 REPLY 1
HP Recommended

Hi @UNAIS1


Welcome to the HP Support Community. 


Try the steps below to resolve the issue -


Step one: Remove any loose paper first


Remove all loose paper from tray 1, the priority input tray, and the output bin.

   CAUTION: 

Do not try to remove jammed paper at this stage.

Step two: Clear the jam


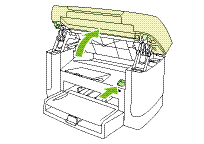
  1. Open the print-cartridge door.

    NOTE: 

    Opening the print cartridge door and removing the print cartridge relieves tension on the product rollers, which prevents damage to the product and makes removing jammed paper easier.

    Figure : Open the print cartridge door

    Illustration of opening the print cartridge door.
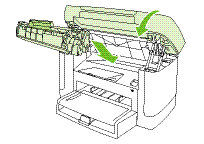
  2. Grasp the handle on the print cartridge, and then pull the print cartridge straight out to remove it.

    Figure : Remove the print cartridge

    Illustration of removing the print cartridge.
       CAUTION: 

    To prevent damage to the print cartridge, cover it with a sheet of paper to minimize exposure to direct light.

  3. With both hands, grasp the paper where it is most visible, including the middle, and then carefully pull the paper out of the print cartridge area.

    Figure : Remove jammed paper from the print cartridge area

    Illustration of removing jammed paper from the print cartridge area.
  4. Remove any jammed paper from tray 1. With both hands, grasp the paper where it is most visible, including the middle, and then carefully pull it out of tray 1.

    Figure : Remove jammed paper from tray 1

    Illustration of removing jammed paper from tray 1.
  5. Remove any jammed paper from the priority input tray. With both hands, grasp the paper where it is most visible, including the middle, and then carefully pull it out of the priority input tray.

    Figure : Priority input tray

    1. Priority input tray

  6. Remove any jammed paper from the output tray. With both hands, grasp the paper where it is most visible, including the middle, and then carefully pull it out of the output tray.

    Figure : Remove the jam from the output tray

    Illustration of removing the jam from the output tray.
  7. Reinstall the print cartridge, and then close the print cartridge door.

    Figure : Reinstall the print cartridge

    Illustration of reinstalling the print cartridge.

Step three: Reset the printer

  1. Press the Power button () to turn off the product.

  2. Wait 30 seconds, and then press the Power button () to turn on the product.

Step four: Reload paper

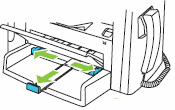
  1. Slide the paper length and width guides to their outermost positions.

    Figure : Slide out the paper guides

    Illustration of sliding out the paper guides.
  2. Tap a stack of plain, white paper on a flat surface to align the edges.

    NOTE: 

    Do not fan paper prior to loading. To loosen the ream, hold it firmly in both hands, and then twist the media by rotating your hands in the opposite direction.

  3. Load the paper into tray 1 with the narrow edge first and the print side facing up, and then slide the paper length and width guides against the paper.

    Figure : Load paper and slide in guides

    Illustration of loading paper and sliding in the paper guides.

Step five: Check the print settings

Follow these steps to check and adjust print settings to match the loaded paper.

NOTE: 

The steps can vary depending on the software program.

  1. From the File menu in the software program, click Print.

  2. In the Print dialog box, click Properties.

  3. Check the settings on the Paper/Quality tab, change them if necessary, and then click OK.

  4. Try printing again.

  • If these steps resolved the issue, there is no need to continue troubleshooting.

  • If the issue persists, see the next step.

Step six: Clean the cartridge area


During the printing process, paper, toner, and dust particles can accumulate inside the product and might cause paper jams. Follow these steps to clean the print cartridge area.

  1. On the product control panel, press Setup.

  2. Press the Right Arrow button () to scroll to Service, and then press OK.

  3. Press the Right Arrow button () to scroll to Cleaning mode, and then press OK.

  4. Load plain paper if prompted.

  5. Press OK again to start the cleaning process.

    A page feeds through the product slowly. Discard the page when the process ends.

Hope this helps! Keep me posted. 


Please click “Accept as Solution” if you feel my post solved your issue, it will help others find the solution.

Click the “Kudos, Thumbs Up" on the bottom right to say “Thanks” for helping

† The opinions expressed above are the personal opinions of the authors, not of HP. By using this site, you accept the <a href="https://www8.hp.com/us/en/terms-of-use.html" class="udrlinesmall">Terms of Use</a> and <a href="/t5/custom/page/page-id/hp.rulespage" class="udrlinesmall"> Rules of Participation</a>.