-
×InformationNeed Windows 11 help?Check documents on compatibility, FAQs, upgrade information and available fixes.
Windows 11 Support Center. -
-
×InformationNeed Windows 11 help?Check documents on compatibility, FAQs, upgrade information and available fixes.
Windows 11 Support Center. -
- HP Community
- Printers
- JetAdvantage, Printing Applications and Services
- Margin problem for my printer HP Deskjet Ink Advantage 3635

Create an account on the HP Community to personalize your profile and ask a question
11-06-2018 09:14 PM - edited 11-06-2018 09:15 PM
Hello,
I have a problem with my printer DeskJet 3635. I want to print my document and I always check the margin on the print preview. However, when I print it, the margin is shifted to more left, leaving a big space for the right margin. For example, I print the document in the normal margin, which means the right and left space must be the same. But the outcome is like what I had explained before.
I already see the printer setting from my laptop, but I cannot find the setting for margin one. The paper adjustment in the printer also does not have any problem. I already print and scan the alignment paper, but nothing change.
Please help me!
Best regards
11-08-2018 02:23 PM - edited 11-08-2018 02:24 PM
Thank you for choosing the HP Support Forums, a community energized by solutions, as we are eager to help resolve your concerns,
I am Riddle_Decipher and I'm at your service (Like a Genie, however, without magic powers) 😉
Does the copier work as a stand-alone device?
Have you ensured the paper type & size is supported by your device?
(Click here to verify, if you haven't done that yet)
Meanwhile, here's what you need to do, to fix this issue:
Upgrade the printer firmware if the paper type & size is supported by the device: Click here for steps.
Click here to print custom size paper to suit your preference.
And Align the printer:
Load paper into the input tray.
Open or search for the HP folder in your list of installed software programs, click the folder for your printer, and then click the name of your printer.
The HP Printer Assistant software opens.
On the HP Printer Assistant window, click Maintain Your Printer.
Click the Device Services tab, and then click Align Ink Cartridges (
 ).
).The printer prints an alignment page.
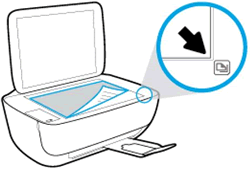
Lift the scanner lid.
Place the alignment page with the print side down on the scanner glass, and then position it according to the engraved guides around the glass.
Figure : Place the alignment page on the scanner glass

On your computer, click Scan.
The printer aligns the ink cartridges.
Print another Print Quality Diagnostic page, and examine the page.
If these steps resolved the issue, you can stop troubleshooting.
If the Print Quality Diagnostic page shows track marks or smears, continue to the next step to clean the area around the ink nozzles.
If these steps did not resolve the issue, and the Print Quality Diagnostic page does not show track marks or smears, skip to the step to replace the problem ink cartridge.
Let me know how that pans out
I will have a colleague follow-up on this to ensure it's taken care off, in case you don't respond in the next 24-48hrs,
As I need to know if the issue has been resolved, to get proper sleep at night.
Feel free to give me a virtual high-five by clicking the 'Thumbs Up' icon,
Followed by clicking on 'Accepted as Solution' as it would help the community gain more knowledge and have a great day Ahead!
Riddle_Decipher
I am an HP Employee
Learning is a journey, not a destination.
Let's keep asking questions and growing together.
