• ×
    Information
    Windows update impacting certain printer icons and names. Microsoft is working on a solution.
    Click here to learn more
    Information
    Need Windows 11 help?
    Check documents on compatibility, FAQs, upgrade information and available fixes.
    Windows 11 Support Center.
  • post a message
  • ×
    Information
    Windows update impacting certain printer icons and names. Microsoft is working on a solution.
    Click here to learn more
    Information
    Need Windows 11 help?
    Check documents on compatibility, FAQs, upgrade information and available fixes.
    Windows 11 Support Center.
  • post a message
Guidelines
Do you need the WPS PIN to connect your printer? Click here for tips and tricks!
HP Recommended
Laser Jet Pro CM1415fnw
Microsoft Windows 7 (64-bit)

Over that last 3-4 months, the problem has become worse. Each time I print, the first 3-4 pages are covered with black, horizontal lines.


I have changed the toner cartridge, run all cleaning and maintenance functions, and the problem still persists.


This happens regardless of the document type (PDS, Word, Excel, etc.) that I am printing.


Help!!

2 REPLIES 2
HP Recommended

@DWMALES


Good Day. A warm welcome to the HP community.

I understand that you are getting black horizontal lines while printing and you have tried with different toners and done few troubleshooting steps.

  • Did you do any changes in print settings?
  • Does the issue persist when you make a photocopy on the printer?

Meanwhile, follow the below steps to fix this issue:


Check the paper type setting

  1. Right-click the product icon, and click Printing Preferences to open the Printing Preferences window.

  2. Click the Paper/Quality tab.

  3. Check the paper or media type setting.

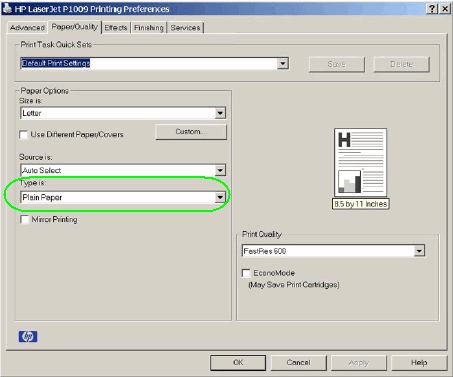
    1. Find the Type is: drop-down list.

      Figure : 'Type is:' drop-down list in the Printing Preferences window

      'Type is:' drop-down list in the Printing Preferences window, Paper/Quality tab (screenshot)
    2. Select the paper or media type you are using.

      • For thinner paper, select Light, Thin, or Vellum.

      • For thicker paper, select Heavy or Thick.

         NOTE:

      HP does not recommend the use of heavily textured paper, extremely thin paper, or paper with a basis weight heavier than 90 g/m2 (24 lb).

  4. Make sure the paper or media type setting is appropriate for the fuser temperature.

       NOTE:

    Unlike ink printers, laser printers use heat to fuse a plastic toner to the surface of the paper. Make sure to use heat-resistant paper, and labels and envelopes that use adhesives compatible with the heat and pressure of the product’s fusing process.

    1. If you are experiencing any issues in the following list, adjust the setting.

      • If the paper is curled or wavy, try the following:
        1. Decrease the fuser temperature setting. To do this, select Light, Thin, or Transparency.

        2. Use the archive print feature to improve toner fusing. To do this, select Archive or Bond.

      • If the printout has areas of fuzzy or dark print, or toner scatter, increase the fuser temperature setting.

        1. Select Heavy or Thick.

          If this does not resolve the fuzzy, dark print, or toner scatter issues, use a lower basis weight or thinner paper.

  5. Click Apply.

Check the print density settings

  1. In the Printing Preferences window, click the Paper/Quality tab, and find the Print Quality section.

    Figure : 'Print Quality' section in the Printing Preferences window

    'Print Quality' section in the Printing Preferences window, Paper/Quality tab (screenshot)
  2. If you are experiencing any issues in the following list, adjust the settings.

    • If the entire page is too dark, change the dpi setting, and turn on EconoMode.

      1. Select 600 dpi from the drop-down list.

      2. Select the EconoMode check box.

    • If the entire page is too light, change the dpi setting, and turn off EconoMode.

      1. Select FastRes 1200 from the drop-down list.

      2. Clear the EconoMode check box.

  3. Click Apply, click OK, and then close the Printing Preferences window.

  4. Open Printer Properties. To do this, right-click the product icon, and click Properties.

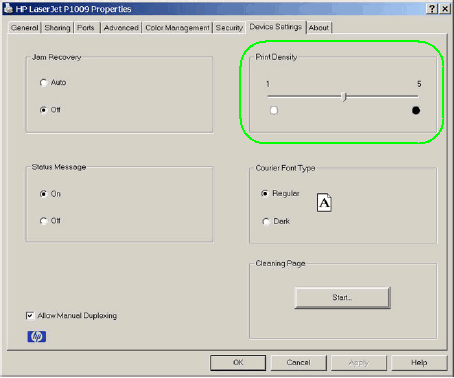
  5. Click the Device Settings tab, and find the Print Density section.

    Figure : 'Print Density' section in the Properties window

    'Print Density' section in the Properties window, Device Settings tab (screenshot)
  6. If you are experiencing any issues in the following list, adjust the setting.

    • If the printout has areas of gray shading or a gray background, decrease the print density setting.

      To do this, slide the bar to the left.

    • If the printout has light, dull or faded areas, increase the print density setting.

      To do this, slide the bar to the right.

  7. Click Apply, click OK, and then close the Properties window.

  8. Try again to print.

Reset the product

  1. Press the Power button () to turn on the product.

  2. With the product turned on, disconnect the power cord from the rear of the product.

  3. Unplug the power cord from the wall outlet.

  4. Wait at least 15 seconds.

  5. Plug the power cord back into the wall outlet.

  6. Reconnect the power cord to the rear of the product.

  7. If the product does not turn on by itself, press the Power button () to turn it on.

You can refer this HP document for more assistance: https://support.hp.com/us-en/product/hp-laserjet-pro-cm1415-color-multifunction-printer-series/40891...


Let me know how it goes.

To thank me for my efforts to help you, please mark my post as an accepted solution so that it benefits several others and please give the same post a Kudos.

Cheers.

Sandytechy20
I am an HP Employee

HP Recommended

Hello, 

The explanation provided by Sandytechy20 is I believe the solution to my problem.  However, I work in a Mac environment.  I believe I probably caused this problem when I attempted to print some things on card stock.  If you could please reply with instructions for resolving the issue, using a Mac, I would be so grateful.  


Thank you!  Judy1960


† The opinions expressed above are the personal opinions of the authors, not of HP. By using this site, you accept the <a href="https://www8.hp.com/us/en/terms-of-use.html" class="udrlinesmall">Terms of Use</a> and <a href="/t5/custom/page/page-id/hp.rulespage" class="udrlinesmall"> Rules of Participation</a>.