-
×InformationNeed Windows 11 help?Check documents on compatibility, FAQs, upgrade information and available fixes.
Windows 11 Support Center. -
-
×InformationNeed Windows 11 help?Check documents on compatibility, FAQs, upgrade information and available fixes.
Windows 11 Support Center. -
- HP Community
- Printers
- LaserJet Printing
- Brand new MFP M281fdw prints worse than my 4550

Create an account on the HP Community to personalize your profile and ask a question
Your account also allows you to connect with HP support faster, access a personal dashboard to manage all of your devices in one place, view warranty information, case status and more.

It has been a while since anyone has replied. Simply ask a new question if you would like to start the discussion again.
11-09-2018 12:53 PM - edited 11-10-2018 10:11 AM
 HP Recommended
Product: MFP M281fdw
Operating System: Microsoft Windows XP
Just bought a MFP M281fdw and I'm disappointed with the print quality compared with my old 4550. The contrast is worse and details are just not there. Is there a better colour profile? It feels as though I need to turn up the contrast and brightness, I'm letting the printer do the colour conversion, using Adobe RGB 1998. My graphics software is Coreldraw X6. I'm printing a mixture of photos and text for CD inlays. Any suggestion would be very welcome. And now I look at it, the scanner's not great either.
5 REPLIES 5
11-10-2018 04:31 PM
HP Recommended
Welcome to HP forums, I see that you are getting print quality issues while printing.
Print a cleaning page
-
From the Home screen on the printer control panel, swipe left, and then touch Setup.
-
Touch Service, and then touch Cleaning Page.
-
Load plain, white paper when you are prompted.
-
Touch OK to begin the cleaning process.
-
Try to print again to see if the issue is resolved,
Check print settings
-
In the software application you are trying to print from, click File, and then click Print.
The Print window opens.
-
Open the Properties dialog box.
Depending on the software program, the button might be Properties, Options, Printer Setup, Printer, or Preferences.
-
Depending on your print job, you might consider modifying the following settings:
-
Paper Type: Select the appropriate type of paper, such as photo paper, plain paper, or labels.
-
Print Quality: Increase the print quality from Normal or Draft mode to Best.
-
Paper Size: Select the correct paper size for your print job.
-
-
After changing the print settings, click OK to apply the settings, and then click Print.
Inspect the toner cartridges
-
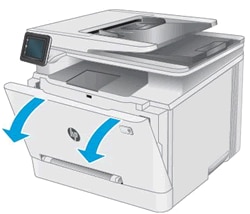
Open the front door.
Figure : Opening the front door
-
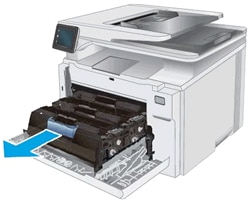
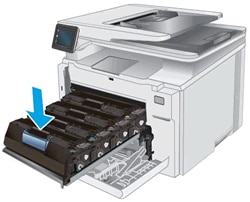
Grasp the blue handle on the toner cartridge drawer, and then pull out the drawer.
Figure : Pulling out the toner cartridge drawer
-
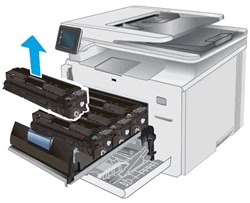
Grasp the handle on the toner cartridge, and then pull the toner cartridge straight up to remove it.
Figure : Removing the toner cartridge
-
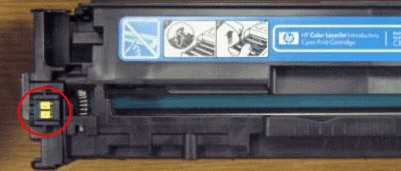
Examine the memory chip for damage.
Figure : Location of the memory chip
-
If the memory chip is damaged, refer to the previous steps in this document to replace the toner cartridge.
-
If the memory chip is not damaged, continue with these steps.
-
-
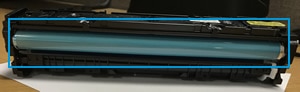
Examine the surface of the imaging drum.
CAUTION:
Do not touch the imaging drum. Fingerprints on the imaging drum can cause print quality problems.
Figure : Location of the imaging drum
-
If you see any scratches, fingerprints, or other damage on the imaging drum, refer to the previous steps in this document to replace the toner cartridge.
-
If the imaging drum is not damaged, continue with these steps.
-
-
Insert the toner cartridge into the drawer. Make sure that the color chip on the cartridge matches the color chip on the drawer.
Figure : Inserting the toner cartridge into the printer
-
Repeat these steps for the other toner cartridges.
-
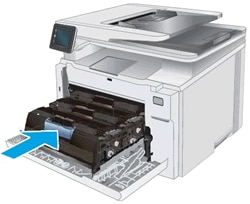
Push the toner cartridge drawer into the printer.
Figure : Pushing the toner cartridge drawer into the printer
-
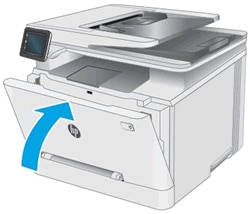
Close the front door.
Figure : Closing the toner cartridge drawer
You can refer to this HP document for more assistance:- Click here
Let me know how it goes.
To thank me for my efforts to help you, please mark my post as an accepted solution so that it benefits several others.
Cheers.
Sandytechy20
I am an HP Employee
11-12-2018 12:19 PM
HP Recommended
Thanks for the reply.
I appreciate your time and effort.
Check the printer environment
-
For the best possible print quality, follow these guidelines:
-
Move the printer away from drafty locations such as open windows or doors, or air conditioning vents.
-
Do not expose the printer to high temperatures or extreme humidity.
-
Very dry (low humidity) conditions can increase the amount of background shading.
-
Very wet (high humidity) conditions can fog up the laser scanner optics, cause drop-outs, cause uneven dark, light or fuzzy print, or leave water droplets on the printed page.
-
-
Move the printer from confined spaces such as a cabinet.
-
Remove anything blocking the top vents. Make sure that air flows freely around the printer, including the top.
-
Protect the printer from airborne debris, steam, grease, or other elements that can leave residue inside the printer.
-
-
Try to print.
Let me know if that help.
If this helps, please mark the public post as an accepted solution so that it benefits several others.
Cheers.
Sandytechy20
I am an HP Employee
11-14-2018 07:35 AM
HP Recommended
Thanks to Soumyashree at HP tech support, here is the answer: when the printer is on a network, go to its web address (something like 192.168.0......) and find tabs labelled System, then print density. There you find detailed controls for the amount of each colour used at various density values. I had to turn down the black density in the mid tones.
11-14-2018 01:45 PM
HP Recommended
It looks like you were interacting with @sandytechy20, but he is out for the day & I'll be glad to help you out.
I'm Raj1788 & I'm at your service.
Thanks for the input.
I'm glad to hear you found the solution you were looking for.
Thanks for taking the time to let the community know about the solution!
Take care now and do have a great week ahead.
:)Cheers:)
Raj1788
I am an HP Employee
Be alert for scammers posting fake support phone numbers and/or email addresses on the community.
If you think you have received a fake HP Support message, please report it to us by clicking on "Flag Post".
† The opinions expressed above are the personal opinions of the authors, not of HP. By using this site, you accept the Terms of Use and Rules of Participation.


Didn't find what you were looking for?
Ask the community
† The opinions expressed above are the personal opinions of the authors, not of HP. By using this site, you accept the <a href="https://www8.hp.com/us/en/terms-of-use.html" class="udrlinesmall">Terms of Use</a> and <a href="/t5/custom/page/page-id/hp.rulespage" class="udrlinesmall"> Rules of Participation</a>.