-
×InformationNeed Windows 11 help?Check documents on compatibility, FAQs, upgrade information and available fixes.
Windows 11 Support Center. -
-
×InformationNeed Windows 11 help?Check documents on compatibility, FAQs, upgrade information and available fixes.
Windows 11 Support Center. -
- HP Community
- Printers
- LaserJet Printing
- Can't set A5 paper size

Create an account on the HP Community to personalize your profile and ask a question
Your account also allows you to connect with HP support faster, access a personal dashboard to manage all of your devices in one place, view warranty information, case status and more.

It has been a while since anyone has replied. Simply ask a new question if you would like to start the discussion again.
11-14-2018 06:41 PM
 HP Recommended
Product: CP1515n
Operating System: macOS 10.13 High Sierra
Dear all,
I am migrating to iMac with OSX 10.13 but I still have my CP1515n printer. The problem is that I can't set an A5 paper size inside the Apple Pages for this printer. I've tried to add the printer with another driver (Generic PCL and PCL 4/5) which gives me a A5 paper size. However, the printer output is grayscale.
So now, I can print colour but can't set paper to A5 and can print A5 but only grayscae mode. What I want is to print A5 with colours.
Thank you.
I hope your problems solved soon.
Best regards,
Bellmond
Best regards,
Bellmond
2 REPLIES 2
11-16-2018 02:05 PM
HP Recommended
Hey there! @bellmond, Welcome to HP forums.
I understand you have issues printing A5 paper size from your printer.
Don't worry I'll try to help you out.
Did you any changes to your printer?
Have you tried printing using a different application does the issue persist?
I have checked the specifications of your printer and your printer is very old and not an AirPrint compatible printer.
As you running 10.13 on your MAC and since your printer is old there are no drivers available from HP.
Try updating the drivers using apple software update and check if it helps.
-
Click the Apple menu, then click System Preferences.
-
Depending on your operating system version, click Print & Fax, Print & Scan, or Printers & Scanners.

-
Check if the name of your printer displays in the Printers list. Do one of the following steps, depending on if the printer is listed or not.
-
If your printer is listed, remove and re-add the printer to confirm communication and to make sure the correct driver is used. Click the name of your printer, then click the minus sign
 to delete the printer. Once the printer is removed, click the plus sign
  , click Add Printer or Scanner, click the name of your printer, then continue to the next step.
 -
If your printer is not listed, click the plus sign, click Add Printer or Scanner, click the name of your printer, then continue to the next step.
-
If your printer is not listed in the Add Printer or Scanner window, make sure the printer is connected to the Mac with a USB cable, or that it is on the same wired or wireless network as your Mac. See the Frequently asked questions in this document to resolve connection issues, try to add the printer again, then continue to the next step.
-
-
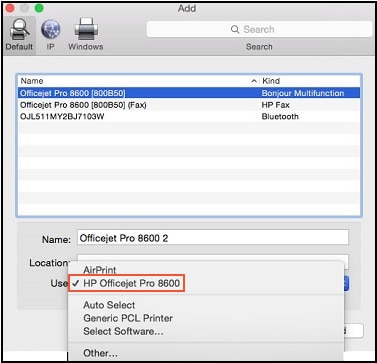
Click the Use or Print Using menu, then select the name of your printer.
NOTE:
Selecting a Generic driver option from the Use menu can result in limited printer functionality.
-
Click Add to add the printer to the list.
-
If you are prompted to install software, click Download and Install to complete the installation.
-
If ‘Software is currently unavailable’ displays, click Cancel, then go to Printer and scanner software for macOS Sierra, El Capitan, Yosemite, and Mavericks (in English). If your printer is supported, go to HP Printer Drivers for macOS and OS X Mavericks and later (in English) or HP Printer Drivers for OS X Mountain Lion and OS X Lion (in English) to try manually installing the drivers.
-
-
Close the System Preferences window.
-
Try to print, scan, or fax, depending on your printer functionality.
However, Create a custom paper size and try printing.
-
Load the custom-size paper into the paper input tray.
-
Open the item you want to print.
-
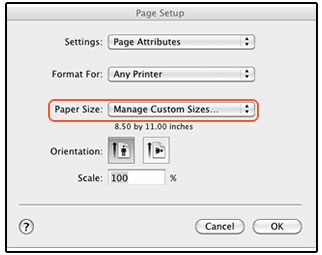
Click File, and then select Page Setup.
-
In Paper Size, select Manage Custom Sizes.
The Custom Paper Sizes window displays.
-
In the Custom Paper Sizes window, click the plus sign
to create a new paper size, double-click the default untitled name, and then type a new name for the custom paper size.NOTE:
Use a different, unique name for the new custom paper size. Do not use an existing paper size name for any new custom paper size names because it overrides the existing preset. For example, if a custom paper size is namedA4, then the existing A4 paper size is no longer available as a choice.

-
In the Paper Size section, type the dimensions of the custom paper in the Width and Height text boxes, and then set the margins, if desired.
-
Paper Size
-
Margins
-
-
Click OK.
-
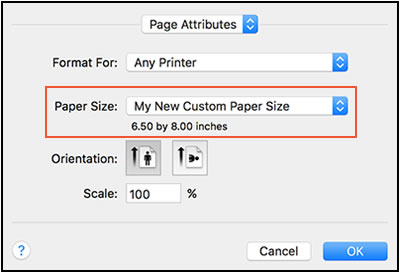
In the Page Setup window, select the new custom paper size, and then click OK.
-
Click File, and then select Print.
-
Change print settings, if desired, and then click OK or Print to print the document.
Refer this article to know more information about creating custom paper size. Click Here
Let me know if this works!
Have a great day ahead! 🙂
Please click “Accept as Solution” if you feel my post solved your issue, it will help others find the solution.
Click the “Kudos, Thumbs Up" on the bottom right to say “Thanks” for helping!
A4Apollo
I am an HP Employee
11-19-2018 04:49 AM
HP Recommended
Thank you for the reply.
However, I have done what you've mentioned with no results. But, today, I receive a notification on my Apple Update there is an update of the driver and after I intalled it, it works like charm!
I guess HP havent finished working the updated driver for High Sierra.
Thank you HP!
@A4Apollo wrote:Hey there! @bellmond, Welcome to HP forums.
I understand you have issues printing A5 paper size from your printer.
Don't worry I'll try to help you out.
Did you any changes to your printer?
Have you tried printing using a different application does the issue persist?
I have checked the specifications of your printer and your printer is very old and not an AirPrint compatible printer.
As you running 10.13 on your MAC and since your printer is old there are no drivers available from HP.
Try updating the drivers using apple software update and check if it helps.
Click the Apple menu, then click System Preferences.
Depending on your operating system version, click Print & Fax, Print & Scan, or Printers & Scanners.
Check if the name of your printer displays in the Printers list. Do one of the following steps, depending on if the printer is listed or not.
If your printer is listed, remove and re-add the printer to confirm communication and to make sure the correct driver is used. Click the name of your printer, then click the minus sign
If your printer is not listed, click the plus sign, click Add Printer or Scanner, click the name of your printer, then continue to the next step.
If your printer is not listed in the Add Printer or Scanner window, make sure the printer is connected to the Mac with a USB cable, or that it is on the same wired or wireless network as your Mac. See the Frequently asked questions in this document to resolve connection issues, try to add the printer again, then continue to the next step.
Click the Use or Print Using menu, then select the name of your printer.
NOTE:Selecting a Generic driver option from the Use menu can result in limited printer functionality.
Click Add to add the printer to the list.
If you are prompted to install software, click Download and Install to complete the installation.
If ‘Software is currently unavailable’ displays, click Cancel, then go to Printer and scanner software for macOS Sierra, El Capitan, Yosemite, and Mavericks (in English). If your printer is supported, go to HP Printer Drivers for macOS and OS X Mavericks and later (in English) or HP Printer Drivers for OS X Mountain Lion and OS X Lion (in English) to try manually installing the drivers.
Close the System Preferences window.
Try to print, scan, or fax, depending on your printer functionality.
However, Create a custom paper size and try printing.
Load the custom-size paper into the paper input tray.
Open the item you want to print.
Click File, and then select Page Setup.
In Paper Size, select Manage Custom Sizes.
The Custom Paper Sizes window displays.
In the Custom Paper Sizes window, click the plus sign
NOTE:Use a different, unique name for the new custom paper size. Do not use an existing paper size name for any new custom paper size names because it overrides the existing preset. For example, if a custom paper size is namedA4, then the existing A4 paper size is no longer available as a choice.
In the Paper Size section, type the dimensions of the custom paper in the Width and Height text boxes, and then set the margins, if desired.
Paper Size
Margins
Click OK.
In the Page Setup window, select the new custom paper size, and then click OK.
Click File, and then select Print.
Change print settings, if desired, and then click OK or Print to print the document.
Refer this article to know more information about creating custom paper size. Click Here
Let me know if this works!
Have a great day ahead! 🙂
Please click “Accept as Solution” if you feel my post solved your issue, it will help others find the solution.
Click the “Kudos, Thumbs Up" on the bottom right to say “Thanks” for helping!
I hope your problems solved soon.
Best regards,
Bellmond
Best regards,
Bellmond
Be alert for scammers posting fake support phone numbers and/or email addresses on the community.
If you think you have received a fake HP Support message, please report it to us by clicking on "Flag Post".
† The opinions expressed above are the personal opinions of the authors, not of HP. By using this site, you accept the Terms of Use and Rules of Participation.


Didn't find what you were looking for?
Ask the community
† The opinions expressed above are the personal opinions of the authors, not of HP. By using this site, you accept the <a href="https://www8.hp.com/us/en/terms-of-use.html" class="udrlinesmall">Terms of Use</a> and <a href="/t5/custom/page/page-id/hp.rulespage" class="udrlinesmall"> Rules of Participation</a>.