-
×InformationNeed Windows 11 help?Check documents on compatibility, FAQs, upgrade information and available fixes.
Windows 11 Support Center. -
-
×InformationNeed Windows 11 help?Check documents on compatibility, FAQs, upgrade information and available fixes.
Windows 11 Support Center. -
- HP Community
- Printers
- LaserJet Printing
- My HP OFFICEJET PRO 6830 is still in the warrantee period bu...

Create an account on the HP Community to personalize your profile and ask a question
Your account also allows you to connect with HP support faster, access a personal dashboard to manage all of your devices in one place, view warranty information, case status and more.

It has been a while since anyone has replied. Simply ask a new question if you would like to start the discussion again.
07-22-2018 04:52 AM
 HP Recommended
Product: HP OFFICEJET PRO 6830
Operating System: Other
I have a HP OFFICEJET PRO 6830
The printer has an Error message "There is a problem with the printhead"..
This is not something that I can resolve, has nothing to do with the original print cartridges that I used.
My printer is still in the warrenty period until 6 Aug 2018.. however according to HP they do not service this product anymore. Where does that leave me??
Solved! Go to Solution.
1 ACCEPTED SOLUTION
Accepted Solutions
07-24-2018 07:55 AM
HP Recommended
Thanks for the reply.
I'm glad to hear you found the solution you were looking for.
Thanks for taking the time to let the community know about the solution.
You've been great to work with and it has been a genuine pleasure interacting with you.
I hope both you and your product works great and remain healthy for a long time 😉
Take care now and do have a fabulous week ahead.
If the information I've provided was helpful, give us some reinforcement by clicking the Accepted Solution and Kudos buttons, that'll help us and others see that we've got the answers!
:)Cheers:)
Raj1788
I am an HP Employee
3 REPLIES 3
07-23-2018 01:11 PM
HP Recommended
Thank you for joining HP Forums.
This is a great place to get support, find answers to your technical queries.
I understand that you are getting an error on the printer need not worry I'll be glad to assist you.
To provide you with an accurate solution, I'll need a few more details:
Any hardware changes done in the printer?
Have you tried any troubleshooting steps on your own?
How long are you facing this issue?
Are you using genuine HP ink cartridge?
In the meantime, follow the below steps.
Step 1: Use genuine HP ink cartridges
If your ink cartridges are not compatible with your printer, it might cause an error message.
HP recommends that you use genuine HP ink or toner supplies. HP cannot guarantee the quality or reliability of non-HP or refilled cartridges. If you do not use genuine HP cartridges, the steps in this document might not resolve the issue. To check the authenticity of your cartridges, go to hp.com/go/anticounterfeit.
Purchase replacement cartridges and other supplies from the HP Store or local retailers.
If the issue persists, continue to the next step.
Step 2: Reset the printer
In some cases, a printer reset can clear the error message.
-
Turn the printer on, if it is not already on.
-
Wait until the printer is idle and silent before you continue.
-
With the printer turned on, disconnect the power cord from the rear of the printer.
-
Unplug the power cord from the wall outlet.
-
Wait at least 60 seconds.
-
Plug the power cord back into the wall outlet.
note:
HP recommends connecting the printer power cord directly to the wall outlet.
-
Reconnect the power cord to the rear of the printer.
-
Turn on the printer, if it does not automatically turn on.
-
Wait until the printer is idle and silent before you proceed.
If the error persists, continue to the next step.
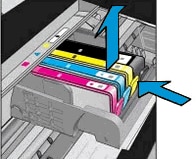
Step 3: Remove the ink cartridges
Removing the ink cartridges and checking for an error message can help diagnose the printer issue. Take the ink cartridges out of the print carriage, and then check the printer control panel or computer for an error message.
-
Open the ink cartridge access door.
-
Wait until the carriage is idle and silent before you proceed.
-
To remove the ink cartridge, press the tab on the front of the ink cartridge to release it, and then remove it.
Figure : Removing the ink cartridge
-
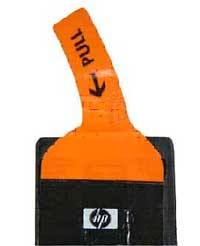
If an orange tab is attached to any ink cartridge, remove it.
Figure : Example of the orange tab
-
Place the ink cartridges on a clean piece of paper upside-down with the ink opening pointing up.
caution:
Do not leave the ink cartridges outside the printer longer than 30 minutes. Doing so can result in damage to both the printer and the ink cartridges.
-
Close the ink cartridge access door.
-
Check the printer control panel for any error messages.
-
If the printer displays an Ink System Failure message on the control panel, skip to the step to Update the printer firmware.
-
If the message is to Replace the
 ,
,  ,
,  , or
, or  Ink Cartridge, continue to the next step.
-
Step 4: Clean the ink cartridge vents and contacts
Cleaning the ink cartridge contacts and vents, and then reinstalling the ink cartridges one at a time can help determine if a specific ink cartridge is causing the error message.
-
Gather the following materials:
-
A pin to clean any clogged vents
-
A clean, lint-free cloth
-
A clean, dry cotton swab
-
Distilled or bottled water
caution:
Do not use tap water because it might contain contaminants that can damage the printhead.
-
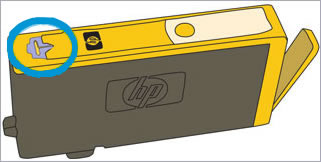
- Examine the vent area located on top of the ink cartridge, next to the HP logo.
Figure : Example of the vent area
-
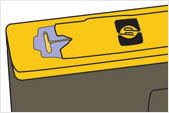
If any of the ink cartridges have clogged vents, use a pin to clean the vents.
Figure : Example of a clogged vent

Figure : Example of a clean vent
-
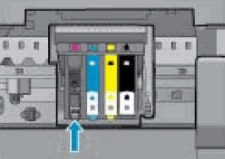
Use a fresh, lightly dampened, lint-free cloth to wipe any accumulated ink and debris on the copper-colored contact on the ink cartridge.
caution:
Be careful to wipe only the ink cartridge contacts. Do not smear any ink or debris elsewhere on the ink cartridge.
Figure : Example of the contacts on the ink cartridge
-
Ink cartridge contacts
-
-
Wipe the contact with a dry, lint-free cloth before proceeding to the next step.
-
Repeat the steps to clean each ink cartridge contact.
-
Use a fresh, lightly dampened, lint-free swab to wipe any accumulated ink and debris on the copper-colored contact on the printhead.
Figure : Example of the copper-colored contact on the printhead
-
Wipe the contact with a dry, lint-free swab before you proceed to the next step.
-
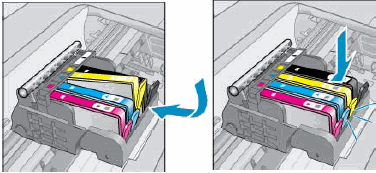
Carefully reinsert each of the ink cartridges into its slot, and then push the ink cartridge down and forward until it snaps into place.
Make sure each colored dot on the ink cartridge label matches the colored dot on the carriage.
Figure : Snapping the ink cartridge into place
-
Run your finger along the top of the ink cartridges to make sure none of them protrude.
If any ink cartridges protrude, press down firmly until each ink cartridge snaps into place.
-
Close the ink cartridge access door.
-
Check the printer control panel display for the error message.
-
If the message is to Replace the
, , , or Ink Cartridge, remove the specified ink cartridge(s) and clean the copper-colored contact again, and then reinsert the ink cartridge(s). -
If the issue persists, continue to the next step.
-
Step 5: Update the printer firmware.
Use this link: https://support.hp.com/us-en/product/hp-officejet-pro-6830-e-all-in-one-printer-series/5390307/docum... to update the firmware.
If the issue persists, I have sent you a private message, for more details that cannot be shared in a public post.
Can you please check your inbox on the forums page for the private message.
Have a great day!
Raj1788
I am an HP Employee
07-23-2018 02:46 PM
HP Recommended
I telephoned the customer support line today and resolution is that the printer will be replaced.
I'm very happy about that and the very friendly, efficient service 🙂
Thank you very much HP and thank you Raj1788 for your very detailed reply with instuctions.
Cheers
07-24-2018 07:55 AM
HP Recommended
Thanks for the reply.
I'm glad to hear you found the solution you were looking for.
Thanks for taking the time to let the community know about the solution.
You've been great to work with and it has been a genuine pleasure interacting with you.
I hope both you and your product works great and remain healthy for a long time 😉
Take care now and do have a fabulous week ahead.
If the information I've provided was helpful, give us some reinforcement by clicking the Accepted Solution and Kudos buttons, that'll help us and others see that we've got the answers!
:)Cheers:)
Raj1788
I am an HP Employee
Be alert for scammers posting fake support phone numbers and/or email addresses on the community.
If you think you have received a fake HP Support message, please report it to us by clicking on "Flag Post".
† The opinions expressed above are the personal opinions of the authors, not of HP. By using this site, you accept the Terms of Use and Rules of Participation.


Didn't find what you were looking for?
Ask the community
† The opinions expressed above are the personal opinions of the authors, not of HP. By using this site, you accept the <a href="https://www8.hp.com/us/en/terms-of-use.html" class="udrlinesmall">Terms of Use</a> and <a href="/t5/custom/page/page-id/hp.rulespage" class="udrlinesmall"> Rules of Participation</a>.