-
×InformationNeed Windows 11 help?Check documents on compatibility, FAQs, upgrade information and available fixes.
Windows 11 Support Center. -
-
×InformationNeed Windows 11 help?Check documents on compatibility, FAQs, upgrade information and available fixes.
Windows 11 Support Center. -
- HP Community
- Printers
- LaserJet Printing
- My printer doesn’t print even with my new cartridges

Create an account on the HP Community to personalize your profile and ask a question
12-21-2018 09:01 AM
Welcome to the HP Forums 🙂 I would like to take a moment and thank you for using this forum, it is a great place to find answers.
Does your Printer come up with any error message? If yes, please let us know the error message and if you're able to make a copy.
Let's try to reset the Printer here as it helps in removing any stored static electricity from the Printer which might be causing these issues.
- Turn the printer on, if it is not already on.
- Wait until the printer is idle and silent before you continue.
- With the printer turned on, disconnect the power cord from the rear of the printer.
- Unplug the power cord from the wall outlet.
- Wait at least 60 seconds.
- Plug the power cord back into the wall outlet.
- NOTE: HP recommends connecting the printer power cord directly to the wall outlet.
- Reconnect the power cord to the rear of the printer.
- Turn on the printer, if it does not automatically turn on.
- Wait until the printer is idle and silent before you proceed.
Try inserting the old cartridges back in and let me know if you're able ti print something at least.
Let me know if this helps.
If the information I've provided was helpful, give us some reinforcement by clicking the Accepted Solution and Kudos buttons, that'll help us and others see that we've got the answers!
Thanks!
Have a great day!
I am an HP Employee
12-23-2018 05:56 PM - edited 12-23-2018 05:58 PM
I see that you were interacting with @Betty0610. I'd like to help.
Thanks for the reply.
I appreciate your time and effort.
Make sure that the cartridges are properly vented and seated correctly
Press the Power button to turn on the printer, if it is not already turned on. Wait until the printer is idle and silent before continuing.
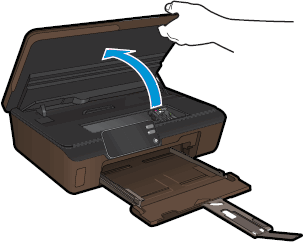
Open the cartridge access door. The carriage moves to the access area.
Figure : Open the cartridge access door
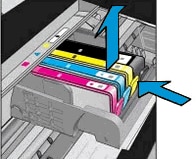
Press the tab on the front of the cartridge inward to release it, and then pull up on the cartridge to remove it from the slot.
Figure : Remove the cartridge from the slot
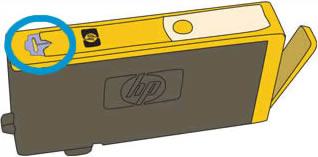
Examine the vent area on each cartridge, above the HP logo on the top of the cartridge.
Figure : Vent area on the top of the cartridge
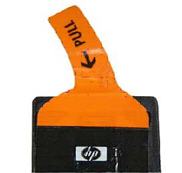
If the cartridge still has the orange pull-tab attached, pull to remove it.
Figure : Orange pull tab
If the vent is clogged, use a straight pin to gently remove excess adhesive from the vent.
Figure : Clean the clogged vent with a pin
-
Clogged vent
With a straight pin, gently remove excess adhesive from the vent
Unclogged vent
With the nozzle and contacts facing down, slide the cartridge into its slot. Press down on the cartridge until it clicks into place.
NOTE:
Make sure that each cartridge is installed in the correct slot. Match the shape of the icon and the color of the cartridge with the slot that has the same shaped icon and color.
Figure : Reinsert the cartridge

Repeat these steps to inspect the vents on each of the cartridges.
Make sure that each cartridge is firmly in place in its slot. Run your finger along the top of the cartridges to feel for any that are protruding, and if any are, press down firmly until each cartridge snaps into place.
Close the cartridge access door.
Figure : Close the cartridge access door
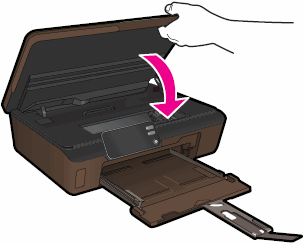
Try the print job again.
Use an automated tool to clean the printhead
Make sure that plain white U.S. letter or A4 size paper is loaded in the tray.
From the control panel home screen, touch the Right Arrow (
 ), and then touch the Setup icon (
 ).
).Touch Tools, and then touch Clean Printhead. The printer cleans the printhead, and then prints a test page.
Review the print quality on the test page.
Figure : Example of print quality test page

You can refer to this HP document for more assistance:- Click here
Let me know how it goes.
To thank me for my efforts to help you, please mark my post as an accepted solution so that it benefits several others.
Cheers.
Sandytechy20
I am an HP Employee
