-
×InformationNeed Windows 11 help?Check documents on compatibility, FAQs, upgrade information and available fixes.
Windows 11 Support Center. -
-
×InformationNeed Windows 11 help?Check documents on compatibility, FAQs, upgrade information and available fixes.
Windows 11 Support Center. -
- HP Community
- Printers
- LaserJet Printing
- Unable to remove cartridge from CP1025nw

Create an account on the HP Community to personalize your profile and ask a question
04-19-2020 12:46 PM
Hi @Pan-46
Welcome to the HP Support Community. I'd be happy to assist you with the "cartridge/carriage jammed" issue.
Let's try a power reset on the printer
Reset the product
- With the printer turned on, disconnect the power cord from the rear of the printer.
- Unplug the power cord from the wall outlet.
- Wait at least 60 seconds.
- Plug the power cord back into the wall outlet.
- Reconnect the power cord to the printer.
- Turn the printer on. HP recommends plugging the printer directly into a wall outlet.
then, Check for any torn paper, debris, or foreign objects in the cartridge area
Check for and remove any torn pieces of paper, debris, or foreign objects that are accessible from the print cartridge area.
You need a flashlight to complete some of these steps.
Figure : Flashlight

-
Close the print cartridge and rear doors, if they are not already closed.
-
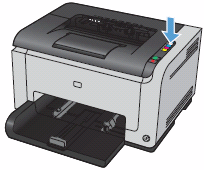
On the control panel, press the Print Cartridge button
 that corresponds to the print cartridge you want to replace.
The printer makes noises while the toner cartridge carousel rotates.
Figure : Press the print cartridge button

-
Wait until the Print Cartridge light
 stops flashing and the rotation sounds stop before you proceed to the next step.
 -
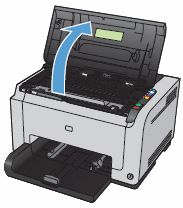
Open the print cartridge door.
Figure : Open the print cartridge door

-
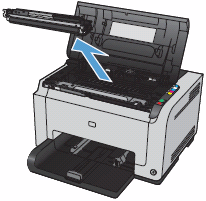
Grasp the handle on the print cartridge, and then pull the print cartridge straight out to remove it. Set the print cartridge aside.
Figure : Remove the print cartridge

-
Turn off the printer, and then disconnect the power cord from the wall socket or power strip.
WARNING:
You must disconnect the power cord before reaching inside the printer to avoid risk of injuries or electric shock.
-
Use a flashlight to thoroughly check for any torn pieces of paper, debris, or foreign objects that might remain inside the printer. If any torn pieces of paper or foreign objects remain inside the printer, more jams are likely to occur.
-
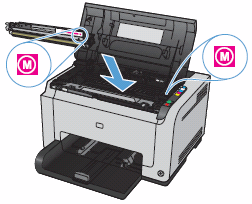
Grasp the print cartridge by the center handle, and then insert the print cartridge into the correct slot. Make sure the color label on the print cartridge matches the color label in the carousel slot.
Figure : Insert the print cartridge into the correct slot

-
Reconnect the power cord to the wall outlet or power strip, and then turn on the printer.
-
Try to print again.
If the error persists, continue to the next step to reset the printer.
Also, refer to -Replacing Cartridges
Hope this helps! Keep me posted.
Please click “Accept as Solution” if you feel my post solved your issue, it will help others find the solution.
Click the “Kudos, Thumbs Up" on the bottom right to say “Thanks” for helping!
Have a great day!
