-
×InformationNeed Windows 11 help?Check documents on compatibility, FAQs, upgrade information and available fixes.
Windows 11 Support Center. -
-
×InformationNeed Windows 11 help?Check documents on compatibility, FAQs, upgrade information and available fixes.
Windows 11 Support Center. -
- HP Community
- Printers
- LaserJet Printing
- Wireless HP Laserjet won't connect to new wifi

Create an account on the HP Community to personalize your profile and ask a question
02-28-2019 01:57 PM
First installation with this printer went fine; it all worked wireless. But then my wifi broke down and I got a new router. Since then my was offline of course because I have a different wifi. But I don't know how to install it to the new Wifi. Already tried a couple of things. For instance removed the former installation from my laptop and then tried to go through the installation process again from the start. But then I get stuck at the first step already 'finding your printer'. I think the printer still is installed to my former wifi - but that one is already gone for a longtime. So I dont know how to remove that installation from my printer so that it can look for new wifi connections - probably it will appear then in the installation cycle when it's looking for a wireless printer. Can someone help me out?
Solved! Go to Solution.
Accepted Solutions
03-01-2019 09:40 AM
@Annesophie, Welcome to HP Support community!
To connect the printer to the wireless network, follow the steps below:
Use Wi-Fi Protected Setup (WPS) to connect the printer so the HP installer can find the printer during the installation. Consult your wireless router manual to confirm if it supports the WPS push button connection type.
- If your router supports WPS, continue with these steps.
- On the printer control panel, press and hold the Wireless button.

- Release the button when the wireless light starts blinking.
- Within two minutes, press and release the WPS button on your wireless router.
- Wait up to two minutes while the printer and router establish a network connection.
After the printer connects to the network, the wireless light is on and steady. You can add the printer and try printing.
Alternatively, you can you can open the HP Utility software using the USB connection, and then set up a wireless connection.
-
Connect a USB cable to the USB port on the rear of the printer
 and to the computer.
 -
Search the Mac for Print, and then click Printers & Scanners or Print & Scan in the list of results.
-
Click the plus sign
 and then click Add Printer or Scanner.
 -
Click the printer name with USB as the kind, click the Use menu, select the printer name in the pop-up menu, and then click Add.
NOTE:
AirPrint is the default driver. To access all printer features, select the HP printer name.

-
Click the name of the printer, and then click Options & Supplies.
-
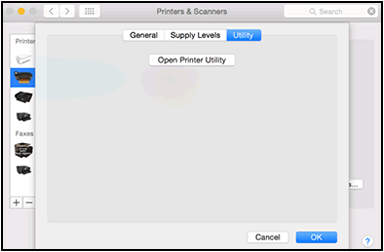
Click Utility, and then click Open Printer Utility.

-
Click Continue, and then follow the on-screen instructions to complete the printer setup.

-
Click Wireless Setup.

-
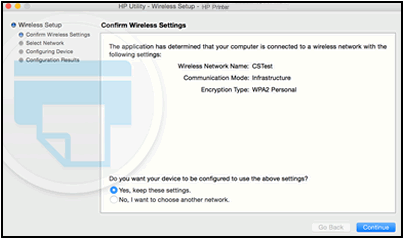
Make sure your network is listed on the Confirm Wireless Settings screen, and then click Continue to complete the wireless configuration.

-
Disconnect the USB cable from the printer and the computer.
-
In the Printers & Scanners or Print & Scan window, click the name of the printer, click the minus sign
 and then delete the USB installed printer.
 -
Click the plus sign
 and then click Add Printer or Scanner.
 -
Click the name of the printer with Bonjour as the kind, click the Use menu, and then select the name of the printer in the pop-up menu.
-
Click Add to add the printer to the list.
The printer is connected to the wireless network.
Let me know if this helps.
Please click “Accept as Solution” if you feel my post solved your issue, it will help others find the solution. Click the “Kudos/Thumbs Up" on the bottom right to say “Thanks” for helping!
TEJ1602
I am an HP Employee
03-01-2019 09:40 AM
@Annesophie, Welcome to HP Support community!
To connect the printer to the wireless network, follow the steps below:
Use Wi-Fi Protected Setup (WPS) to connect the printer so the HP installer can find the printer during the installation. Consult your wireless router manual to confirm if it supports the WPS push button connection type.
- If your router supports WPS, continue with these steps.
- On the printer control panel, press and hold the Wireless button.

- Release the button when the wireless light starts blinking.
- Within two minutes, press and release the WPS button on your wireless router.
- Wait up to two minutes while the printer and router establish a network connection.
After the printer connects to the network, the wireless light is on and steady. You can add the printer and try printing.
Alternatively, you can you can open the HP Utility software using the USB connection, and then set up a wireless connection.
-
Connect a USB cable to the USB port on the rear of the printer
 and to the computer.
 -
Search the Mac for Print, and then click Printers & Scanners or Print & Scan in the list of results.
-
Click the plus sign
 and then click Add Printer or Scanner.
 -
Click the printer name with USB as the kind, click the Use menu, select the printer name in the pop-up menu, and then click Add.
NOTE:
AirPrint is the default driver. To access all printer features, select the HP printer name.

-
Click the name of the printer, and then click Options & Supplies.
-
Click Utility, and then click Open Printer Utility.

-
Click Continue, and then follow the on-screen instructions to complete the printer setup.

-
Click Wireless Setup.

-
Make sure your network is listed on the Confirm Wireless Settings screen, and then click Continue to complete the wireless configuration.

-
Disconnect the USB cable from the printer and the computer.
-
In the Printers & Scanners or Print & Scan window, click the name of the printer, click the minus sign
 and then delete the USB installed printer.
 -
Click the plus sign
 and then click Add Printer or Scanner.
 -
Click the name of the printer with Bonjour as the kind, click the Use menu, and then select the name of the printer in the pop-up menu.
-
Click Add to add the printer to the list.
The printer is connected to the wireless network.
Let me know if this helps.
Please click “Accept as Solution” if you feel my post solved your issue, it will help others find the solution. Click the “Kudos/Thumbs Up" on the bottom right to say “Thanks” for helping!
TEJ1602
I am an HP Employee
